Supported web browsers
The supported Web Browsers for clients running the ShareAspace Web User Interface are:
- Google Chrome
- Microsoft Edge
Supported releases of the ShareAspace Web User Interface will continuously be kept up to date with the latest (evergreen) updates of the browsers listed above.
Collection
The ShareAspace Nova Collection Home Screen is often the first place where you as an end user will end up after login. From the Collection Home Screen it is possible to navigate further into the Spaces that you have access to.
Log on
When signing on to ShareAspace Nova following default configuration
for the collection site https://myServer/sasweb you will end up at
the Collection home screen.
Login form using ShareAspace Identity Provider

Tip
It is possible to follow a link to navigate straight to a specific Space after sign on. More on this in the Space section.
Layout

1. List of spaces
The list of Spaces will list all Spaces to where you have been invited. A Space can be based on either an InReach or an InControl Space Template.
To navigate to Space start page, simply click on one of the Spaces presented in the list.
2. News
The news section is visible to all users invited to the collection. The
Collection Administrator controls the information put under the News
section.
3. User menu

From the User menu, while on the collection level you have two options. Edit your user profile (Collection Profile), manage your personal access tokens (PAT), and sign out. If you are a Collection Administrator you will have one more option. More on that here.
Collection Profile

| Setting | Description |
|---|---|
| Display name | What will be presented in the application where you as a user are referenced. |
| Avatar upload | You can upload an image file to be used as you user avatar. Use a square image to get the correct aspect ratio. Supports png and jpg. |
| Language | The default language setting used by default in all Spaces. Can be overridden on each single Space. By default ShareAspace only supports English. This is however configurable |
| Time zone | The default time zone to be used when presenting dates and time within the application. Can be overridden on each single Space. |
| Change password | If ShareAspace is setup to use the ShareAspace Identity store, clicking this link will allow you to change your ShareAspace password. |
Personal access token
Clicking the "Personal access tokens" item in the user menu brings up the PAT administration. All PATs that you have created will be listed here.

Using the actions in the ribbon menu you can:
- Create a new PAT.
- Revoke an existing PAT.
- Extend the life time of an already existing PAT.
Create a new PAT

When creating a new PAT you need give it a unique name and set the validity time of the token. Once done you click "Save changes".

This brings up another window allowing you to copy the newly created access token.
Note
ShareAspace will only provide the PAT value when it is first created. The PAT is not stored in ShareAspace so there is no way of getting the value for a specific PAT at a later time.
Important
The PAT should be kept secret and handled with care.
4. Get back
From anywhere within the ShareAspace Web Application you can always navigate back to the Collection Home Screen by clicking the ShareAspace Logo.
Space
When navigating to a Space via a direct link or by navigating from the Collection Home Screen; you will end up on the start page for that specific Space.
Tip
You can use a direct link to a Space, by default it will look
like this: https://myServer/sasweb/space/{spaceId}. The
web application will make sure to first redirect you to the
authentication page if you are not already authenticated.
Main Layout
The landing page for the Space might look a bit different depending on the configuration of the Space and your active Role. However there is a generic layout, independent of the configuration.

1. Get back
From anywhere within the ShareAspace Web Application you can always navigate back to the Collection Home Screen by clicking the ShareAspace Logo.
2. Get Back to Space Start
Takes you back to the Space Start Page.
3. Modules
This section will show tile icons for Modules that you have access to. The icons are often grouped together by functionality. By clicking on a module icon that Module will open in a new tab within the Space User Interface.
As a user, you can specify what Modules you want to display on your start page selecting from what Modules you have access to with your current Role.

Some Modules can display a number on the tile. This number is
the result counter for a query, i.e. it shows the total number of hits from a query. In the example above the counter
shows how many Work items are assigned to the current user. If the total number of hits of the configured query exceed 1000 hits the number indicator will display -1.
What modules are available and what their names are fully depends on the configuration of the Space.
4. News and Space name
The news and Space name settings will show the News set for the current space as well as the name of the current space.
The news is managed by the "Space Administrator" (users with the
Manage Space Definition access modifier on one of their roles).
The name is managed by the Collection Administrator.
5. Favorites
Favorites are objects that you decide you want to see here in this "space" screen. They will stay here in this screen until you once again choose to not see them here any more. See the Favorites section for more information about creating/removing/using favorites.
6. User Menu & Modules Menu
Like on the Collection Home Screen the User Menu is in the top right corner. This menu is always available to you but the contents of the menu will vary depending if you are in a Space or on the Collection Home Screen. However, included in this menu is the "Modules Menu."
The top will display your configured Display Name and your
uploaded avatar image.
While in the context of a Space your current role will show
beside your Display Name (using the format Role@Participant).

The bottom half of the menu after the horizontal line is the "Modules menu" which is a list of all modules you are allowed to view for your role in the space.
Note
Some Modules requires input parameters to start. These Modules can only be opened from within other Modules. I.e. it is not possible to have a tile link to these Modules. Also, Modules with start parameters will not show up in the Modules Menu.
My Profile
My Profile will let you edit your user's Collection Profile see Collection profile.
Files
Files will bring up the files modules in a modal window. For more information about the files module, see the File management user interface.
My Space Settings
My Space Settings will bring up a form for setting Space specific settings for your user account.

| Setting | Description |
|---|---|
| Current Role | Displays your current active Role and let you switch the active role, picking from all Roles you have been given within the Space. The selection will be stored as your default role, i.e. the selection will be kept when you log on the next time. |
| Mail Out | When unticked the System will not be able to send Space specific emails to your email. |
| Language | The language settings for the current Space. Will default to your Collection settings but can be overridden on each Space. |
| Time zone | The time zone settings for the current Space. Will default to your Collection settings but can be overridden on each Space. |
| Effectivity | Your current effectivity filter setting. More details under advanced. |
| Application Context | Your current Application Context filter setting. More details under advanced. |
| Identifier Context | Your current Identifier Context filter setting. More details under advanced. |
| Owner Context | The Participant that will be the Owner of new Unit of Informations created. This will be the Participant for the the current Role that you have selected. You can only create Unit of Informations if that Role has the Create access modifier. |
| Modules | A list of all available Modules that does not require input parameters to open. If the Put on homescreen checkbox is ticked, the Module tile for the specific Module will be displayed on the Space Home Page. |
Advanced

Tip
Start by reading about the the concepts of Information filter.
| Setting | Description |
|---|---|
| Effectivity | The effectivity settings used to filter effectivity controlled references. When enabled and Mode is set to Live, all information fetched from the system will be showing what the information looks like at the time of the request and Role Actual. When enabled and Mode is set to Explicit, it is possible to set a point in time as well as defining the Role to filter on (Actual or Planned). Disabling the effectivity filter does not apply to SoftTypes - it can only be used with the Model Browser and the Binary export. If disabled, the system will return the full history of information. |
| Application context | Only applicable to the Model Browser and Binary exports. Defines what Application Context to use when filtering Master-Version-Definition objects. |
| Identifier context | Only applicable to the Model Browser and Binary exports. Defines what identifiers and names should be presented as default (based on the context of the identifiers and names). |
Sign Out
Will make you sign out from the system. To get back in. You will need to go through the login process again.
7. History
By clicking on the "history" icon in the upper right-hand corner of the screen you can see a history of all objects you have clicked on in the current session.

See the History section for more information about history.
Module Layout
There are many different kinds of Modules in the ShareAspace Web Application. While the layout and design might differ there are a couple reoccurring designs and layouts.
To exemplify this we use a configured Authoring Module from the InReach Knowledge Transfer Space template. This Module deals with authoring of Parts and Documents.

1. Quick Search
As the name entails the Quick Search lets you quickly search for information handled by the Module. The Quick Search can be configured to run any Query that takes one input parameter. What this Query does is entirely up to the configuration however the Quick Search is often configured to take id and/or name as the input parameter.
2. Query List
The Query List will show Queries configured for the Module. The Queries are grouped under three categories, Space, Participant, and Personal.
Queries listed under Space are Queries that was part of the Space Template configuration.
Queries listed under Space are Queries that has been setup during runtime. These
Queries has been configured by someone with Write Access to a Participant to which
you as a user has the minimum of Read Access.
Queries listed under Personal are Queries that you as a user has defined for yourself.
Finally there is a Section, Charts, this section will list queries that also has a chart view configured.
Queries that are defined with values for the search terms will also be executed directly when selected. Queries that have empty values for the query terms will first require user input before the query is executed. The default query of a module will always be executed by default even if it requires user input. For this case the input fields will be ignored until they are given values by the user.
All queries can be opened in the details mode. This is done by clicking the magnifying glass.

From this view it is possible to change the parameters of the query terms. It is also possible to redefine the query completely and executing it even without having to save the query.
Depending on the user's access to the query there will be different actions available on the query itself.
- Save - If the user has access to edit the query this option will be available. Save will save any configuration done to the query at runtime.
- Save as - Allows the user to save a copy of a query. Depending on the user's access this query could be stored on:
- the Space - the query will be available to everyone within the space.
- a Participant - the query will be available to all users with a role in that Participant.
- a personal query - the query will be personal and only be available to the user that created the query.
- Advanced settings - If the user has access to edit the query it is possible to quickly access the advanced configuration. From here the user can control the query in full, this includes controlling what columns should be displayed etc.
You can read more about how to configure queries at runtime in the Index and queries user guide.
3. Query Result
The Query Result is the main area of the Module. Here you will be able to see the result of a Query.
Some Modules are configured to run a Query when the Module is opened.
Some Queries take input parameters, in which case you will first be asked to provide the input before the query is executed and the results are displayed.

The result counter of the Query result will stop counting when reaching more than
1000 hits. The user interface will then display, 999+ hits. You can however still
page past 1000 hits.
At the bottom of the result list you will see the page navigation.
Tip
You can reorder the result by sorting descending/ascending on the Query result columns. Just click a header title to sort.
4. Export CSV
In some configured modules you will also be able to see a button, "Export to Excel". Clicking this button will export the full Query result to a CSV-file (with a maximum of 10 000 records).
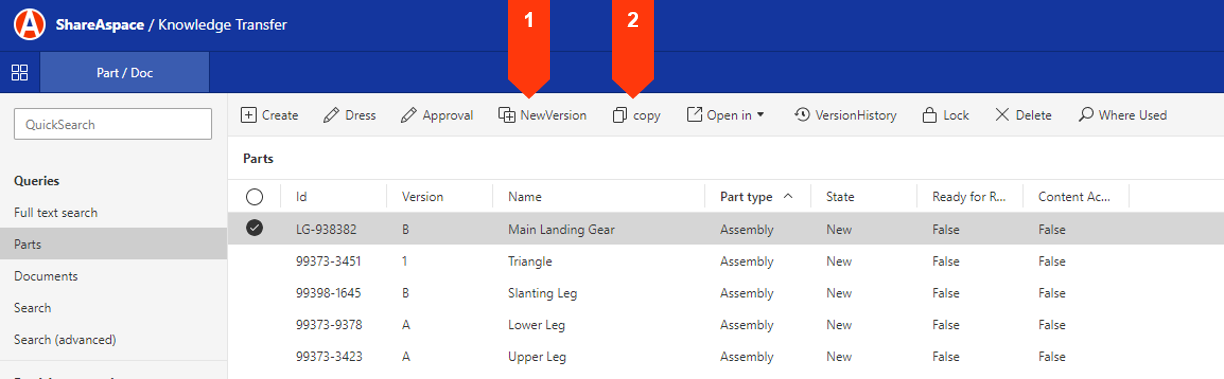
5. Ribbon Menu
At the top of the Query Result there is a ribbon menu. This menu can have buttons, both static (e.g. Create) as well as object context dependent.
Object context dependent buttons require you as a user to first select and object from the Query Result.
What buttons that will show up in the ribbon menu depends on both the Configuration as well as your current Role and its' access.
6. Object Viewer
The Object Viewer will present detailed information about the object selected in the Query result view.
7. Module Help
If the configuration contains help link configurations, clicking the question mark will open the documentation for that specific module.
8. SoftType Help
If the configuration contains help link configurations for the SoftTypes, clicking the question mark in the Object Viewer will bring up the documentation for that specific SoftType.
9. Module Tab
Each opened module will be presented as a Tab in the ShareAspace Web Application. When hovering the mouse over the Tab, two buttons will show. One for reloading the module content and one for closing the module.
It is possible to have multiple instances of the same module open at the same time.
10. Query result navigation
This will show you what page of the query result you are looking at. It will also contain clickable navigation texts to navigate between the query result pages.
11. Favorite
This star you can click on to select the object as a favorite. If the star is yellow then it is already a favorite. Clicking on a yellow star will remove the object from the favorite list.
Navigating between modules
To navigate between modules simply click the module tab for the module that you want to navigate to.
As state earlier, some modules require start parameters, i.e. these module cannot
be opened from the Module menu. One example of this is using the Open in ribbon
button.

Tip
It is possible to use links, so called deep links to directly navigating to a
module. Example: https://myServer/sasweb/space/{spaceId}/{moduleId}.
History
There is a "history" list of all SoftType object instances that you have selected in any window during your nova session. You can see this history list by clicking on the History icon  in the tab row as shown below:

This is a "toggle" button so click on the icon to show the history and click on the icon to hide the history.
When clicked, the window will appear and look like the following:

You can keep this history window visible during your entire session in all views.
Select history item
If you let your mouse pointer hover over one of the items in the history list then 3 dots appear at the right hand side of the row:

Click on these 3 dots and a sub menu will appear and you may then view the object in any of the views shown in the menu

Please note that your menu will most likely be completely different then the menu shown here because this menu is very SoftType/role specific.
Special constraints
Keep in mind the following 2 constraints about history:
- The history is only valid for one session. When you log out the history is erased.
- There is a maximum of 100 items allowed in the history list. After that the oldest history items will be erased.
Favorites
Favorites are objects that you decide you want to see in the "space" screen. They will stay here in this screen until you once again choose to not see them here any more.

You have the option to select a favorite in the "Read view" of an object. In the example below we have:
- Selected an object.
- If you click on the white star, then the object will show up in the "space" screen and thereby be a favorite. When an object is a favorite, the star will be yellow. By clicking on a yellow star then the object will no longer be a favorite

Below you see how it looks in the favorite screen when there is one favorite. By clicking on three dots beside the favorite, you will see a menu where you can select which screen you want to see this object in.

This menu screen is very object dependent so your menu will most likely be very different then the one shown here.

Role settings for favorites
The favorites list is by default role specific so that if you change to another role, then the favorites list will probably be completely different. You can however change this default functionality by:
- Clicking on the space settings menu.

- Open the "advanced" section.
- Choose "Any role" in the "Favorites role" dropdown list-box
- Hit the "save" button.
You will need to do this for each role that you want the "any role" functionality in.

Copy link
When viewing an object in any of the modules that supports the "Read view" of objects it is possible to copy a link to that object in that module.
Clicking the copy link button (1).

A link to that object in the current module will be saved in the clipboard. A notification in ShareAspace will appear when the save happens.

You can paste this link in any application. As an example this link can be pasted into an email and sent to some one that should look at this object information.
Note
The people that receives these links will be required to sign in to ShareAspace to view the object. It is also required that these user have access to the actual object. If not they will just get the "No access" prompt when trying to use the link.
Compare
It is possible to "compare" any two versions of any objects. Particularly useful is the comparison of 2 versions of the same object. This comparison may be designed to show only those fields that you might find interesting for such a comparison. The comparison highlights differences.
Note
Because the "Compare" functionality is highly configurable, your menu item texts and views will most likely be very different than all the illustrations shown here.
Start from a known object
There are a few different ways to come to the compare window. Perhaps the most useful is start from an object you see that you want to compare:
- Select an object you want to be compared.
- Hit the "Open in" menu.
- Select "Compare" in the menu.

When you come into the compare window, you must select the second object to compare to:
- Enter the first few characters of the id of the object you want to compare to.
- Select the object you want to compare when it appears. If there are more then one version of the object then you must select the version of the object as well.

Finally you have defined exactly which items you want to compare and your comparison is shown with differences highlighted in a yellowish color:

Start from a main menu
You might also find your "compare" in either the main space screen or the "Module" menu.
The Main Menu might look something like this:

The module menu might look something like this:

Then you get a completely empty "compare" window where you must search after the two items you want to compare with the "quick select" text boxes:

Copy object and new version
Copy
When enabled, clicking the Copy button in the ribbon menu will allow you to create a new object by copying all the data from the selected object.
In order to perform a copy:
- You need to have full read access to the object that you are copying.
- You need create access in the participant where you want to put the new object.
When copying an object the copy will always copy everything from the copied object, no matter if it is visible in the edit form for the copy operation or not. Alterations made in the form will be merged with the copy operation, i.e. changing values, adding or removing things to a list will override those parts of the copy operation.
Note
When copying information via new version or the copy object, only the latest active values are copied. Historical data (out of the current date and time effectivity) will not be copied.
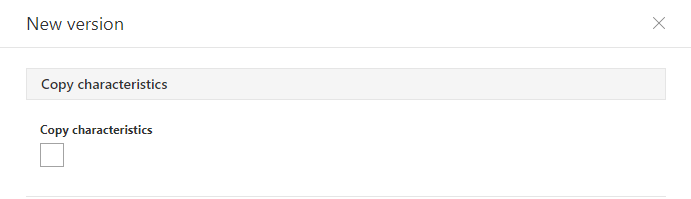
New version
When creating a new version you have two options.
- To create a blank new version.
- With this option you will be presented with a view for filling out data for the new version to be created.
- To create a full copy of the previous version. This option is accessed by marking the "Copy characteristics" check box. With this option you are presented with a different view where you have the ability to make changes on what to copy.
- "Copy characteristics" will always copy everything from previous version, no matter if the information is visible in the view or not. Alterations made in the new version form will be merged with the copy of the previous version.
In order to perform a "Copy characteristics" operation, you need to have full read access to the previous version.
Multi select/edit
If you select two or more objects in a query window then a "MultiEdit" menu item could appear allowing you to edit several objects at the same time. in the example below, the "MultiEdit" menu is called "Approval."

Note
Because the "MultiEdit" functionality is highly configurable, your menu item texts and views will most likely be very different than all the illustrations shown here.
Press on the "Approval" menu item and a "multi-edit" dialog will appear.
Be aware that each field in the "edit" dialog shows you a quick comparison of all the selected objects:
- If the field is blank then that means that either the values in this field in the selected objects are differing or that all values in this field in the selected objects are all blank.
- If the field is filled in with a value then that means that all values in this field in the selected objects are identical and are equal to the value shown.
- The fields might be disabled which means they are only for viewing purposes and not allowed to be edited.

Keep in mind while editing the fields in the dialog that:
- If you leave a blank field blank, then the values in this field in the selected objects will remain the same as they were (differing) after you hit update.
- Any fields you enter a value into will change all the selected objects respective fields to that newly entered value.
Model Browser
The Model Browser is an "Information Expert" view of Unit of Informations.
It presents how objects are persisted in the ShareAspace database according to the ShareAspace Nova Core Model.
It is possible to either start the module and search for an object or starting the module by passing an object as a start parameter from another module.
The module can present instances of SoftTypes as well as imported data that have no SoftType representation.
Layout

The left hand side structure shows a hierarchical representation of the object graph for a Unit of Information.
The center shows the metadata of a selected Object or Entry. It is possible to navigate to other Unit of Informations by following links to them from within the model browser.
The right hand side list shows a history log of the navigation between different Unit of Informations.
Ribbon Menu and Edit
From the ribbon menu, depending on your current access to the selected, Unit of Information, there is a set of operations.
| Ribbon Button | Description |
|---|---|
| Information filter | Lets you control the information filter settings for displaying and navigating the information within the Model Browser. |
| Delete | Deletes the selected Unit of Information or Entry. Requires delete access to the data. |
| Change Owner | Lets you change the Owning Participant of a selected Unit of Information (or other pivot object). |
Caution
Deleting a Unit Of Information will neither remove it from indexes nor will it remove references to the Unit of Information (from other UoIs).
Edit
Provided that you have the appropriate access to the information, selecting entries, will allow you to edit and/or remove values. This is done using the pen-button and x-button in the detailed view.

Caution
Use this functionality with caution!
Participant
The Participant module lets you setup Sub Participants for the predefined Participants that have been configured at space creation time.
Module Layout
To open the Participant Module either use the tile icon on the space main page

or the corresponding menu item within the Module Menu:

The layout is very similar to the authoring module described in the Space user guide.

On the left side of the screen, is a tree view that presents the structure of Participants and Sub Participants.
Note
The list of Participants is created together with the Space creation and is not modifiable after.
This module only allows to manage Sub Participants. Read more about the Participant and Sub Participant concepts. .
When selecting a Participant or a Sub Participant, the Object viewer panel displays the following:
- General information about the selected Participant
- Internal rights (restriction rights to access the data owned by the Participant for any role given to users within the Participant)
- External rights: rights that the selected participants has on the other participant (Received) and rights that the selected participants has allowed for other participant (Granted).
A greyed out access right acronym indicates that this rights is disabled. A black bold access right acronym indicates that this rights is enabled.
Create Sub Participant
In the main panel or in the tree on the left select a Participant [1] , a toolbar will appear on top of the main Participant panel table [2].

Click the Create button to create a Sub Participant owned by the selected Participant.

Scroll down and you can access the other attributes that can be edited.

| Attribute | Description |
|---|---|
| Participant Definition | The name of the Participant SoftType that will be instantiated for creating the Sub Participant |
| Id | The unique business identifier for the Sub Participant |
| Organization Name | The name of the Organization corresponding to this Sub-Participant. Each Participant or Sub Participant actually have an instance of the Organization PLM object associated (same id as the participant and the given name here). |
| Internal Access Rights | the list of internal access right for the Sub Participant. link |
| Roles | Add users that will be set in the corresponding roles. Those roles are the same as the one defined at the Participant level. |
| Granted Rights | Set access rights for each other Participant into the created Sub Participant. By default the Participant for which the Sub Participant is created is granted all access rights. |
Note
To enable/disable Access Rights click on the corresponding acronym. If the acronym is bold black then it is enabled, if it's greyed out then it is disabled.
After creation, the Sub Participant will be available under the Participant in the tree on the left:

The depth of the participant structure is not limited.

Modify Sub Participant
In the main panel or in the tree on the left select a Sub Participant, a toolbar will appear on top of the Participant panel table.

Click the Edit button to modify the Sub Participant.

The only characteristics that can be modified in the edit dialog for a Sub Participant are the access rights granted for other Participants.
Security
If you are the administrator (you have a role with the
Grant User Access access modifier) of a Participant in a Space you will have
access to the Security module.
From the Security module you can manage all users' Role assignment to your current Participant.
You can also invite new users to the Space and your Participant.
Layout
On the left hand side you will get a list of all users that have been given a Role within the current Participant. By selecting a user you will get a detailed view to the right.
By selecting a user you will also see that the ribbon menu is updated
with the Edit and Remove buttons.

Invite
To invite one or more users to the Participant, click the Invite
button on the ribbon menu.

Select what roles should be given to the invited users. The list of available roles are dependent on the Space Configuration template.
Under Invitees type the email addresses of the people that you
want to invite to the Participant. It is possible to invite more
than one person at the time. Separate the email addresses with a
semicolon ;.
Under Message you can write a message that will be included in
the invite email sent out to the invited people.
Edit Access
To edit what Roles an already invited user should have within the
current Participant, select the user in the list and click the
Edit button in the ribbon menu.

Check and/or uncheck the checkboxes for the roles in order to achieve the result you want.
Remove all Access
To remove all Role Assignments (all access) from a user to the
current space. Select the user from the list and click the
Remove button in the ribbon menu.
Project
The project module is used for managing the project information. InReach templates comes with an instance of a Project PLM object and the Project Module is configured with a link to that object.
From the Project Module it is possible to manage the state of the project, the project metadata, as well as managing the News for the Space.
Layout
The project module displays meta data about the Project instance. The intention is that the project represent additional information about the space.

Project News
If you are the space administrator (i.e. a role with the
Manage Space Definition access modifier) you will see
the Edit Space News button in the ribbon menu.
Clicking this button brings up a form with a markdown editor that lets you set the Space News.
The Space News is visible to all users invited to the space and is displayed on the space start screen.
Edit project
Clicking the Edit project button in the ribbon menu brings
up a form for editing the metadata of the referenced Project
instance.
Next phase
Clicking the Next phase button brings up a form for changing
the Project's Level State.
This is the same form that is used for managing the states of all objects configured with a Maturity System. Read more about the Maturity Systems in the Maturity system user guide.