Config Tool Example
Goal of this example
This Config Tool Example will go through all the steps of creating your own SoftType with some simple objects inside of the SoftType. Before you read this example you need to be familiar with some concepts first. Make sure you understand the information in the following link:
The SoftType we will create will look somewhat like the following:
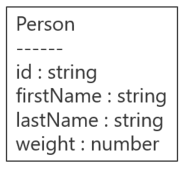
That is, a "Person" with an id, firstName, lastName and a weight. Each one of these fields are actually Product Lifecycle Management (PLM) objects themselves and each one requires special attention when creating a SoftType. Actually, a more complete model of what this section will accomplish detailing most of the objects involved, is shown below:
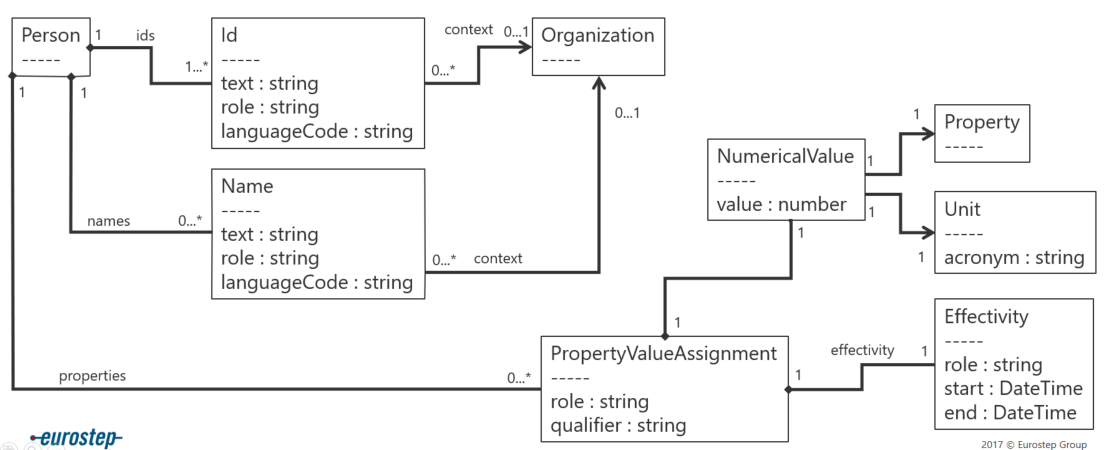
We will be coming back to this diagram later to show how each object is created in the SoftType.
Install the Config Tool and a template
- Install ConfigTool. You will need an installation program probably with a name like "ConfigTool-x.y.z.build.msi."
- Install a template. You must start with an already existing template. I recommend that you start with the InControl template but any template will be ok. If you are going to use the InControl template you will need an installation program probably with a name like "InControl-x.y.z.build.msi."
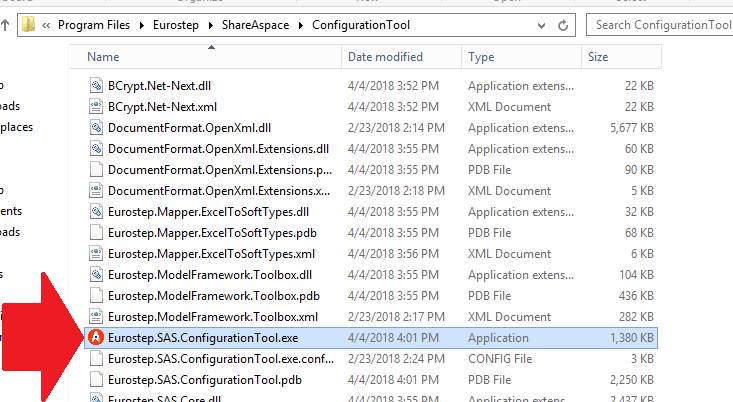
The ConfigTool does not create any "menu" items in your Windows operating system so you must find where the config tool was installed and double-click directly on the program itself. The program will probably be in the directory:
C:\Program Files\Eurostep\ShareAspace\ConfigurationTool
And double click on the "A" icon as shown in the picture below:
Then you will see the following program start up:
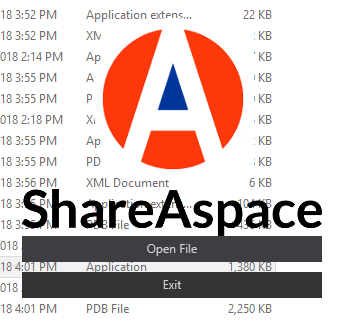
Where you need to hit the "Open File" button and select your template. If you installed the InControl template it will probably be in the directory:
C:\Program Files\Eurostep\ShareAspace\ConfigurationTemplates
Create a SoftType
How to create a SoftType
If you have followed the previous steps in this example you would have started the "Config Tool", opened your template, and you should see something like the following screen in front of you:

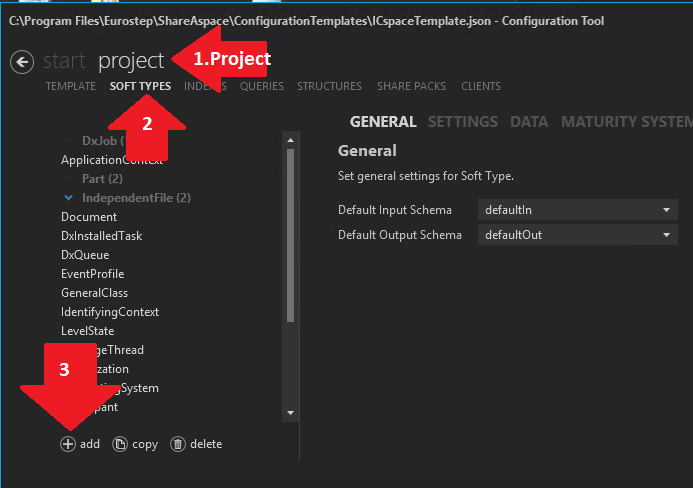
Next we need to navigate to the SoftTypes screen to get access to the "add" button:
- Click on the tab "Project"
- Click on the tab "SoftTypes"
- Hit the "add" button.
As shown below:
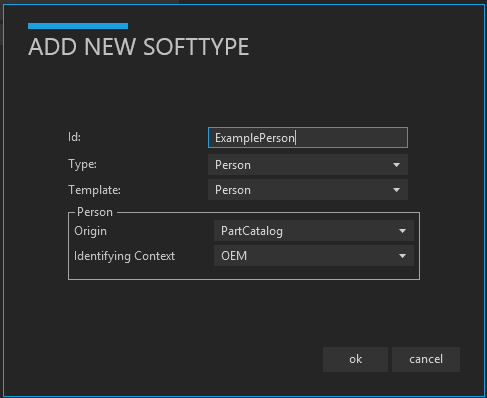
You will then be presented with a dialog where you must choose:
- Id = ExamplePerson (or any other appropriate name)
- Type = Person
- Template = Person
- Origin = Choose Any
- Identifying Context = Choose Any
And hit "Ok" as shown in the picture below:
At this point you have created your ExamplePerson SoftType but it might not be visible in the list because it is hidden under the text "Person." Click on the text "Person" in the left-hand column and your ExamplePerson SoftType should show up as in the example below:
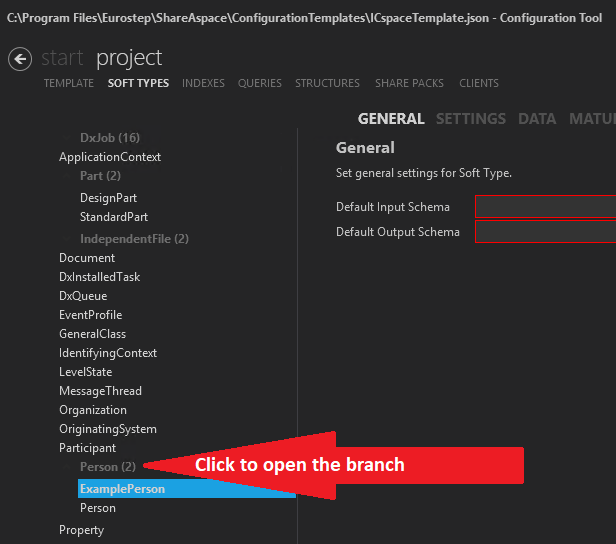
You will notice that "Default Input Schema" and "Default Output Schema" are red indicating that something is missing but we can't fix that yet.
Save your work
It is a good idea to save your work regularly. Click on "Verify" and then "Save and Verify".

There may be some errors that appear but at this point that is expected.
Data
Find the DATA
Navigate to the "Data" section of your newly created "ExamplePerson" SoftType:
- Hit the project tab
- Hit the SoftTypes tab
- Select your ExamplePerson SoftType in the left hand list
- Hit the DATA tab
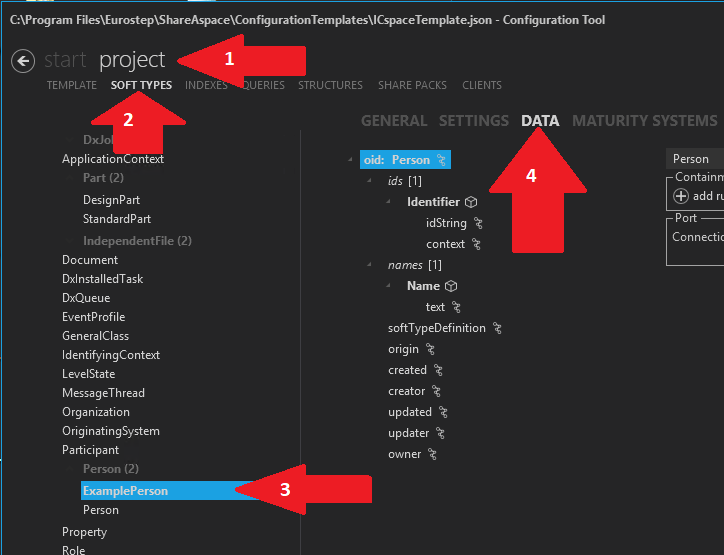
In the picture above I have also opened up all the branches in the DATA section.
Naming
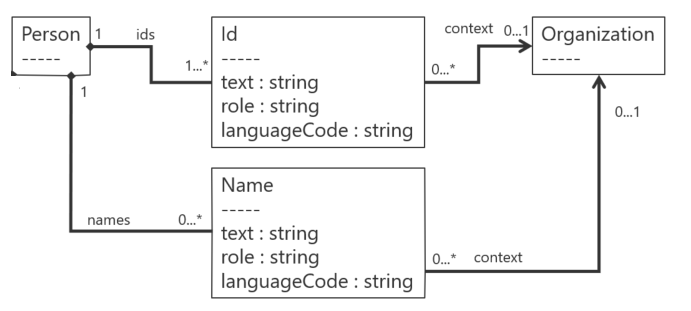
The first thing we will add/change is the "naming." "Naming" is the Product Lifecycle Management (PLM) terminology for the Id's and names for an object. PLM uses an object called Id and an object called Name as well as an Organizational Context of the Id and Name. These you can see in the diagram below
The ID
The id is already created for us. However let's look at how it is defined. Select the "Identifier" under "ids[1]" as shown in the picture below:
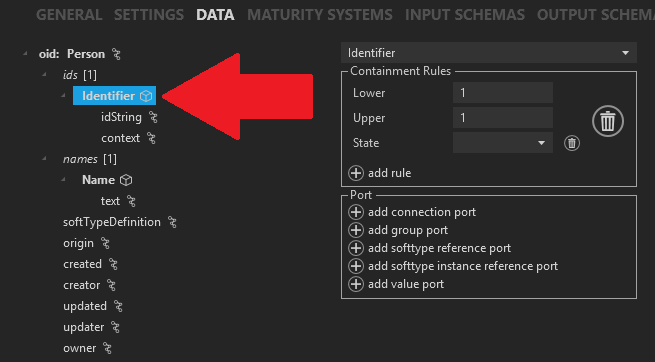
There you will see on the right-hand side that the "Containment Rules" is "Lower=1" and "Upper=1". This means that you must have at least one of these "Identifiers" and no more than one "Identifier". In other words you must have exactly one "Identifier". This also fulfills the PLM requirements that the person object must have at least one identifier. See Containment rules for more information.
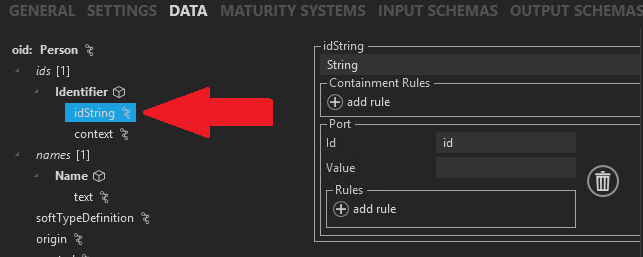
If you click on the "idString" you will see on the right-hand side that a port is defined with the id=id. This means that a variable is now defined for this identifier and the variable name is "id". See Connection Port for more information.
If you click on the "context" you will see on the right-hand side that a port is defined with an instance of "OEM". If yours shows something other then "OEM" it is ok as well. This means that a constant value is given to the "context" of OEM and it can never be changed. Since the "id" is left blank it means this value can never be read either.
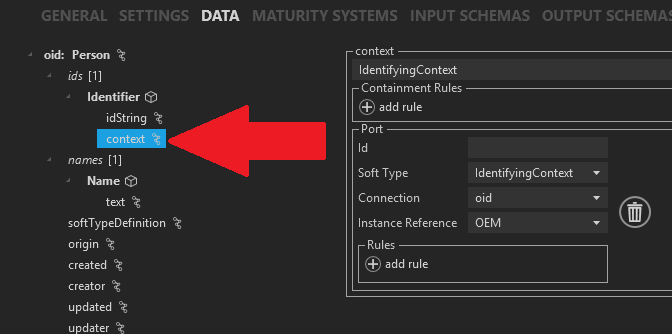
See SoftType instance reference port for more information.
As stated in the beginning, the id was already created for us and it was exactly as we wanted it so no changes have been made to the id definition.
The First name
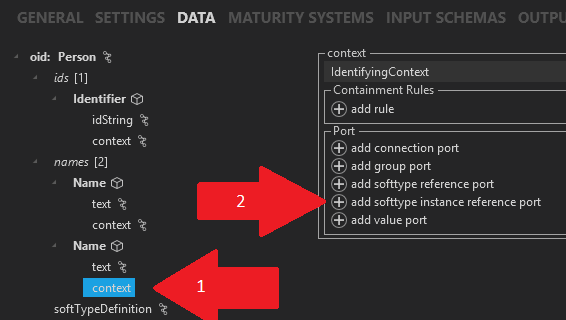
We have a name defined for us by the "template" that created our SoftType ExamplePerson but this name is incorrect for our needs so we must change it. Let's first look at the "Name" definition as shown below, Click on "Name".
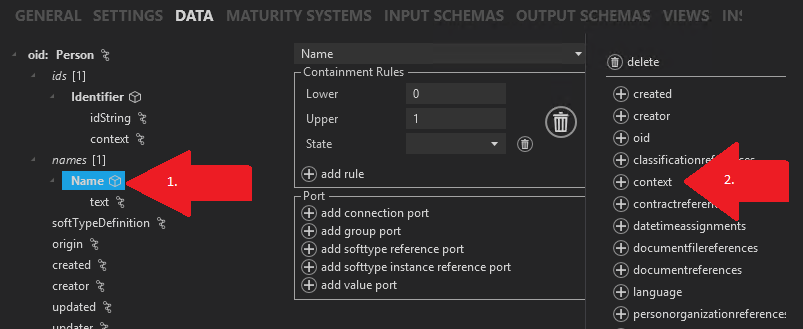
There you will see in the center that the "Containment Rules" is "Lower=0" and "Upper=1". This means that you may have no names if you want or no more then one "Name". This means we don't require the first name but they can enter it if they want. See Containment rules for more information.
If you look in the picture above you will see a red arrow labeled "2.". Click on this item "context" so that it is added to our "Name" object. You then should see the following. Note that "context" has been added to our "Name" object. Click on the "context" object:
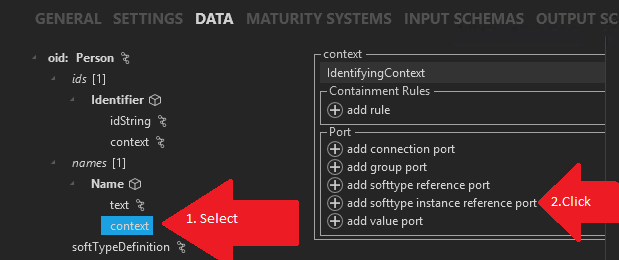
We must define a constant value for this "context" object. To do that, click on the "add SoftType instance reference port" and fill it in as shown below:
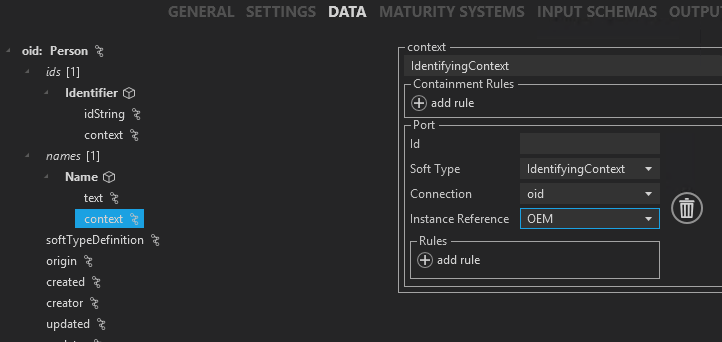
It is ok if your "Instance Reference" is something other than "OEM".
It is important to understand why we selected "add SoftType instance reference port" to define our port. The definitions of all these types of ports you can find at:
We must change the name of the variable "name" to "firstName". Select the item "text" and fill in the "id" as shown below:
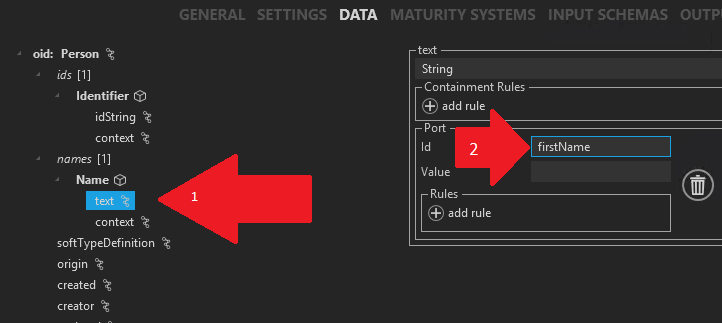
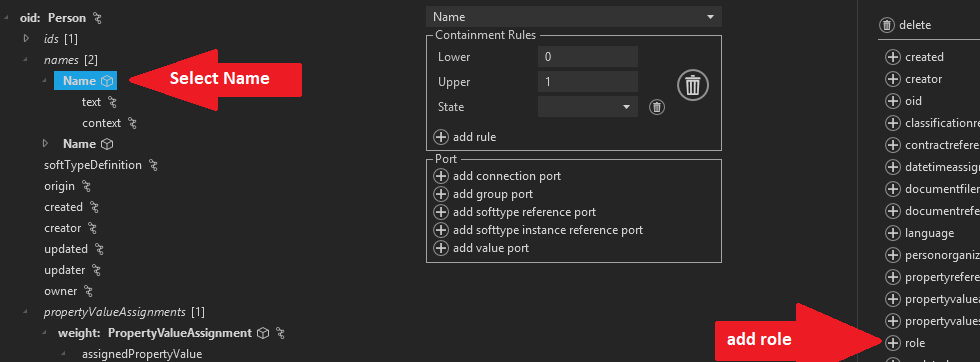
Since we will have 2 names we must have a "role" to separate them for PLM.
Select your first name Name object and on the far right hit the "role" button to add a role to the Name object.
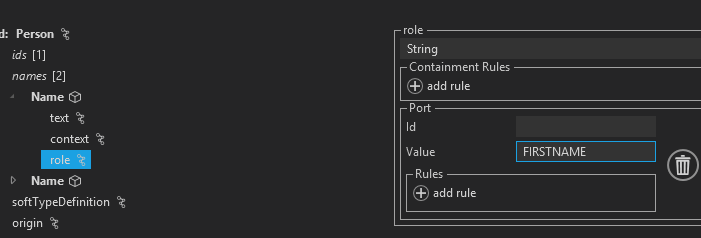
Select your role you just added and click on the button "add value port":

Fill in only "value" with "FIRSTNAME":
Now you are finished defining the "firstName":
The Last name
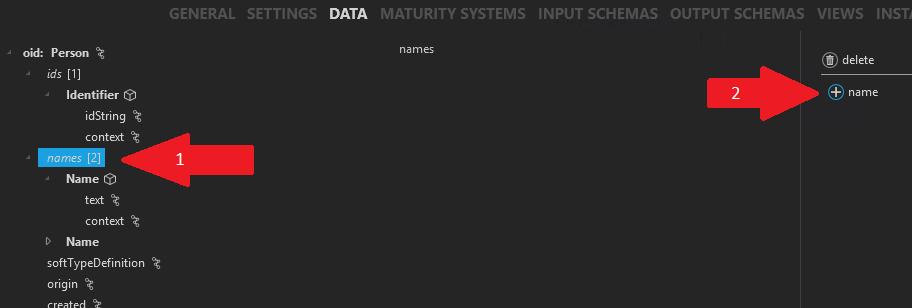
We need one more "name" object for the "last name" and to achieve that click on "Names" on the left-hand side and then select "name" on the right-hand side to add a new "Name" object as shown below:
Click on your newly added name and then click on "add rule" as shown in the following:
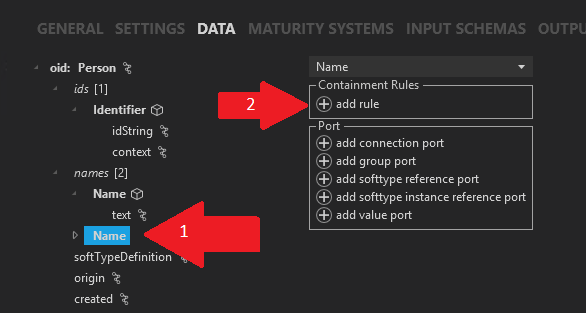
Then fill in the rule as shown in the following to state that they may have zero or one last name:
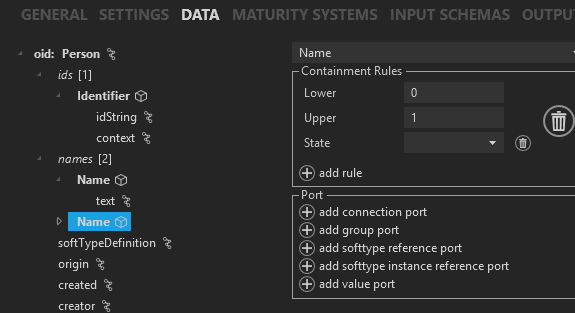
See Containment rules for more information.
Click on the "text" definition for your newly added "Name" object and hit the "add value port":
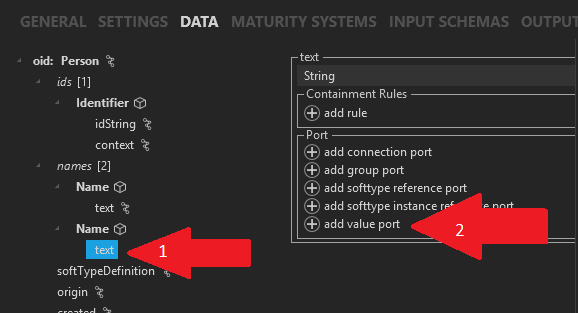
Then fill in the value port as shown below with the id=lastName:
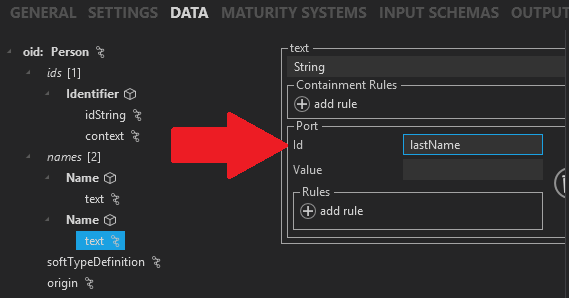
See Value Port for more information on why we made this "value port"
Now we need to add a constant "context" to our "Name" object. To achieve that click on your newly added "Name" object and click on the far right-hand side "context" as shown below:
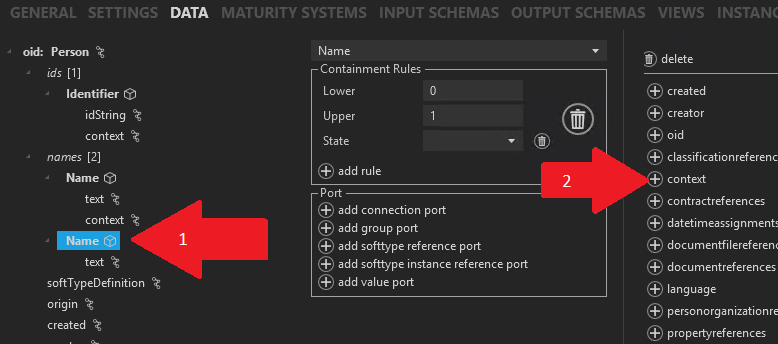
Click on your newly added "context" object and select "add SoftType instance reference port" in order to define your constant "context" as shown below:
Fill in the port information as follows:
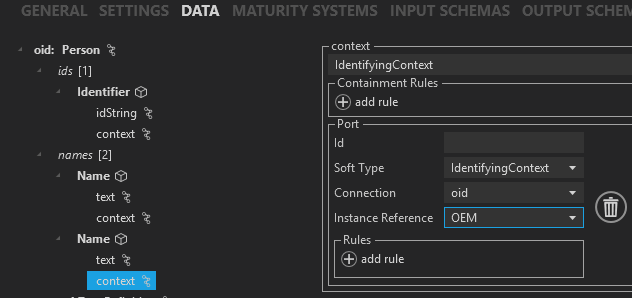
It is ok if your "Instance Reference" is something other then "OEM".
See SoftType instance reference port for more information about why we use this port definition
Since we will have 2 names we must have a "role" to separate them for PLM.
Select your last name Name object and on the far right hit the "role" button to add a role to the Name object.
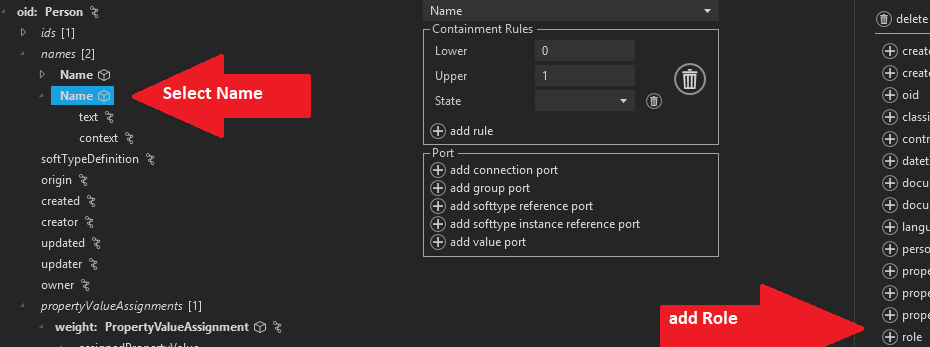
Select your role you just added and click on the button "add value port"

Fill in only "value" with "LASTNAME"

The Weight
We now need to add the weight-property object. A simplified PLM diagram below shows in the red rectangle the class structure of a numerical property which will be our "Weight" object:
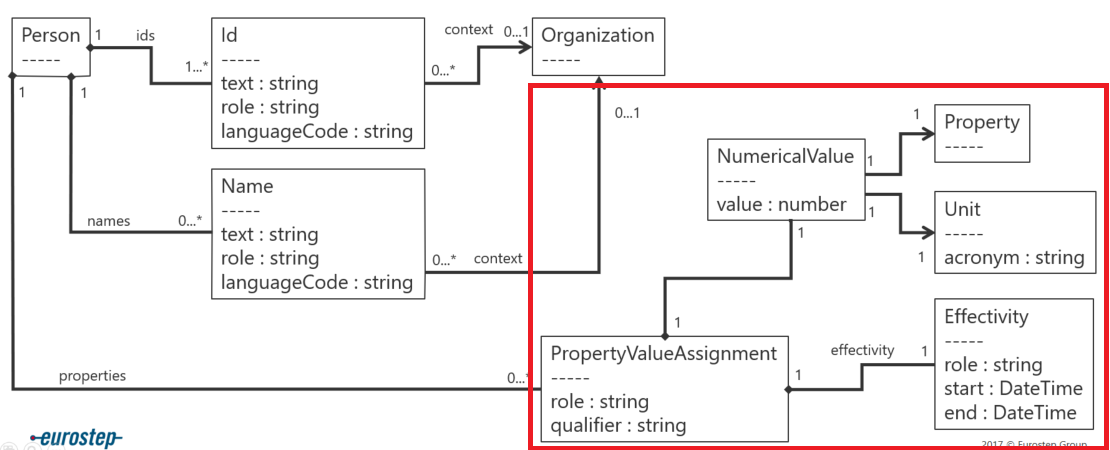
This is what we must now define in our "Data Section"
Click on the top "Person" object and then click on "propertyvalueassignments." Make sure you DON'T click on "propertyvaluesetassignments"
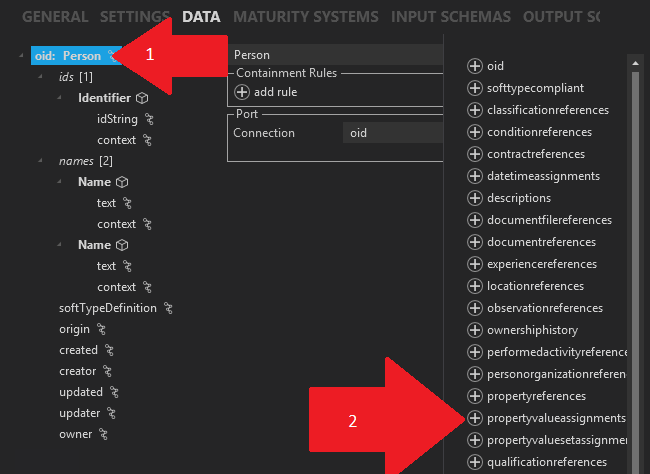
Click on your newly created propertyValueAssignments[0] and hit on the right-hand side "propertyvalueassignment" as shown below:
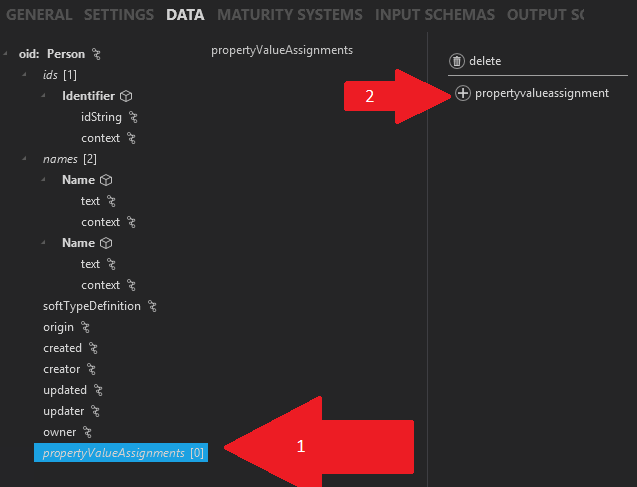
Then click on your newly created propertyValueAssignments[0] and hit on the right-hand side "propertyvalueassignment" as shown below:

Fill in the "template" form as shown below and hit ok:
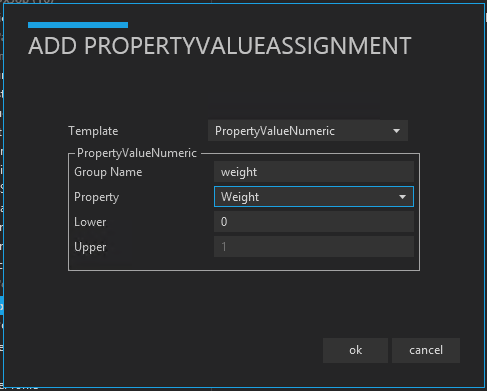
If you don't have a "Property" called "Weight" then you will first need to add the weight property instance and then come back to do this "template."
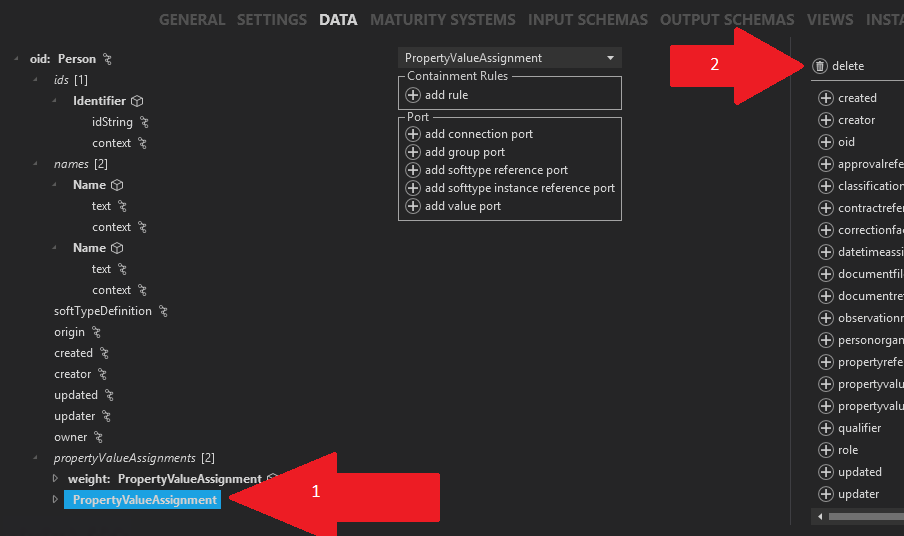
Otherwise, your property is finished with all the objects added that you need. In some versions of ConfigTool there is a bug where you must delete an extra "PropertyValueAssignment". Open your PropertyValueAssignments and if you see 2 "PropertyValueAssignment" you must delete the one that is not marked "weight: PropertyValueAssignment". Click on the extra "PropertyValueAssignment" and hit the "delete" button as shown below:
Add a Weight property instance
Only do this step if you could not do the last step because your "Weight" property instance was missing.
Otherwise, Skip to the next section Add units
Select on the far left-hand side the "Property" SoftType and then the "INSTANCES" tab and then hit the "add instance" button as shown below:
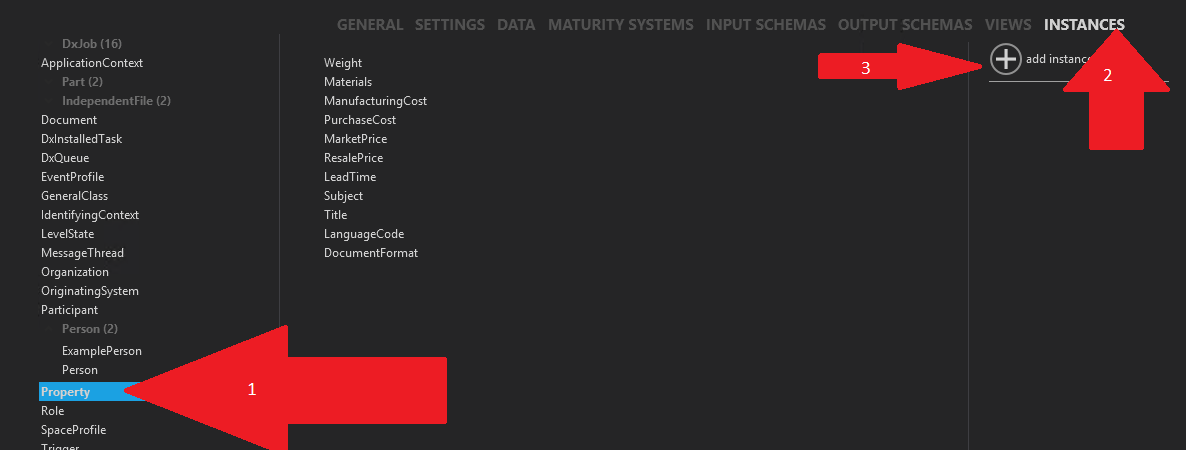
You will then get something that looks like the following:
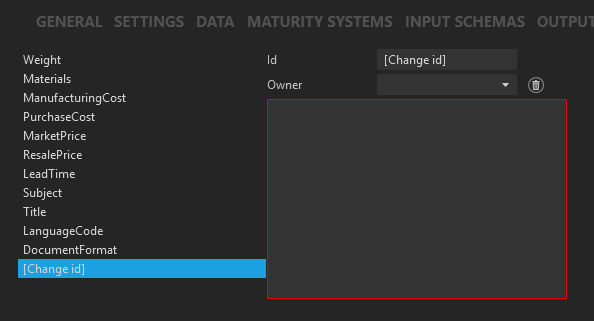
Fill it in as shown below:
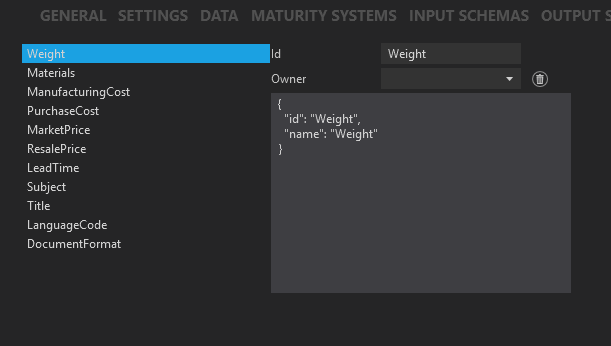
Now return back to the Add weight property previous step and add your "Weight" property.
Add units
We need to define for the "units" what units we will allow for our weight property.
- Open your weight property branch to expose "unit"
- Select "unit"
- Hit the button "add rule"
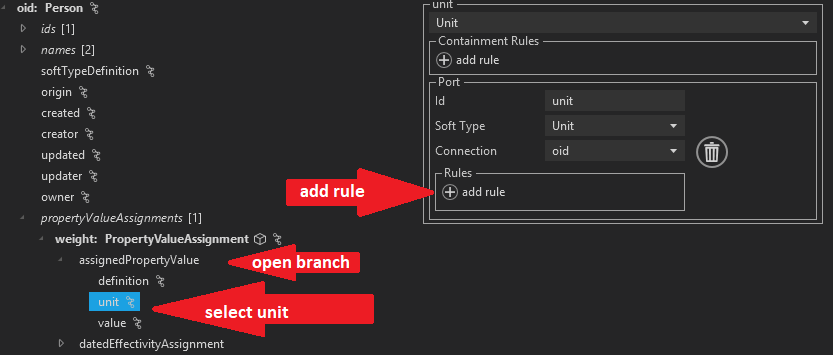
Hit the "add instance" button twice and fill in the values for the allowed instances "kilogram" and "gram" as shown below:

Save your work
It is a good idea to save your work regularly. Click on "Verify" and then "Save and Verify".

There may be some errors that appear but at this point that is expected.
Input Schemas
What is an input schema?
Input Schemas are used to define the REST API contracts for creating and updating a SoftType (POST and PUT in RESTful terms). You must have at least one input schema defined and at a minimum you need to add all the "required" fields to each input schema. See Schemas for more information.
Create an input schema
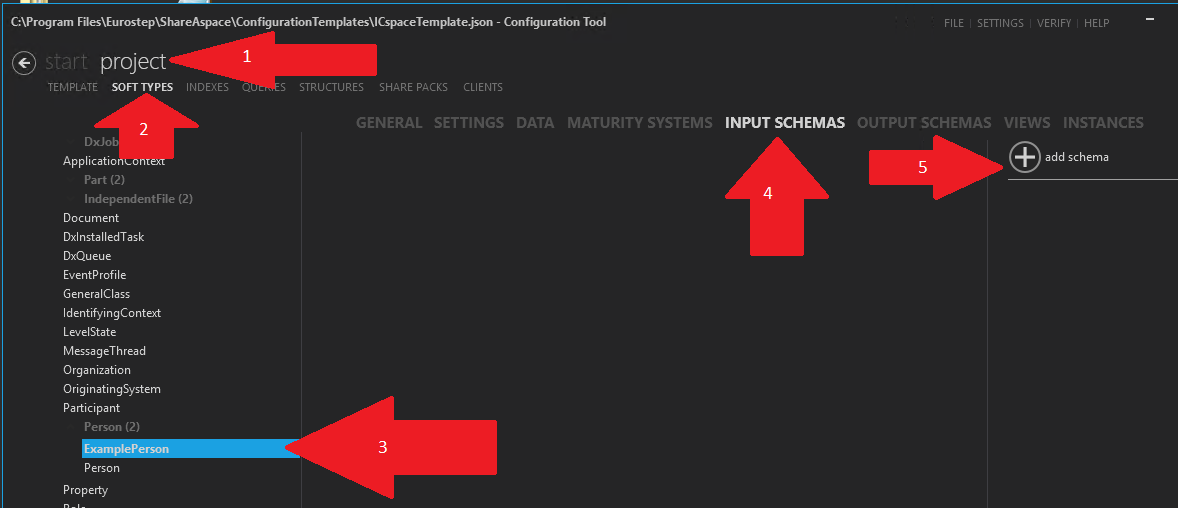
Navigate to the "INPUT SCHEMAS" section of your newly created "ExamplePerson" SoftType:
- Hit the project tab
- Hit the SoftTypes tab
- Select your ExamplePerson SoftType in the left hand list
- Hit the INPUT SCHEMAS tab
- Hit the "add schema" button
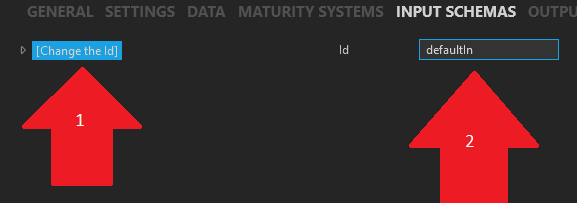
- Click on your newly created Schema
- Give your new schema the name "defaultIn"
Add items to the schema
- Open the "defaultIn" branch
- Select the "Definition"
- Look at the list of items you may add to the definition
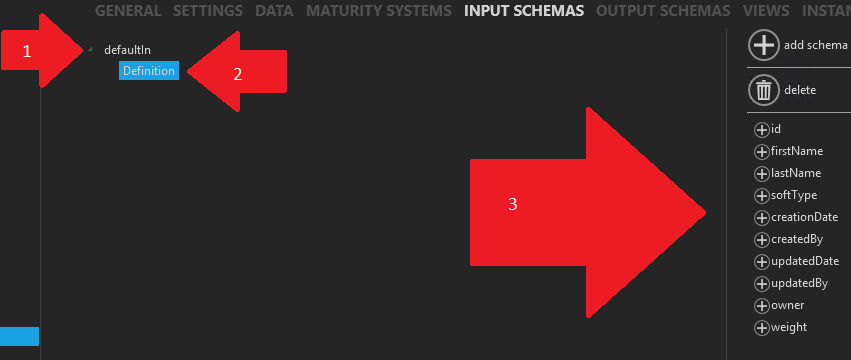
You see on the right-hand side all the items you may add to the definition of your schema. It is possible to simply add all the items and it would probably work. But it is not logical to add all of the items since some of the items are not editable.
I will here list all the fields and explain their usability in the schema:
- id: REQUIRED. Must be in every input schema
- firstName: Should be added because otherwise there will be no possibility to change it's value
- lastName: Should be added because otherwise there will be no possibility to change it's value
- softType: Illogical to add because this is a value that cannot be changed
- creationDate: Illogical to add because this is a value that cannot be changed
- createdBy: Illogical to add because this is a value that cannot be changed
- updateDate: Illogical to add because this is a value that cannot be changed
- updatedBy: Illogical to add because this is a value that cannot be changed
- owner: Illogical to add because this is a value that cannot be changed
- weight: Should be added because otherwise there will be no possibility to change it's value
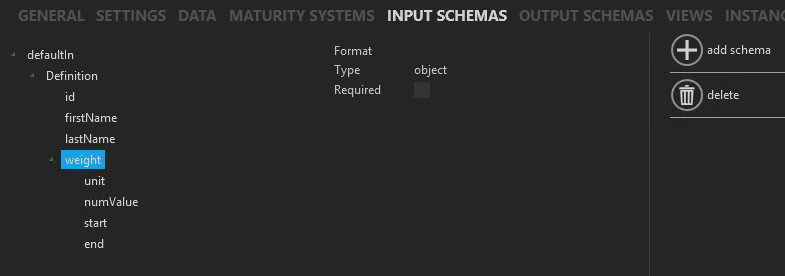
Lets add these "Required" and "Should be added" to our defaultIn schema. That is, add id, firstName, lastName and weight. The result should look like the following:
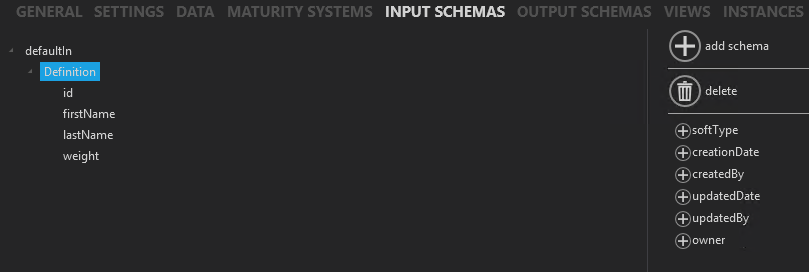
We are almost finished with the input schema but the "weight" object has more that needs to be added. Click on the "weight" object and add all the items on the right by clicking on each item on the right as shown below:

The result should look like the following:
One last thing to do. Remember the "id" field is required and we need to mark it as "Required." If we mark it as required here then any view showing this field will mark it as "required." Select the "id" on the left-hand side and then check the "Required" box:
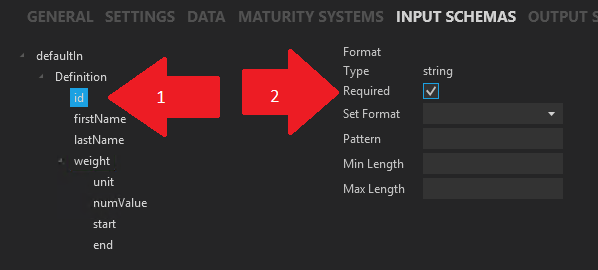
See Rules for more information about the required field and other schema fields that we are not using in this example.
Save your work
It is a good idea to save your work regularly. Click on "Verify" and then "Save and Verify".

There may be some errors that appear but at this point that is expected.
Output Schemas
What is an Output schema?
Output Schemas are used to define the REST API contract for reading a SoftType (GET in RESTful terms). You should have at least one Output schema defined. See Output Schemas for more information
Create an Output schema
Navigate to the "OUTPUT SCHEMAS" section of your newly created "ExamplePerson" SoftType:
- Hit the project tab
- Hit the SoftTypes tab
- Select your ExamplePerson SoftType in the left hand list
- Hit the OUTPUT SCHEMAS tab
- Hit the "add schema" button

- Click on your newly created Schema
- Give your new schema the name "defaultOut"

Add items to the schema
- Open the "defaultOut" branch
- Select the "Definition"
- Add all of the items on the right-hand side to your definition
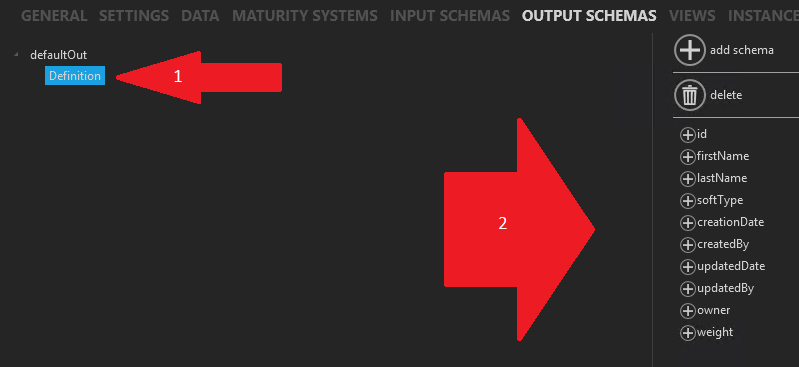
The following is the result after all items are added:
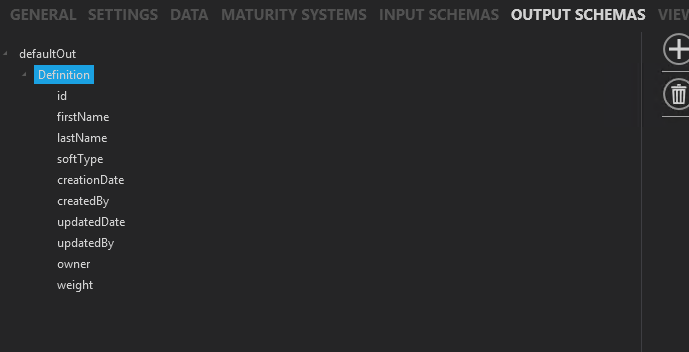
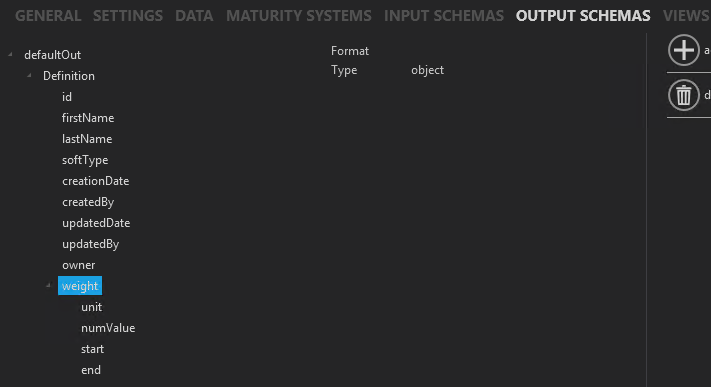
We are almost finished with the Output schema but the "weight" object has more that needs to be added. Click on the "weight" object and add all the items on the right by clicking on each item on the right as shown below:
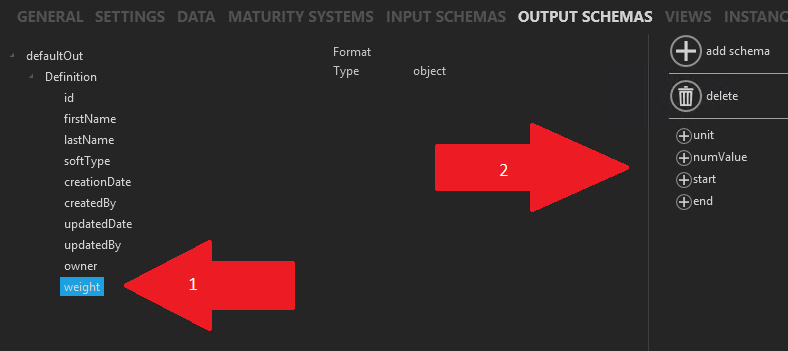
The result should look like the following:
See Object Resolve for more information about other schema fields that we are not using in this example.
Save your work
It is a good idea to save your work regularly. Click on "Verify" and then "Save and Verify".

There may be some errors that appear but at this point that is expected.
General
To get to the General section of your SoftType.
- Hit Project
- Hit SoftTypes
- Perhaps you need to click on "person" to open the branch.
- Click on your ExamplePerson SoftType

You will notice that "Default Input Schema" and "Default Output Schema" are red indicating that something is missing. Click on each of these 2 fields and fill them in with defaultIn and defaultOut as shown below:

Save your work
It is a good idea to save your work regularly. Click on "Verify" and then "Save and Verify".

There may be some errors that appear but at this point that is expected.
Settings
To get to the Settings section of your SoftType.
- Hit Project
- Hit SoftTypes
- Perhaps you need to click on "person" to open the branch. Click on your ExamplePerson SoftType.
- Hit Settings
As shown below:
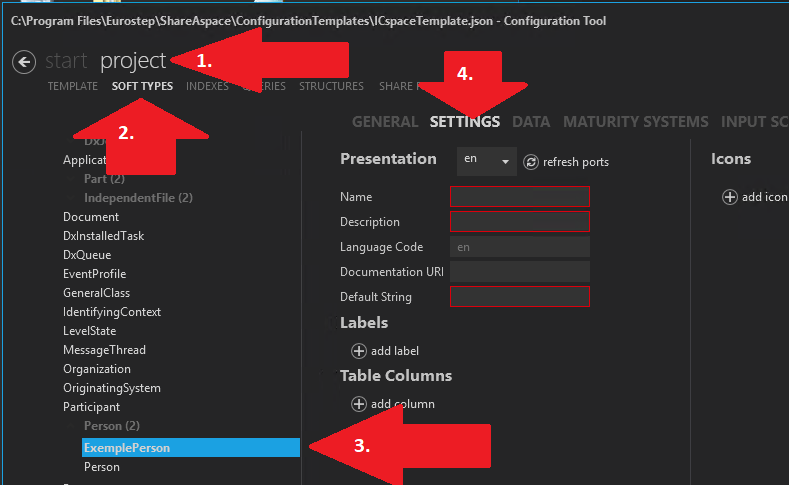
There are some important fields here that you must fill in:
- Presentation (language): The following fields are language dependent so you must select here what language you are currently editing. By default there is only one language (en for English) so you can only select that one language here. See Language configuration for an explanation about how to add more languages if you need it
- Name: The name of your SoftType. It should be a User-Friendly name because this name will show up in dialogs that are presented to your user
- Description: Not currently used but perhaps eventually this field will be used
- LanguageCode: Same as above under "Presentation"
- Documentation URI: This is a URI to a help system for specific help for this SoftType. This link shows up as a blue question mark in dialogs and some views if this field is filled in. Leave blank for this example
- Default String: This field is very important as it shows up in many places. This field is coded and you must understand the code in order to fill it in correctly. The code is that any item surrounded with {} is a "port" in your SoftType and exists in your default output schema. A typical value here is "({id}) {name}, {versionId}" Which would give the id in parenthesis followed by the name and versionId separated by a comma. Lets just put "{firstName} {lastName}" in our example
- Labels: These are language independent labels (Key) that are used in the "Views" connected to language dependent texts (Value). In order to accomplish our views we will need to add an entry for each variable we will use in our views plus group headers. Therefore add here definitions for "id", "firstName", "lastName", "weight", "Identification" and "Properties. The last 2 are group headers
- Table Columns: This is a table representation of your SoftType that is used in certain screens, for instance the WhereUsed dialog. Let's keep it simple and just add "SoftType", "id", "firstName" and "lastName. "Link" simply means that if a person "clicks" on this field if the field should then link back to the whole SoftType object
- Icons: These are icons that will represent your SoftType in many different screens. Normally we define 3 icons here: small, medium and large. For the "small" icon enter "Images/SoftTypes/Person/user_12.svg" as the relative path and for the other 2 enter "Images/SoftTypes/Person/user_16.svg" as the relative path. This path is relative to the "Collection" unmanaged file area
For now, your settings should look like the following:
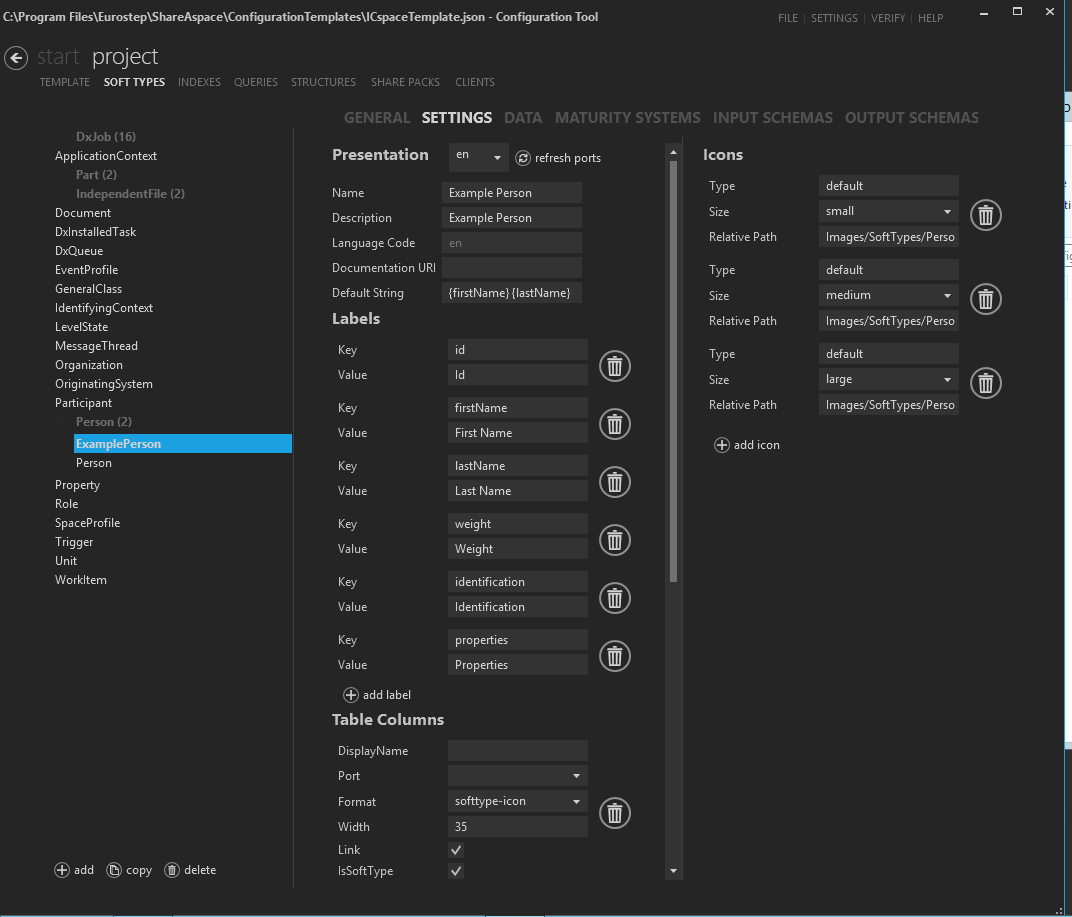
Since the settings didn't all fit on the above screenshot, below is the rest of the "table" settings
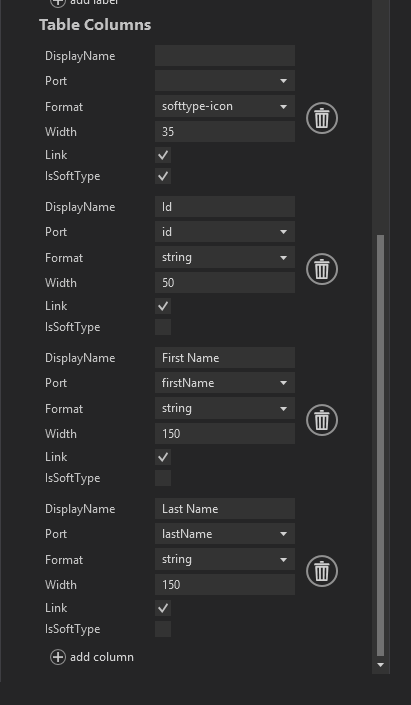
Save your work
It is a good idea to save your work regularly. Click on "Verify" and then "Save and Verify".

At this point, there should be NO errors appearing in the error list. If you have "errors" then try to fix them or get someone to help you to fix the errors.
Views
To get to the VIEWS section of your SoftType and create a new view,
- Hit Project
- Hit SoftTypes
- Perhaps you need to click on "person" to open the branch. Click on your ExamplePerson SoftType.
- Hit VIEWS
- Hit "add view"

Let's begin with making a "Create" view simply so that we can see all the components of any view. In the "id" field choose "create" and then write "Create" in the Label field. In a "create" dialog we only need an "Input Schema" so there select "defaultIn". Lastly hit "add group".
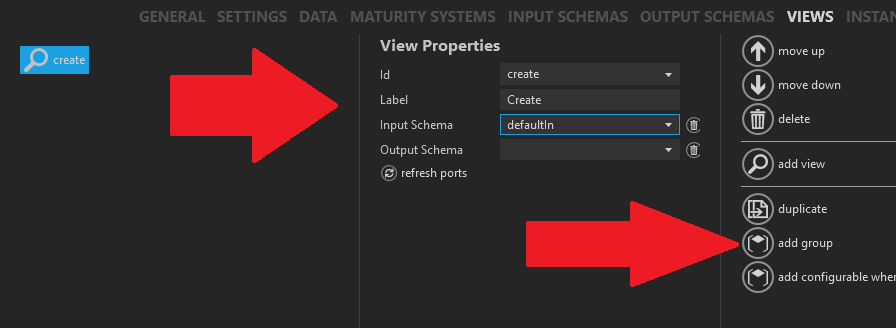
Give the "Label" the value "Identification". The main focus of this discussion is the list of components on the right hand side of the screen below:
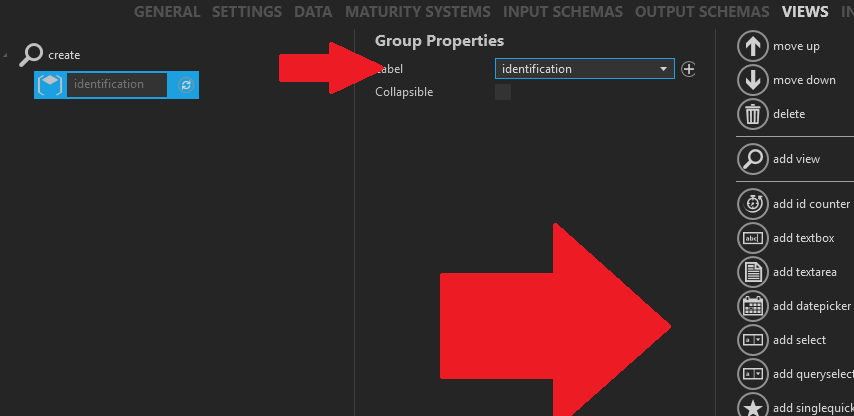
Each component has a specific purpose and some are used mainly for "Read" views and some mainly for "Create or Edit" views and some only for "Where used" views. The next section is a reference of all components describing their setup, usage and resulting runtime view.
Create View
Before continuing here, you must have done the steps in the previous section View
At this point, you should have in your ConfigTool the following:

Add the control "id counter" to the "identification" group by hitting the button "add id counter" as shown below:

Fill in the "id counter" as shown below:

Notice that the "id counter" is disabled. This is because we don't want to give the user the chance to change this id.
Add the textbox control for the firstName. First, click on the identification group and then select the "add textbox" button

Fill in the "textbox" as shown below:

Add the textbox control for the lastName. First, click on the identification group and then select the "add textbox" button

Fill in the "textbox" as shown below:

We want to add now a Property group. First, click on the "Create" view and then select the "add group" button

Fill in the "group" as shown below:

Add the textbox control for the weight. First, click on the properties group and then select the "add textbox" button

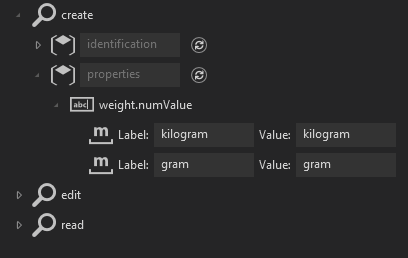
Fill in the "textbox" as shown below and then click on the "add unit" button:

Fill in the "unit" as shown below:
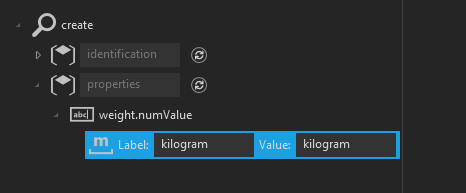
Click on the "weight.numValue" textbox and once again add a unit by clicking on the "add unit" button

Fill in the new unit as shown below with "gram"
Now it might happen that you don't have the units "kilogram" and "gram" in your unit instances so we must make sure that this is correct. Go to your "Unit" SoftType and click on the instances tab as shown below:
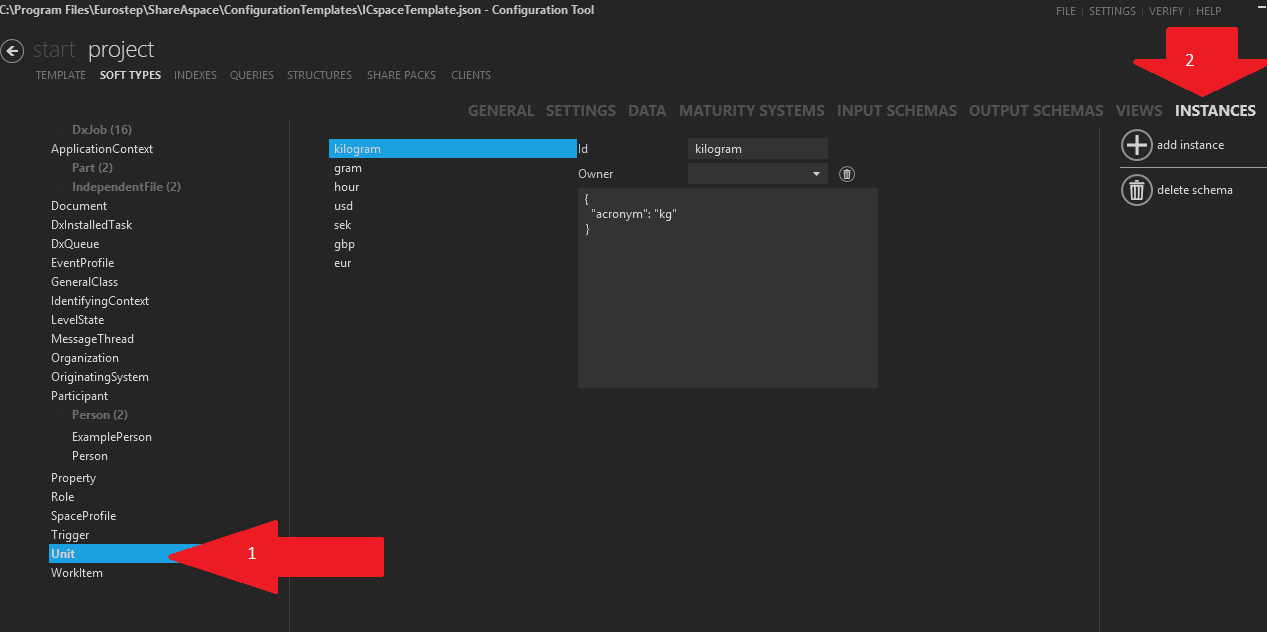
Make sure you have the units "kilogram" and "gram" defined here as shown in the picture above. If you don't have them then click on the "add instance" button to add them.
Save your work
It is a good idea to save your work regularly. Click on "Verify" and then "Save and Verify"

At this point, there should be NO errors appearing in the error list. If you have "errors" then try to fix them or get someone to help you to fix the errors.
Read View
To get to the VIEWS section of your SoftType and create a new Read view,
- Hit Project
- Hit SoftTypes
- Perhaps you need to click on "person" to open the branch. Click on your ExamplePerson SoftType.
- Hit VIEWS
- Hit "add view"
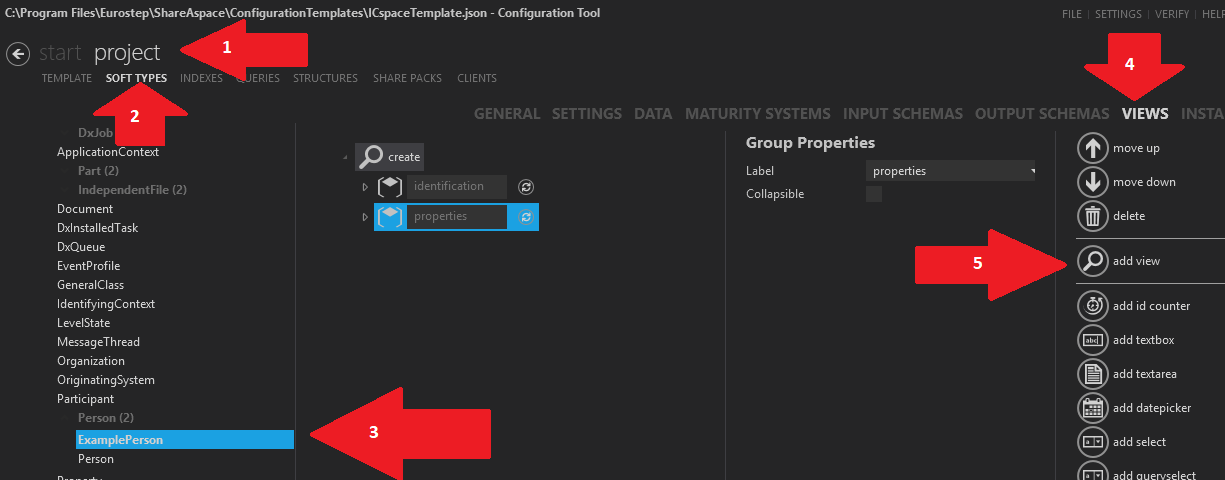
In the "id" field choose "read" and then write "Read" in the Label field. In a "read" dialog we only need an "Output Schema" so there select "defaultOut". Lastly hit "add group".
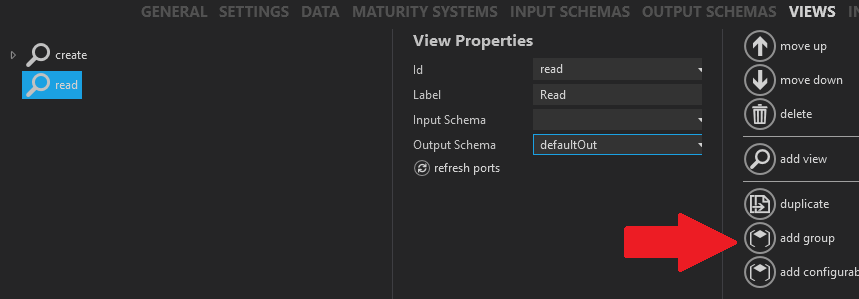
Give the "Label" the value "Identification" and then hit the button "add value text block" for the id as shown in the screen below:

Fill in the id text block with the following values:

click on the identification group and hit the "add value text block" button for the first name:

Fill in the first name as shown below:

click on the identification group and hit the "add value text block" button for the last name:

Fill in the last name as shown below:

We need another group for the property weight. Select the "read" view and then hit the "add group" button
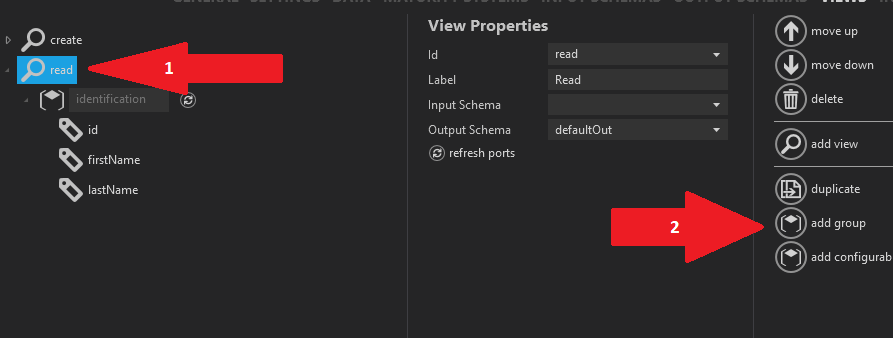
Fill in the property group and then hit the "add value text block" as shown below:

Fill in the weight as shown below:

Save your work
It is a good idea to save your work regularly. Click on "Verify" and then "Save and Verify"

At this point, there should be NO errors appearing in the error list. If you have "errors" then try to fix them or get someone to help you to fix the errors.
Edit View
The "Edit" view is almost an exact copy of the "create" view done before except for the only difference that the "id" field will be a disabled "text box" instead of an "id counter" and a defaultOut must be defined. If you want you can go back to the "create" section and do this OR you can "duplicate" the "create" view and then make a few changes to convert it to an "Edit" view.
Below is shown how to do the duplicate of the "create" view:
To get to the VIEWS section of your SoftType and duplicate "create",
- Hit Project
- Hit SoftTypes
- Perhaps you need to click on "person" to open the branch. Click on your ExamplePerson SoftType.
- Hit VIEWS
- Hit create
- Hit "duplicate"
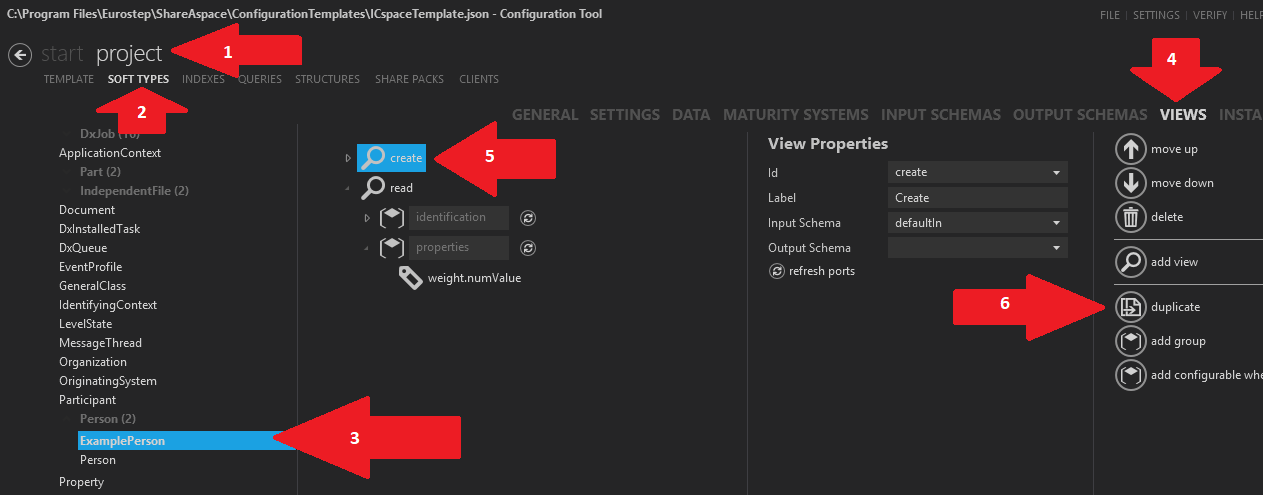
Click on your newly created duplicate(it will also be called create) and then fill in the values as shown below:

Lastly, we need to correct the id field by deleting the current field.
- Open your branches of your Edit view until your "id" field is showing
- Select the id field
- Hit the delete button

Add your new textbox field by:
- Select group identification
- Hit the "add textbox" button

Fill in your id as shown below and then hit the "arrow up" button twice in order to put the id at the top of the identification group

Save your work
It is a good idea to save your work regularly. Click on "Verify" and then "Save and Verify"

At this point, there should be NO errors appearing in the error list. If you have "errors" then try to fix them or get someone to help you to fix the errors.
Indexes
At this point the definition of your ExamplePerson SoftType is done. However, you will still never be able to use or see your SoftType until you create an Index, Query and a Client. Here we will define the index.
See the following for a background on what an index is.
To get to the Index section,
- Hit Project
- Hit INDEXES
- Hit "add index definition"
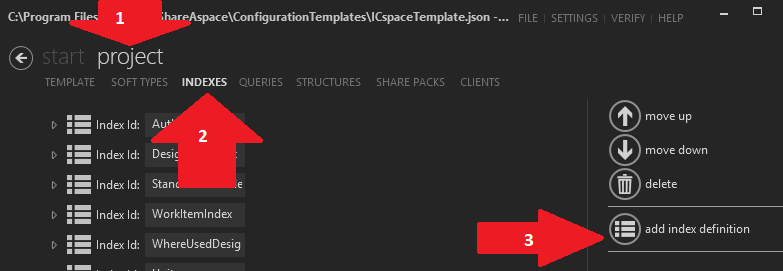
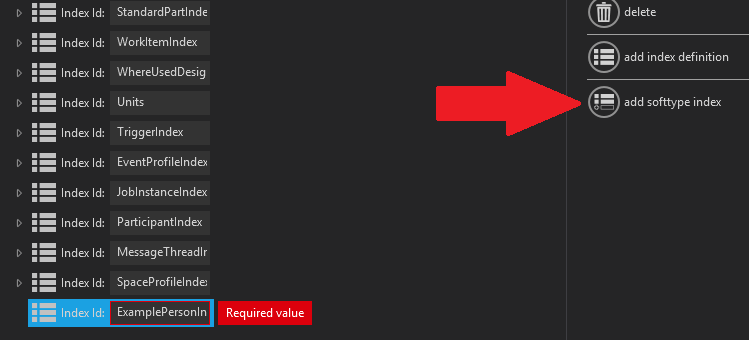
Fill in the name of the index to be "ExamplePersonIndex" and hit the "add SoftType index" button
Fill in the SoftType as shown below and then hit the "add term" button
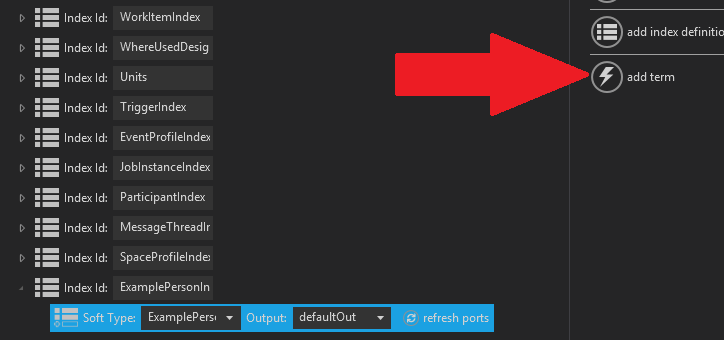
Fill in the id fields as shown below and then select the SoftType group and hit the "add term" button

Fill in the first name fields as shown below and then select the SoftType group and hit the "add term" button

Fill in the last name fields as shown below and then select the SoftType group and hit the "add term" button

Fill in the SoftType fields as shown below
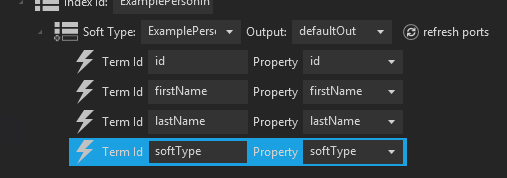
Save your work
It is a good idea to save your work regularly. Click on "Verify" and then "Save and Verify".

At this point, there should be NO errors appearing in the error list. If you have "errors" then try to fix them or get someone to help you to fix the errors.
Queries
At this point the definition of your ExamplePerson SoftType is done. However, you will still never be able to use or see your SoftType until you create an Index, Query and a Client. Here we will define the query.
See the following for a background on what an query is.
To get to the Query section,
- Hit Project
- Hit QUERIES
- Hit "add query"
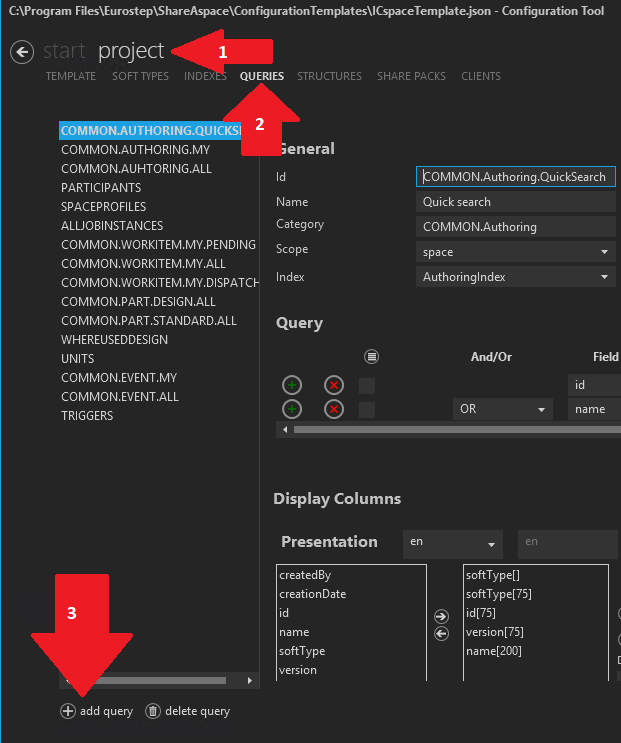
Fill in the following
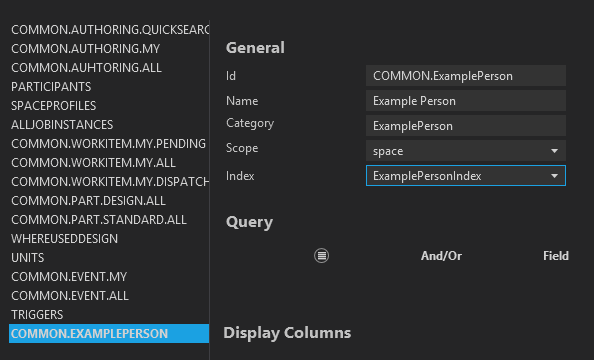
- id = COMMON.ExamplePerson
- Name = Example Person (This is the text shown to the user so it needs to be user friendly)
- Category = "ExamplePerson". This is used to group together several different queries under the same "Category". Right now this will be the only one in it's group
- scope = space. This is where the query will go, for all to see
- Index = ExamplePersonIndex. The index you just created in the previous section
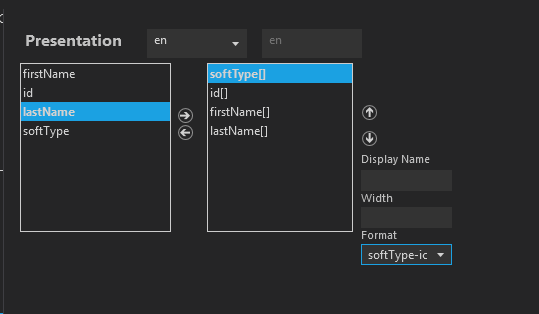
Move all the fields in the left of the "presentation" box to the right using the "arrow right". Make them in the order as shown. You can change the order using the "arrow up" and "arrow down". Select the "SoftType" field in the right-hand box and enter "SoftType-icon" as the Format.
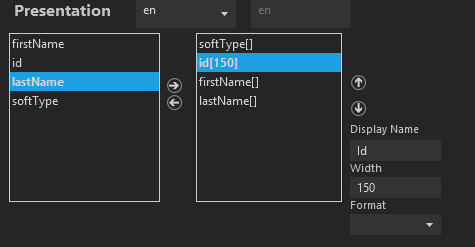
Select the id field in the right-hand box and enter the "Display Name" and "Width" as shown below:
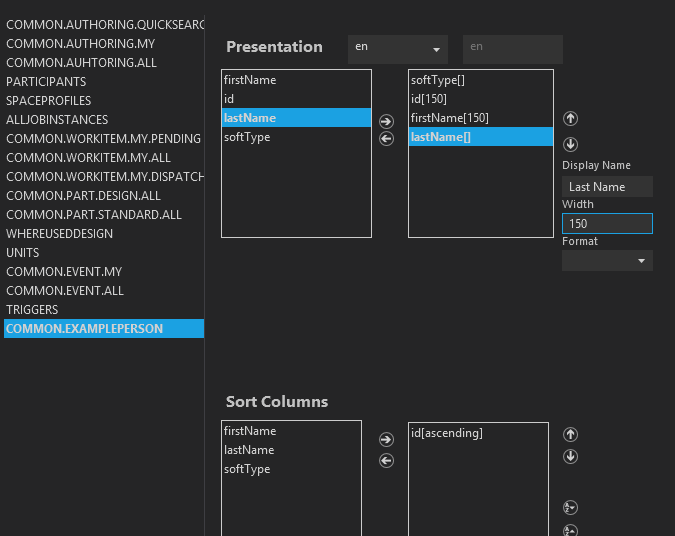
Do the same to the firstName and lastName fields as shown below. Also give a "Sort Column" as "id[ascending]":
Save your work
It is a good idea to save your work regularly. Click on "Verify" and then "Save and Verify".

At this point, there should be NO errors appearing in the error list. If you have "errors" then try to fix them or get someone to help you to fix the errors.
Clients
At this point the definition of your ExamplePerson SoftType is done. However, you will still never be able to use or see your SoftType until you create an Index, Query and a Client. Here we will define the client.
A client tells Nova where and how to show your SoftType and to whom.
See the following for a background on what a client is.
To get to the Client section,
- Hit Project
- Hit CLIENTS
- Hit "add module"
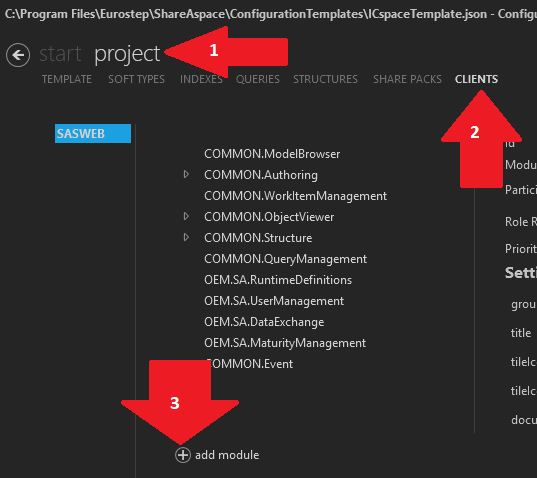
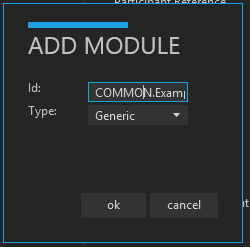
You will be presented with the following dialog. Set Id=COMMON.ExamplePerson and set Type=Generic
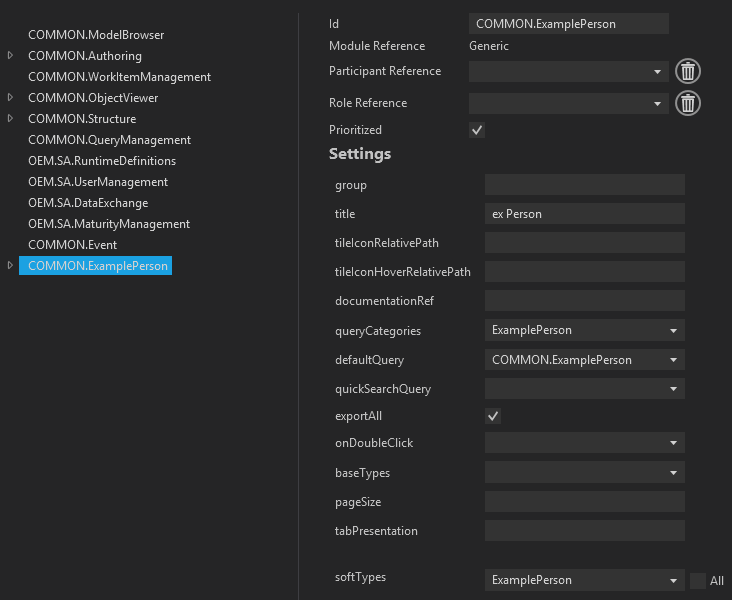
Fill the client as shown below. Many fields are important but we have left many blank because we are trying to do a simple example.
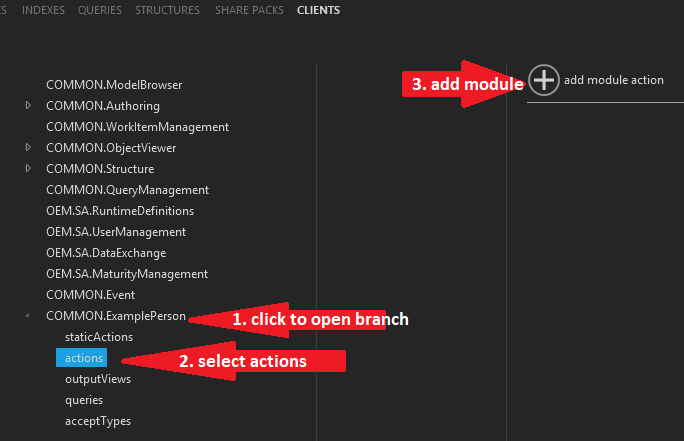
We now need to define that we want the menu items "Create" and "Edit" to show up whenever an ExamplePerson object is selected
To do this, we first add an "Action" for the "Create" view:
- Click on "Common.ExamplPerson" to open the branch
- Select "actions"
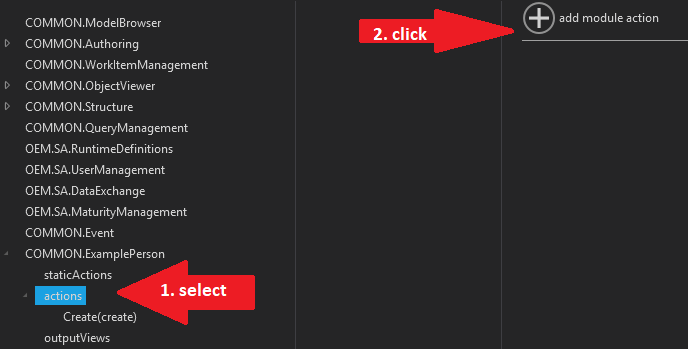
- hit the "add module action"
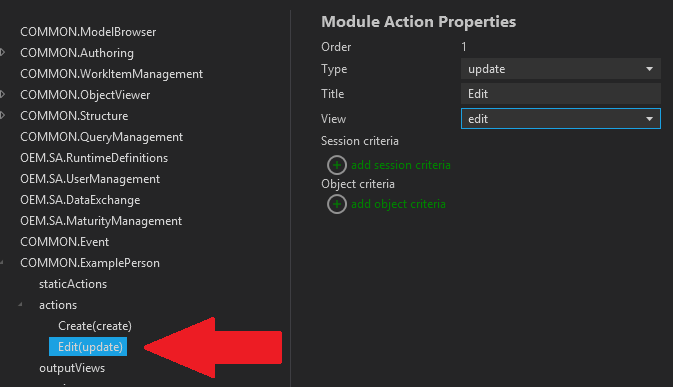
Select your newly created action and fill in the fields as shown in the picture below:
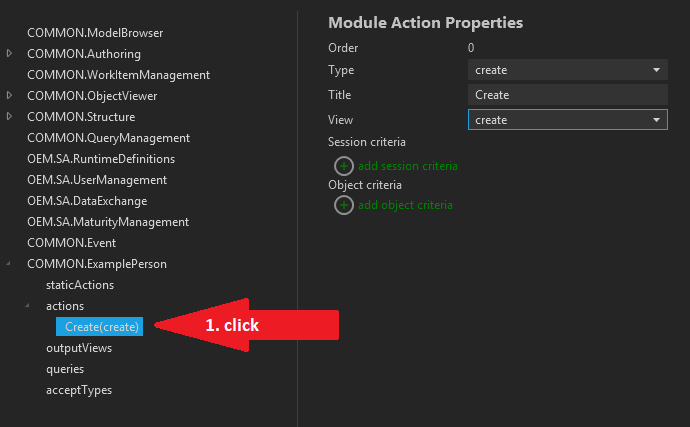
- Select "actions"
- hit the "add module action"
Select your newly created action and fill in the fields as shown in the picture below:
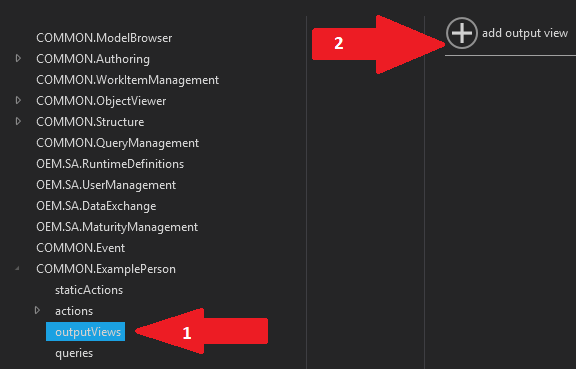
We need to define our "output" read view. To do that
- Select outputViews
- Hit "add output view
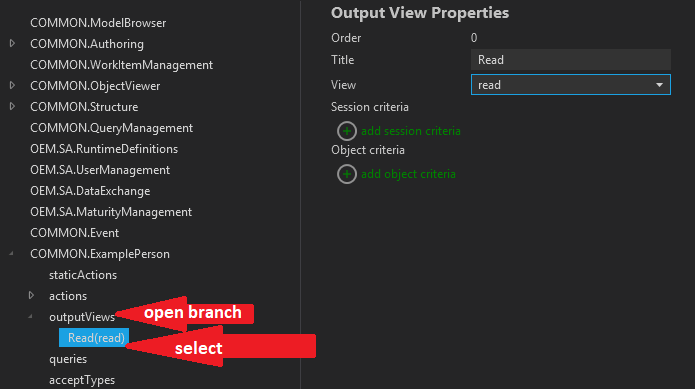
Open up the outputViews branch and select your newly created output view and fill in the fields as shown below:
We need to define what queries will be shown.
- Select the query branch
- Hit the "add query" button
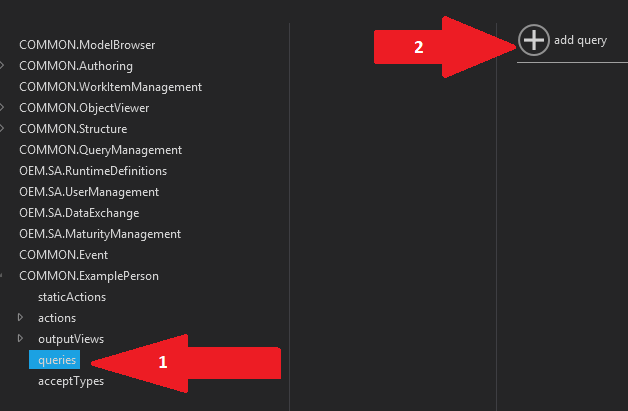
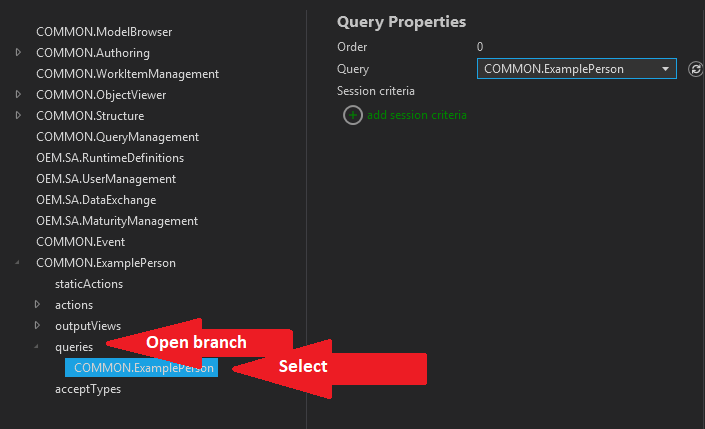
Open the "queries" branch and then select your newly created query and fill in the fields as shown below:
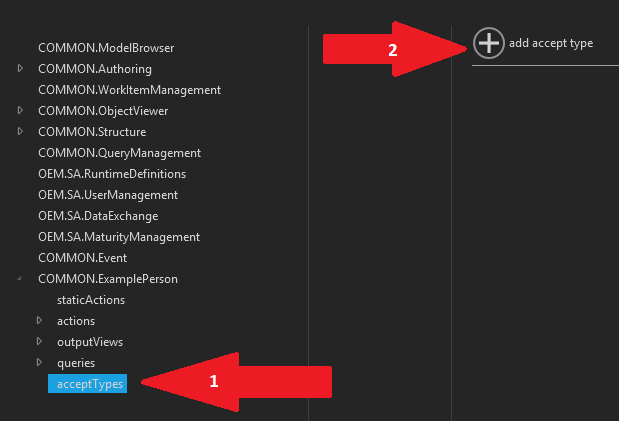
We need to clearly mark which "types" will be allowed for this client.
- Select the acceptTypes branch
- Hit the "add accept type" button
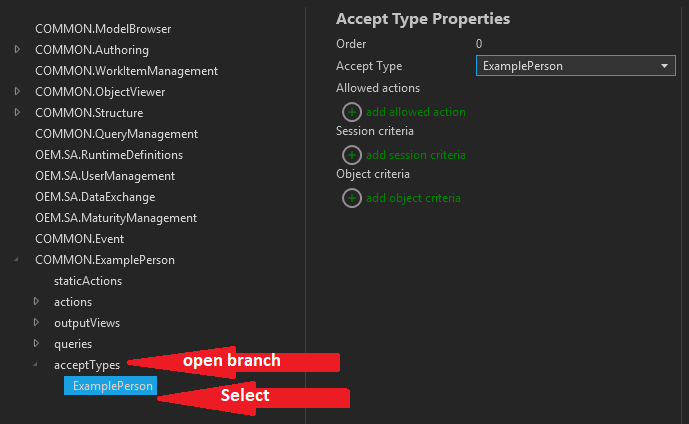
Open the "acceptTypes" branch and then select your newly created type and fill in the fields as shown below:
Save your work
It is a good idea to save your work regularly. Click on "Verify" and then "Save and Verify".

At this point, there should be NO errors appearing in the error list. If you have "errors" then try to fix them or get someone to help you to fix the errors.
Space
This example is finished now but we need to see the result of all our work by creating a space with our new template and seeing our SoftType and all it's views
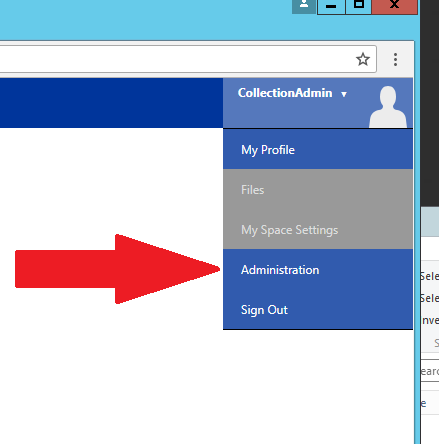
You will first need to log into a Nova website with CollectionAdmin rights.

Select in the menu "Administration"
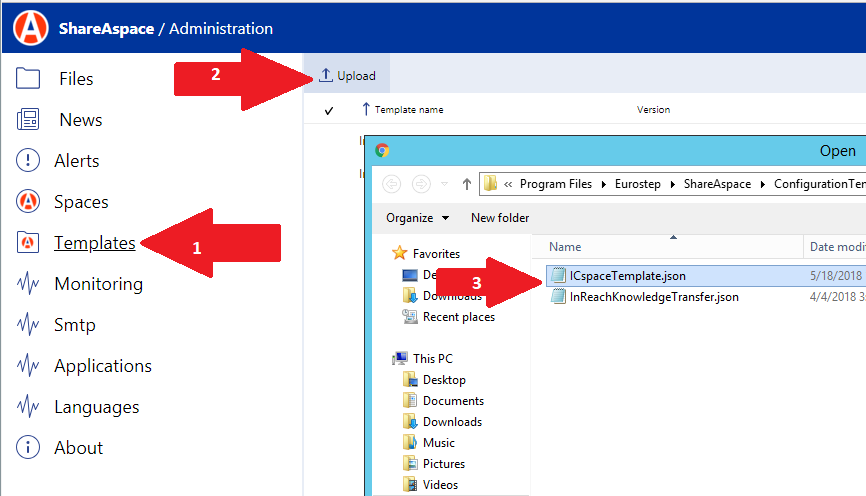
- Select Templates
- Hit "Upload"
- Select the template that you have just created
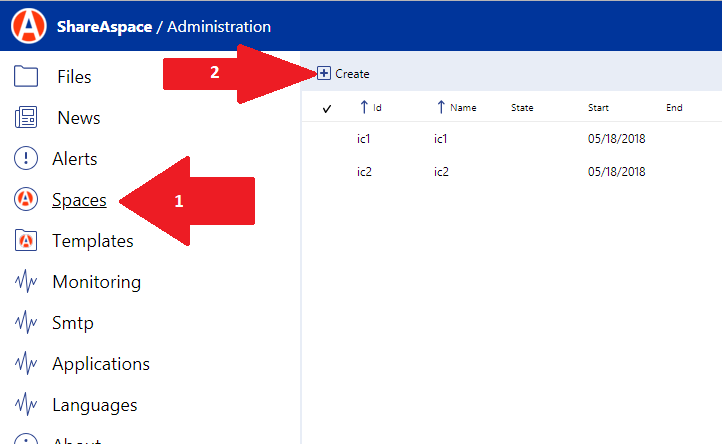
- Select "Spaces"
- Hit "Create"
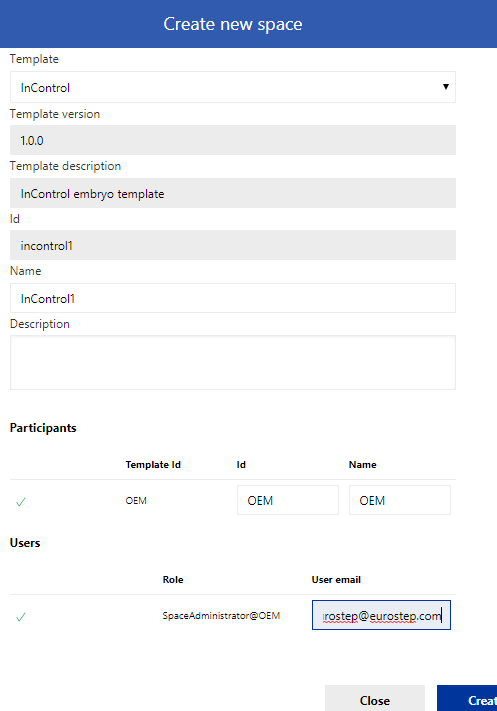
Your dialog may or may not look at all like the following. You need to perhaps get help with filling in this properly from someone familiar with this nova web site and your template.
After you create the space, you must logout and then log in again

Select the space that you just created
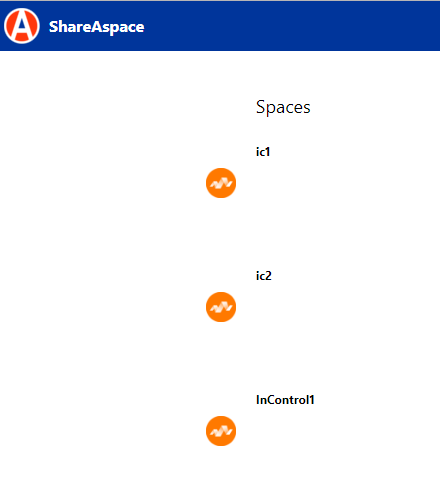
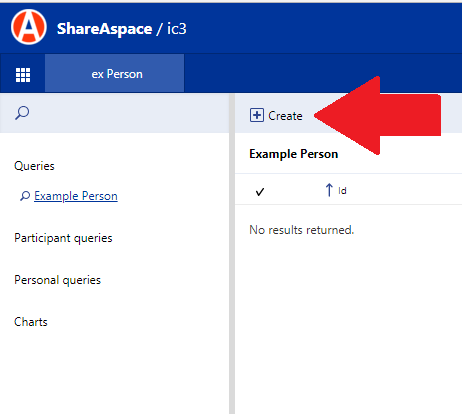
You will get to the main menu. Since we did not specify an icon for our "ExamplePerson" menu in the "client" section we have no icon. However, we have the text "ex Person" you can click on to get to the main screen.

Hit the "create" button in order to create your ExamplePerson
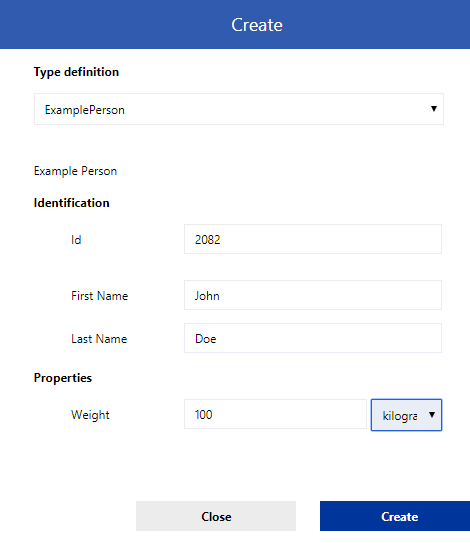
Fill in appropriate values in your "Create" view
Hit the query "Example Person" in the far left in order to see your newly created person. Click on that person and then in the far left column you will see your "read" view.
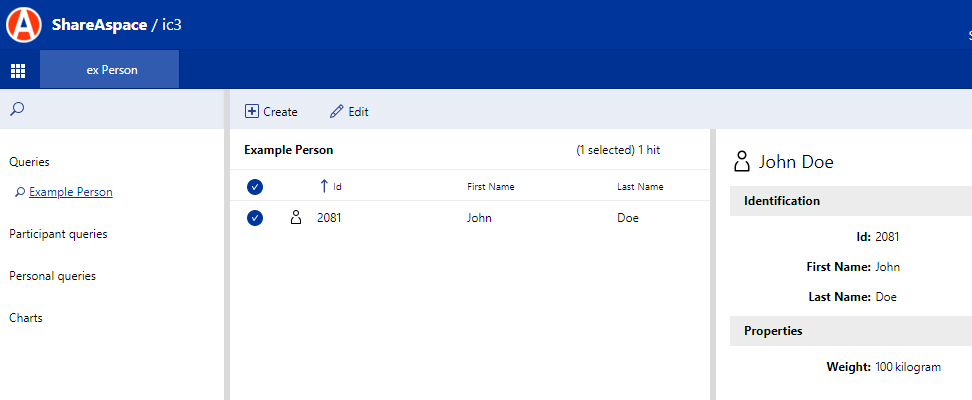
Hit the "edit" button in order to see your "edit" view.
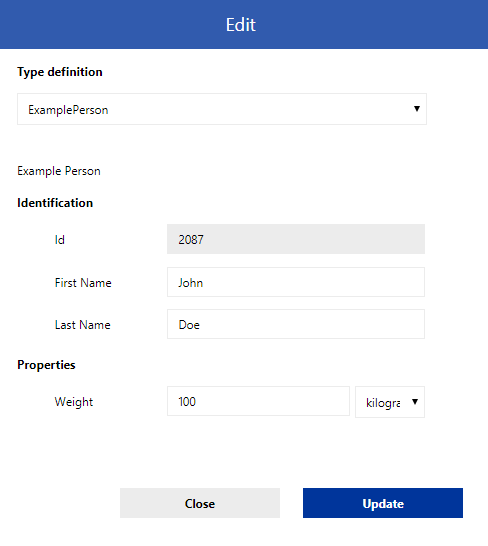
Congratulations! You are finished creating your first SoftType.