Configuration
SoftType
This section of the documentation will look at the details of SoftType configurations. It is expected that the reader is familiar with the SoftType Concepts described in the Concept Documentation before reading this section. It is also recommended that the reader is familiar with the ShareAspace Model and its concepts to fully understand the concepts described in this article.
Introduction
Maybe the most powerful and definitely largest part of the Space Template is the SoftType section. This article will describe the different areas of a SoftType configuration from start to finish.
Most Space Templates will always have a set of SoftTypes that are required in order to setup the other SoftTypes. These are:
- ApplicationContext
- GeneralClass
- LevelState
- Organization
- Person
- SpaceProfile
- Property
- Unit
- Role
- Participant
- OriginatingSystem
- DX Queue, DX Job, DX Installed Tasks
It is possible to extend some of these required SoftTypes.
SoftType definition
The recommended way to create a SoftType is to copy an existing SoftType. To get to the SoftType window, hit 'project' and then hit 'SoftTypes'. Select the SoftType you want to copy and then hit the 'Copy' button and give a unique id for your new SoftType.

Alternatively you can hit the 'add' button and create a SoftType from scratch.

When you create a SoftType with the 'add' button you must give a unique id for your SoftType and choose which PLM type (a Unit of Information) your SoftType will be based on. In this case it is chosen as 'Part'

In the JSON of the template, the a SoftType will look like the following:
{
	"$id": "SoftTypeId",
	"definition": {
    "$defaultOutputSchemaRef": "idOfDefaultInputSchema",
    "$defaultInputSchemaRef": "idOfDefaultOutputSchema",
    "settings": {...},
		"data": {...},
		"inputSchemas": [...],
		"outputSchemas": [...],
		"views": [...],
		"maturitySystems": [...]
	},
    "instances": [...]
}
A SoftType must always have an identifier specified on the $id property. It must also
have a definition set on the definition property. The instances property is optional.
Data section
The data section is used to define an instantiation template for the SoftType. This instantiation template uses the ShareAspace Nova Model, both the application section of the model as well as the PLM section of the model.
Starting point
In the config tool example below we define the data section for the PLM object Part by hitting the sequence project/SoftTypes/Part/DATA

In the JSON of the template, the section that contains the data looks like the following:
{
  "data": {
    "$type": "Part",
    ...
  }
}
The data section starts with the $type attribute. The value of this attribute is a
reference to an entity name in the ShareAspace Nova Model.
Connection port
A Connection Port is used to define a place in the data section that is available for other SoftTypes to reference to. That is, when a SoftType "B" is to be referred to from the data section of a SoftType "A", SoftType "A" will use the value of one of the Connection Ports of SoftType "B".
- A Connection Port can be defined on any of the Model entities defined within the data section.
- The connection port is defined using the
$connectionattribute. - The value of the
$connectionattribute must be unique within the whole data section of a SoftType.
In the config tool you create a $connection by hitting the 'add connection port'

and then enter the oid

{
  "data": {
    "$type": "Part",
    "$connection": "partConnection",
    ...
  }
}
Containment rules
The ShareAspace Model has many rules stating the cardinality of containments. When defining a SoftType these rules cannot be broken, however it is possible to make the rules stricter within a SoftType.
To set a new cardinality of a containment, the $rules attribute is added to the containment
(represented as a JArray within the data section).
The ShareAspace Model defines that a Part can have zero to many names. The names of a Part
are contained on the names attribute. In the example below the ShareAspace Model rules are
further restricted stating that this SoftType can have one or no name set.
To add a name to a SoftType with the config tool you select the root of the SoftType, in this case part, and then hit the 'names' on the right hand side:

Then you select the newly created 'names' array and then on the right hand side hit the 'name' button:

In the config tool you create a $rules by first selecting your newly created 'name' object and then hitting the 'add rule' button:

And then enter the lower and upper limits to the object:

In the JSON of the template it will look like the following:
{
  "data": {
    "$type": "Part",
    "$connection": "partConnection",
    "names": [
      {
        "$type": "Name",
        "$rules": [
          {
            "lower": "0",
            "upper": "1"
          }
        ],
        ...
      }
    ],
    ...
  }
}
Value port
A Value Port is used to define a place in the data section from where to read data from a SoftType instance and/or a place to input data when creating and/or updating a Soft Type. Some values are "read only" and can therefore not take input values.
To define a Value Port the $port attribute is used. A value port is defined by a JSON
object.
In the config tool you create a Value Port by hitting the 'add value port' button

Port id
To define an exposed port, the port object value must contain the id attribute. The value
of the id attribute will then be available for:
- Input Schemas
- Output Schemas
- Index Definitions
- Structure Definitions
- SoftType Settings
Continuing with the Part example and the definition for the Name of our SoftTyped Part,
the Model entity Name has a string attribute named text. If this value is to be made
available in read/create/update operations (using the Input and Output Schemas) and available
in other configuration areas a Value Port must be defined. In this example the Value Port is
defined for the text attribute using the $port construct. The Value Port is given an
identifier using the id attribute. The value of this identifier is set to name
thus the port will be available using name as the reference.
To accomplish this in the config tool select the 'text' object in the tree and then hit the "add value port" and then enter only the id of 'name'

In the JSON of the template it looks like the following:
{
  "data": {
    "$type": "Part",
    "$connection": "partConnection",
    "names": [
      {
        "$type": "Name",
        "$rules": [
          {
            "lower": "0",
            "upper": "1"
          }
        ],
        "text": {
          "$type": "String",
          "$port": {
              "id": "name",
              "$type": "Value"
            }
        },
        ...
      }
    ],
    ...
  }
}
Some values are read only, like the meta data found on all ShareAspace Model entities. When defining a Value Port for such a value, that value can only be read. Also, it is not possible to define any port rules or set any default values.
In the example below a Value Port is defined for the Created Date metadata found on all
ShareAspace Model entities. The Created Date can be found on the attribute created.
The created attribute is of Model type DateTime, thus the $type value is set to
DateTime. The created attribute is then given a Value Port using the $port attribute.
The Value Port is then given an identifier using the id attribute thus the port is available
using masterCreationDate reference.
In the config tool you need to add the object 'created' to the root of the SoftType you are working with by first selecting the root of the SoftType, in this case part, and then hitting 'created'

Then you need to select your newly created object 'created' in the tree and then hit the 'add value port' and enter the id only

In the JSON of the template it will look like the following:
{
  "data": {
    "$type": "Part",
    "$connection": "partConnection",
    "created": {
      "$type": "DateTime",
      "$port": {
        "id": "masterCreationDate",
        "$type": "Value"
      }
    },
    ...
  }
}
Default port value
There is no requirement to always expose ports outside of a SoftType. In some cases one
might also want to define a value to be used all the time. This can be achieved by not
giving a $port and identifier. That makes the Port Value "internal". Do set a constant
value to a Value Port. This is done by setting the default value to the value attribute
of the Value Port.
In the example below, the role attribute of the Name entity is set to DEFAULT_NAME.
To set the role with the config tool, first select the 'Name' object in the tree and then hit the 'role' in the right hand list.

Then select the newly created 'role' object you just added and hit the 'add value port" button

Lastly, enter the value 'DEFAULT_NAME' into the 'value' field.
Note
In this case you should leave the 'id' field blank because this is a constant value so there should be no need access this value by way of the 'id' field

In the JSON of the template it will look like the following:
{
  "data": {
    "$type": "Part",
    "$connection": "partConnection",
    "names": [
      {
        "$type": "Name",
        "$rules": [
          {
            "lower": "0",
            "upper": "1"
          }
        ],
        "text": {
          "$type": "String",
          "$port": { "id": "name" }
        },
        "role": {
          "$type": "String",
          "$port": {
            "value": "DEFAULT_NAME",
            "$type": "Value"
          }
        }
        ...
    ],
    ...
  }
}
Group port
In many cases Value Ports one might want to group Value Ports together to show that a set
of Port Values are required to be able to instantiate Model entities. When grouping Port Values
defined on one entity, all Port Values found under that entity will be grouped. To add a group
to an entity the $groupBy attribute is used. The value of this attribute will be the identifier
for the group. This identifier will then be used when referencing the Group Port in Schemas and
in other definitions.
Note
When using Group Ports the identifiers of Value Ports id will only have to be unique within the defined group.
Note
The Group Port is further explained in the other sections later on in this article.
In the example below a group author is defined for a PersonOrganizationReference entity. The
reason for this is to group the effectivity start and end dates together with the referenced
Person.
Person organization reference
To achieve this in the Config Tool we must first add the personOrganizationReferences and then the personOrganizationReference.
Select your root object which in this case is 'Part'. Then on the right hand side hit "personOrganizationReferences"

Select the newly created object "personOrganizationReferences" in the tree and on the right hand side hit "personOrganizationReference"

Group by
Add the groupBy 'author':
- Select your newly created personOrganizationReference in the tree.
- Hit the 'add group port' button

Then in the 'Group By' field, enter 'author'

Dated effectivity assignment
Complete the 'datedEffectivityAssignment'
- Fully expand the personOrganizationReference branch of the tree and select datedEffectivityAssignment in the tree
- On the right hand side, hit the 'endDefinition'
- On the right hand side, hit the 'role'
- On the right hand side, hit the 'startDefinition'

- Expand the datedEffectivityAssignment in the tree and select 'endDefinition' in the tree
- Hit the 'add value port' button

Enter 'end' as the 'Id'

- Select 'role' in the tree
- Hit the 'add value port' button

Enter 'Actual' as the 'Value'.
Note
This is a constant value so it is entered in the 'Value' field. Since we don't need to access this constant value in Nova we can leave the 'id' field blank.

- Select 'startDefinition in the tree
- Hit the 'add value port' button

Enter 'start' as the 'Id'

JSON result
In the JSON of the template it will look like the following:
{
  "personOrganizationReferences": [
    {
      "$type": "PersonOrganizationReference",
      "$groupBy": "author",
      "$rules": [
        {
          "lower": "0",
          "upper": "1"
        }
      ],
      "role": {
        "$type": "String",
        "$port": {
          "value": "AUTHOR",
          "$type": "Value"
        }
      },
      "datedEffectivityAssignment": {
        "$type": "DatedEffectivityAssignment",
        "startDefinition": {
          "$type": "DateTime",
          "$port": {
            "id": "start",
            "$type": "Value"
          }
        },
        "endDefinition": {
          "$type": "DateTime",
          "$port": {
            "id": "end",
            "$type": "Value"
          }
        },
        "role": {
          "$type": "String",
          "$port": {
            "value": "Actual",
            "$type": "Value"
          }
        }
      },
      "assignedPersonOrganization": {
        "$port": {
          ...
        }
      }
    }
  ]
}
SoftType reference port
So far we have looked at Value Ports for simple types such as strings but a Value Port can be set for all SoftTypeable Model entities. A SoftType can be defined to reference other SoftTypes, both defined instances of a SoftType as well as SoftTypes on a definitional level.
To define what SoftType should be allowed on a Value Port the softTypeId and connection
attributes are used on the Value Port.
softTypeId- The id of the SoftType to allowconnection- The reference to the Connection Port defined on the other SoftType. This connection port must be placed on the Model entity that is allowed for the reference according to the ShareAspace Model.
The example below shows a data definition for a PersonOrganizationReference. The
PersonOrganizationReference has an attribute assignedPersonOrganization, this attribute
can, according to the ShareAspace Model, be set to instances of model entities implementing
the PersonOrganizationSelect. Both the entities Organization and Person implements this
interface. In the example we have however restricted the use to only allow Person since the
referenced SoftType is a SoftType of Person.
To achieve this in the config tool:
- Fully expand the "personOrganizationReference" object in the tree and then select the "assignedPersonOrganization" in the tree.
- Select 'Person' in the Drop Down ListBox at the top of the screen. This is a Person PLM object and not a SoftType.
- Hit the 'add SoftType reference port' button

- Enter 'person' as the Id for this port.
- Click the
add referencebutton - Select 'Person' as the 'SoftType'. This person you have selected is an actual existing "SoftType" defined in your template.
- From the 'connection' drop down list box select 'oid' as the connection port.

Now in the JSON in the template it will look like the following:
{
  "personOrganizationReferences": [
    {
      "$type": "PersonOrganizationReference",
      "$groupBy": "author",
      "$rules": [
        {
          "lower": "0",
          "upper": "1"
        }
      ],
      "role": {
        "$type": "String",
        "$port": {
          "$type": "Value",
          "value": "AUTHOR"
        }
      },
      "assignedPersonOrganization": {
        "$type": "Person",
        "$port": {
          "id": "person",
          "$type": "SoftTypeReference",
          "softTypeRef": [
            {
              "softTypeId": "Person",
              "connection": "oid"
            }
          ]
        }
      },
      "datedEffectivityAssignment": {
        "$type": "DatedEffectivityAssignment",
        "startDefinition": {
          "$type": "DateTime",
          "$port": {
            "$type": "Value",
            "id": "start"
          }
        },
        "endDefinition": {
          "$type": "DateTime",
          "$port": {
            "$type": "Value",
            "id": "end"
          }
        },
        "role": {
          "$type": "String",
          "$port": {
            "$type": "Value",
            "value": "Actual"
          }
        }
      }
    }
  ]
}
Note
Not that the schema for representing a SoftType reference has been changed in 1.6. In previous versions (up till version 1.5) the reference could only be to one specified SoftType. From 1.6 it is possible to define a set of possible SoftTypes.
With the new approach it is possible to select the interface for the reference. In the
example below we have selected the PersonOrganizationSelect and configured the reference
to be able to reference SoftTypes of the base types Person and Organization. The
port id will be the same for both, i.e. value in the example below.
{
  "assignedPersonOrganization": {
    "$type": "PersonOrganizationSelect",
    "$port": {
      "id": "value",
      "$type": "SoftTypeReference",
      "softTypeRef": [
        {
          "softTypeId": "Person",
          "connection": "oid"
        },
        {
          "softTypeId": "Organization",
          "connection": "oid"
        }
      ]
    }
  }
}
To add multiple reference types:
- Select and interface supporting multiple types, in this example
PersonOrganizationSelect. - Add additional references by clicking the
add referencebutton.

SoftType instance reference port
When defining a SoftType it is possible to also define instances of that SoftType to be created when a Space is launched (more on this in the Instances section).
Continuing with the Name example from earlier, we have now also added the context
Organization to be used as the context for the Name. We could have defined a group
for the Name entity and had the text string value grouped with the input/output of an
Organization SoftType, but say we want the Organization context to always be set to a
specific value. We have already seen how this is done for string values on the role
attribute.
To set a SoftType instance as the defined value we use the instanceRef attribute. Where
the value of this attribute is the defined identifier for an instance of a Organization
SoftType.
SoftType Instance Reference ports can also use the, in this case, optional id property.
This can be set if the value should be read from an output schema.
To achieve this in the config tool
- Select 'Name' in the tree
- Hit 'context' in the right hand side list.

- Select the newly added 'context' in the tree
- Hit 'add SoftType instance reference port'

- Select 'Identifying Context' as 'SoftType'
- Select 'oid' as 'Connection'
- Select 'OEM' as 'Instance Reference'
Note
This is a constant value, it is not required to fill the 'Id' field since we do not need to fetch this value at runtime. It is however possible to provide an identifier for the port. This would allow for the configured instance to be overwritten.

The JSON in the template file will then look like the following:
{
  "data": {
    "$type": "Part",
    "$connection": "partConnection",
    "names": [
      {
        "$type": "Name",
        "$rules": [
          {
            "lower": "0",
            "upper": "1"
          }
        ],
        "text": {
          "$type": "String",
          "$port": {
            "$type": "Value",
            "id": "name"
          }
        },
        "role": {
          "$type": "String",
          "$port": {
            "$type": "Value",
            "value": "DEFAULT_NAME"
          }
        },
        "context": {
          "$type": "IdentifyingContext",
          "$port": {
            "$type": "SoftTypeInstanceReference",
            "softTypeRef": [
              {
                "softTypeId": "IdentifyingContext",
                "instanceRef": "OEM",
                "connection": "oid"
              }
            ]
          }
        }
      }
    ]
  }
}
Port rules
It is possible to create rules for Value Ports. Depending on the type of the value there
are different sets of rules available. Rules are defined in a JArray on the optional
$rules attribute of a Value Port.
String rules
maxLenght- defines the maximum number of characters in a stringminLenght- defines the minimum number of characters in a stringallowedValues- defines aJArrayof allowed string values
String rule example
In the example below the Value Port identified as name defined for the string attribute
text is given a rule stating that the maximum amount of characters on the name string
can be 200 characters.
To achieve this in the config tool,
- Select 'text' in the tree under the 'Name' object
- Hit the bottom 'add rule' button.
Note
There are 2 different 'add rule' buttons and you need to hit the bottom one.

Enter in the 'Max Length' field the value of 200

In the JSON of the template it would look like the following:
{
  "text": {
    "$type": "String",
    "$port": {
      "id": "name",
      "$type": "Value",
      "$rules": [
        {
          "maxLength": 200
        }
      ]
    }
  }
}
Numerical rules
minimum- defines the minimum value of a numeric valuemaximum- defines the maximum value of a numeric valueallowedValues- defines aJArrayof allowed numeric values
This can be seen in the Config Tool when you select a numerical item in the tree. For instance:
- In the propertyValueAssignment where it represents a 'real' value, select the 'value' field in the tree.
- Hit the bottom 'add rule' button.
Note
There are 2 different 'add rule' buttons and you need to hit the bottom one.

Enter the desired minimum and maximum values

Allowed instances
Allowed Instances can be used for Value Ports referring to other SoftTypes. Just like a
specific SoftType instance can be set as a fixed value the Allowed Instances will define
a JArray of strings on the rule attribute allowedInstances. Each string is an identifier
of an instantiated SoftType.
Allowed Instances Example
In the config tool you can achieve this by first creating the desired GeneralClass instances that we will be using:
- Select 'GeneralClass' in the 'SoftTypes' list
- Select the 'INSTANCES' group of settings for the 'GeneralClass'
- Hit 'add instance' 3 times since we will need 3 instances.

The result will look like the following. Select the first instance you just created and then add an Id and the following json object in the box.

Do the same thing with the second and third instance so that in the end you will have a TypeA, TypeB and TypeC

Now you can go back to the 'Part' SoftType that we will be adding a ClassificationReference to by hitting the sequence project/SoftTypes/Part/DATA
- Select the root of the data tree which is in this case 'Part'
- Hit the 'classificationreferences' button on the right hand list

- Select your newly created classificationreferences object
- Hit the 'classificationreference' button on the right hand list

Fill in the datedEffectivityAssignment as shown in the previous section 'Dated Effectivity Assignment'

- Fully open the classificationreference object in the tree and select 'referencedClass'
- Hit the 'add SoftType reference port' button

- Fill in the 'Id, 'SoftType', and 'Connection' as shown in the picture
- Hit the bottom 'add rule' button.
Note
There are 2 different 'add rule' buttons and you need to hit the bottom one.

Hit the 'add instance' button 3 times

In each of the instances that you just added you need to select one of the instances TypeA, TypeB or TypeC so that your result looks as in the following picture.

In the JSON of the template it would look like the following
{
  "classificationReferences": [
    {
      "$type": "ClassificationReference",
      ...
      "referencedClass": {
        "$type": "GeneralClass",
        "$port": {
          "id": "class",
          "softTypeId": "GeneralClass",
          "connection": "oid",
          "$rules": [
            {
              "allowedInstances": [
                "TypeA",
                "TypeB",
                "TypeC"
              ]
            }
          ]
        }
      }
    }
  ]
}
Schemas
When a data section is defined for a SoftType it is possible to configure Input and Output schemas. It is possible to have multiple Input Schemas as well as multiple Output Schemas. The schemas has the possibility to expose the groups and ports defined in the data section.
Both Input and Output Schemas has an identifier $id and a definition.
It looks like the following in the JSON of the template.
{
  "$id": "defaultIn",
  "definition": {
    ...
    }
}
The definition section is defined using JSON Schema.
Input schemas
Input Schemas are used to define the REST API contracts for creating and updating a SoftType (POST and PUT in RESTful terms).
Note
An Input Schema to be used when creating a SoftType must expose all the groups and ports that are required according to the ShareAspace Model and the data section configuration. If not the server validation will fail, and no SoftType Instance will be created.
Simple value ports
The Port identifiers defined in the data section will be acting as the attribute names of the SoftType JSON object schema.
Port example
The JSON Schema defines a set of attributes for the JObject that makes up the input for our
SoftType. Since we have a port identified as name, that identifier will be defined as a
property in the JSON Schema (provided that we want to expose it).
In the config tool
- Select 'project'
- Select 'SoftTypeS'
- Select the SoftType you are interested in. In this example we take 'Part'
- Select 'INPUT SCHEMAS'
- Expand the 'defaultIn' tree
- Select the item 'name'

In the JSON of the template it would look something like the following:
{
  "$id": "defaultIn",
  "definition": {
    "type": "object",
    "properties": {
      ...
      "name": {
        "type": "string"
      },
      ...
    }
  }
}
Rules
Since the Input schemas are using JSON Schemas for their definitions it is possible and recommended to use the rules provided by JSON Schemas. This will help the client validation when using the ShareAspace Web Application. It could also help any custom clients wanting to do a validation before sending data to the ShareAspace REST API. The ShareAspace REST API will also validate the input using the defined schemas.
Note
It is important to know that these rules are only a help for the clients consuming the API. The rules setup in the data section will always be "the final" rules. I.e. you cannot break the ShareAspace Model rules or the rules defined in the data section. If you do the API will return an error code to the client, and no SoftType will be created.
Required property example
In the config tool you need to do the following to make a property 'Required':
Check the 'Required' checkbox

In the JSON of the template it would look something like the following:
{
  "$id": "defaultIn",
  "definition": {
    "type": "object",
    "properties": {
      ...
      "name": {
        "type": "string"
      },
      ...
      "required": [
        "id",
        "name"
      ]
      ...
    }
  }
}
Allowed values example
For allowed values one can use the enum property in the JSON Schema. When the Allowed Values
enum is combined with the allowed SoftType instances (like in the example below) it is
important that the strings match the identifiers as they are defined in the data section.
The enum property is added automatically by the config tool to the 'InputSchema' when you define the allowed values in the "Data" section as shown in the previous section 'Allowed Instances Example'
In the JSON of the InputSchema of the template it will appear as the following enum:
{
  "$id": "defaultIn",
  "definition": {
    "type": "object",
    "properties": {
      "typeClass": {
        "type": "object",
        "properties": {
          "start": {
            "type": "string",
            "format": "date-time",
          },
          "end": {
            "type": "string",
            "format": "date-time",
          },
          "class": {
            "type": "string",
            "enum": [
              "TypeA",
              "TypeB",
              "TypeC"
            ]
          }
        }
      }
    }
  }
}
Groups
Groups will be exposed in one of two ways depending on the configured cardinality of the entity.
If the cardinality is defined as "zero to one" or "one to one" the group should be defined as
an object. If the cardinality is defined as "zero/one to many" or
"zero/one to [number larger than 1]" the group should be defined as an array of objects. The
group identifier will be the property name of the JObject making up the SoftType and the Ports
defined within a group will make up the available set of properties for the JObject on the group
named property (or the JObjects within the JArray on that property)
Group example - object
In the SoftType Reference Port section we used PersonOrganizationReference as
an example for the data section. In the rules section of that entity for the group author we
stated that we could have "zero to one" reference to the Person SoftType. Because of this the
group property will be of type object. That object can then use the defined ports within that
group (i.e. start, end, and person).
Since the person port is a reference to another SoftType, the person property in the JSON
Schema will be of type object.
Note
When using the API it is OK to send the whole SoftType object for a Person SoftType,
however, it is only required to send and object containing the $oid property. Read more about
this in the Output Schema section.
Note
An input schema will only create a SoftType instance for the SoftType "in question", i.e. passing a SoftType reference will require that SoftType instance to exist.
{
  "$id": "defaultIn",
  "definition": {
    "type": "object",
    "properties": {
      ...
      "author": {
        "type": "object",
        "properties": {
          "start": {
            "type": "string",
            "format": "date-time"
          },
          "end": {
            "type": "string",
            "format": "date-time"
          },
          "person": {
            "type": "object"
          }
        },
        "required": [
          "person"
        ]
      }
      ...
    }
  }
}
Group example - array
Say we change the cardinality to be "zero to many" for the author group. Then the author
property will be of type array. The object defined for the items property will then have
the ports defined for the group available.
To see this in the config tool we will go back to the SoftType Reference Port section where we created the PersonOrganizationReference with the rule
- Select the 'author' from the previous example
- Change the 'Upper' limit to '*' which means unlimited.

Then go to the input schema and DELETE the 'author' from the defaultIn schema if it already exists there.
- Select 'INPUT SCHEMAS'
- Select 'defaultIn->Definition'
- Hit 'author' on the right hand side

- Select the newly added 'author' object in the tree
- Note the type is now 'array'

In the JSON of the template it would look something like the following:
{
  "$id": "defaultIn",
  "definition": {
    "type": "object",
    "properties": {
      "author": {
        "type": "array",
        "items": {
          "type": "object",
          "properties": {
            "start": {
              "type": "string",
              "format": "date-time"
            },
            "end": {
              "type": "string",
              "format": "date-time"
            },
            "value": {
              "type": "object"
            }
          },
          "required": [
            "value"
          ]
        }
      }
    }
  }
}
Output schemas
Output Schemas are used to define the REST API contract for reading a SoftType (GET in RESTful terms). Just like Input Schemas they are defined using JSON Schema. In many cases it will be a good practice to have the Input Schemas and Output Schemas in pairs, especially for edit scenarios.
The ports from the data section are used exactly like in the input schemas with some differences. First, it is not necessary for an Output Schema to define any rules. The second difference is that Output Schemas extend the "normal" JSON Schema with two ShareAspace specific things (see the Output Resolve sample).
Output schema example
Come to the 'Output Schemas' in the config tool with the following technique:
- Select 'project'
- Select 'SoftTypes'
- Select the SoftType you are interested in
- Select 'Output Schemas'

In the JSON of the template the output schema looks something like the following.
Note
In this example we have gone back to 'author' being defined as an 'object' and not as an 'array'
{
  "$id": "defaultOut",
  "definition": {
    "type": "object",
    "properties": {
      ...
      "author": {
        "type": "object",
        "properties": {
          "start": {
            "type": "string",
            "format": "date-time"
          },
          "end": {
            "type": "string",
            "format": "date-time"
          },
          "person": {
            "type": "object"
          }
        }
      }
      ...
    }
  }
}
By using the standard JSON Schema, like the example above, for describing the SoftType Output;
the defined object type for the person property will return a light weight JSON object
containing the database id $oid for the referenced object as well as the SoftType Id $softType
of that object.
Output JObject example
An example of a RESTful API call to get this OutputSchema, the 'author' would look like the following.
{
  ...
  "author": {
    "start": "2009-02-15T00:00:00Z",
    "person": {
      "$oid": "000000000000000000000000",
      "$softType": "Person"
    }
  },
  ...
}
Object resolve
By specifying that the referenced object should be resolved it is possible to get the referenced SoftType loaded according to a given Output Schema (note that this Output Schema will be one defined for the referenced SoftType).
$outputSchemaRef- a string with the id of an Output Schema defined on the referenced SoftType.$resolve- if set totruethe referenced SoftType will be loaded according to the defined schema.
Output schema with resolve example
In the config tool we can specify the $resolve functionality by the following:
If your author is not in output schema, then you need to select the 'definition' object in the tree and add 'author' to the tree. Then
- Select 'author' in the tree
- Add all the items on the right hand side to the 'author' object.

- Expand your newly added 'author' object in the tree.
- Select the 'person' object in the tree
- Check the 'Resolve' checkbox
- Select the 'defaultOut' for the 'OutputSchema'

The JSON of the template will look something like the following:
{
  "$id": "defaultOut",
  "definition": {
    "type": "object",
    "properties": {
      ...
      "author": {
        "type": "object",
        "properties": {
          "start": {
            "type": "string",
            "format": "date-time"
          },
          "end": {
            "type": "string",
            "format": "date-time"
          },
          "person": {
            "type": "object",
            "$outputSchemaRef": "defaultOut",
            "$resolve": true
          }
        }
      }
      ...
    }
  }
}
Output JObject example
An example of a RESTful API call to get this OutputSchema, the 'author' would look like the following because 'Resolve' was required, the entire object is returned and not just the reference.
{
  ...
  "author": {
    "start": "2009-02-15T00:00:00Z",
    "person": {
      "$oid": "000000000000000000000000",
      "softTypeId": "Person",
      "id": "jde",
      "name": "John Doe"
    }
  },
  ...
}
Settings
The Settings section of the SoftType Definition is used to define the presentation of a SoftType. This section is optional but required if the SoftTypes are to be displayed in the ShareAspace Web Application.
In the Settings section it is possible to define User Interface icons to be used when presenting the SoftTypes. In the section it is also possible to define presentation labels to be used by a User Interface to represent the different exposed ports.
Get to to the settings in the Config tool by the following.
- Select 'project'
- Select 'SoftTypes'
- Select the SoftType that you are interested in.
- Select 'SETTINGS'

In the JSON of the template the settings looks something like the following
{
  ...
  "definition": {
    ...
    "settings": {
      "icons": [...],
      "presentations": [...]
    },
    ...
  }
}
Icons
The icons section is an array of icon definition objects. The icon definition object has the following properties.
iconType- a string describing the type of icon. The ShareAspace Web application will use the ones where the value is set todefault.size- Three possible values,small,medium, andlarge. Should match the.svgdesigned to be "pixel perfect" for the12x12,16x16, and24x24sizes.relativePath- the path to the icon (known by the API). Icons are stored in the ShareAspace Host, not on the Web Server. This relative path is in the Collection unmanaged file section and you can add custom icons there as well.
Icons configuration example
In the config tool the icons are set as shown below

In the JSON of the template the icons look something like the following
{
  ...
  "settings": {
    "icons": [
      {
        "iconType": "default",
        "size": "small",
        "relativePath": "SoftType/document_12.svg"
      },
      {
        "iconType": "default",
        "size": "medium",
        "relativePath": "SoftType/document_16.svg"
      },
      {
        "iconType": "default",
        "size": "large",
        "relativePath": "SoftType/document_text_24.svg"
      }
    ],
    ...
  }
  ...
}
Presentation
The presentation section is an array of presentation definition objects. Each presentation object consist of the following properties.
name- The name of the SoftType that is displayed to the user in the web interface.description- The description of the SoftType that is displayed to the user in the web interface.languageCode- Language Code for which this object is valid for.labels- an array of label definitionsdocumentationRef- a link to a web page for help about this SoftType. This is not required.defaultString- a default string presentation for the SoftTypedefaultTable- an object containing an array of column definitions defining how multiple instances of the SoftType should be displayed as a table.
Full presentation example
In the config tool the Presentation looks like the following:

Go to the Label Handling in SoftTypes section to see a detailed description of how to make labels in the presentation settings.
In the JSON of the template the presentation will look something like the following
{
  ...
  "settings": {
    ...
    "presentations": [
      {
        "name": "Project",
        "description": "Description of the project.",
        "languageCode": "en",
        "documentationRef": "/documentation/help/inreach/soft-types.html#project",
        "labels": [
        {
          "key": "id",
          "value": "Id"
        },
        {
          "key": "name",
          "value": "Name"
        }
        ],
        "defaultString": "Identifier: {id} Name: {name}",
        "defaultTable": {
          "columns": [
            {
              "$selectId": "softType",
              "format": "softType-icon",
              "displayName": ""
            },
            {
              "format": "string",
              "width": 200,
              "displayName": "Id",
              "$selectId": "id",
              "link": false
            },
            {
              "format": "string",
              "width": 200,
              "displayName": "Name",
              "$selectId": "name",
              "link": true
            }
          ]
        }
      }
    ]
  },
  ...
}
Views
As described in the concept section the views are used to define the user interface for
the SoftType. A view has an id, a label, a combination of $inputSchemaRef and
$outputSchemaRef depending on the type of view.
There are four types of views when using the ShareAspace Web Framework.
- read - View for displaying a SoftType, requires the
$outputSchemaRefto be set to enable output binding - create - Used to define a create form for a SoftType. The
$inputSchemaRefmust be set - edit - Used to define an edit form for a SoftType both the
$inputSchemaRefand the$outputSchemaRefmust be set - editStructure - Used to define the form for editing a SoftType structure, a SoftType can have multiple edit structure views (different Ids are required)
- copy - Used to define the form for creating a copy of an existing SoftType. Requires both the
$inputSchemaRefand the$outputSchemaRefto be set. Copying can only be done within one SoftType definition. - newVersion - Used to define the form for creating a new version of an existing SoftType Master instance. Requires the
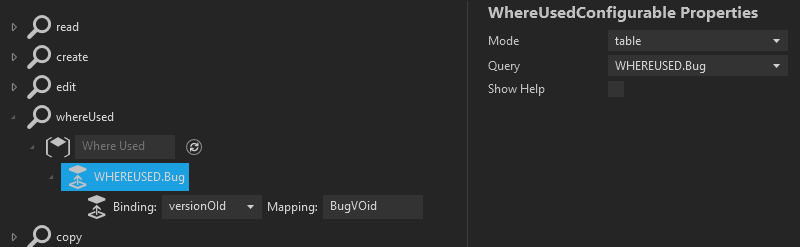
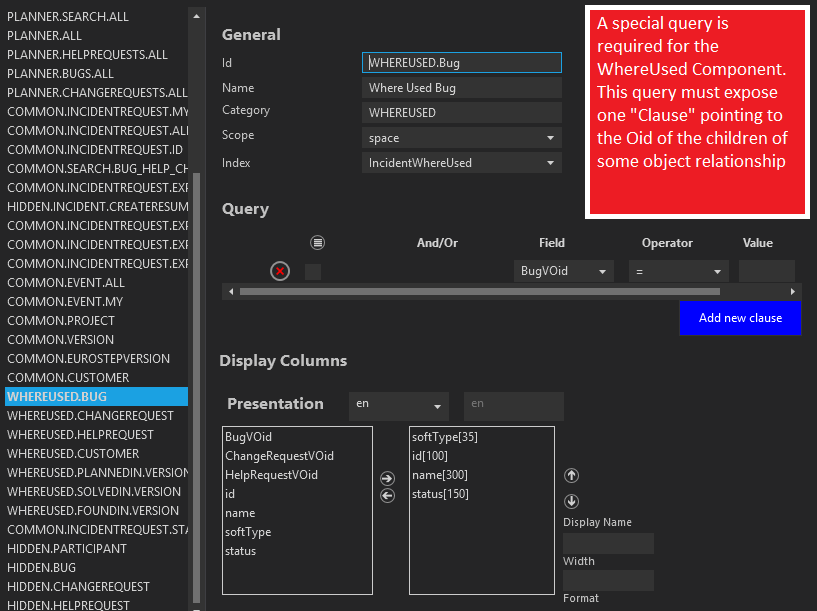
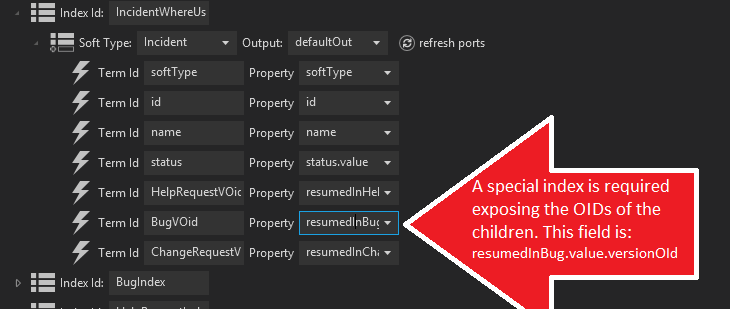
$outputSchemaRefto be set. - whereUsed - Used to define the read form for executing and displaying the result of whereUsed queries. Must have the
$outputSchemaRefset.
The views are built on a 12 column structure, this is done by using the fields.
The configuration is constructed by nesting fields. Each field can span over
multiple columns and can be of different types. The different field controls can bind to
the defined input and output schemas.
In the JSON of the template the views look like the following
  "views": [
    {
      "id": "edit",
      "label": "Edit",
      "$inputSchemaRef": "defaultIn",
      "$outputSchemaRef": "defaultIn",
      "fields": [...]
    }
  ]
To produce views in the config tool go to the view section of the SoftType definitions.

Quite often your first task would be to create a new "view". To do this hit the 'add view' button:

You will then get an empty view created.
- Add a unique Id, that is, unique among all the views already in this view. There are several suggested view names you will see here like create, read, edit, editstructure, newversion, copy, whereused.
- Add a label. This is a text that will show up to the user on the dialog that is created with your view.
- Select the appropriate input and output schemas according to the rules mentioned in the beginning of this Section.

Then the first thing you need to do is:
- select your newly created 'View'
- Hit the button 'add group'. You might later be creating several more groups but at a minimum you must have at least one group.

- select your newly created 'Group'
- Select a label for your new group. This label is created using the technique described in the Label Handling in SoftTypes section..
- You may choose to have this 'Group' Collapsible in the user interface depending on your preference. Check the 'Collapsible' checkbox if you want this functionality

Then you need to begin adding 'components' to your view.
- Select your group
- Select any of the components you see to your right. Each component has it's own set of requirements and we will not document all of them here.

Lets add perhaps the most common component, the textbox
- Select your group
- Select 'add textbox.

- Select your newly created component
- Fill in the Label, Description and binding. This label is created using the technique described in the Label Handling in SoftTypes section.. The binding is what you are binding to in your input and/or output schema

Continue to add components and groups to your view as needed. Although you have now created a view, this view is unusable until you define where the view is to be used in the Modules section..
Maturity systems
The Maturity Systems section is an array of Maturity System definitions for the SoftType. One SoftType can have multiple Maturity Systems defined. For Master-Version-Definition Unit of Informations the systems are always defined for the definitions. It is possible to have multiple Maturity Systems per definition.
Maturity system example
To add a maturity system with the config tool:
- Select project
- Select SoftTypes
- Select the SoftType you want to add the maturity system to
- Select MATURITY SYSTEMS
- Hit the 'add maturity system' button

- Select the newly created MaturitySystem called 'NEW'
- Fill in the Id, Name and Connection. You won't be able to fill in the 'start' until you have created a new 'state' so just wait for that 'start' field.
- Create your first 'state' in your maturity system by hitting the 'add state' button

Here is an example of how it could look after your last step

But you MUST be sure that there is a LevelState defined at the 'Connection' you chose in the last step. To do that:
- Select DATA
- Find the 'Connection' that you chose in your last Maturity step.
- Make sure there is a LevelState defined under this connection that you have chosen.a

Back to the maturity definition. Let's fill in the first state that we created.
- Select a state. If the state you want is not in the list you need to see the instances section on how to add more instances of LevelState.
- Select your newly created state as the Start state for your maturity system.

There are several other choices here.
- You can add approvers. These are persons who are the ones who are allowed to make the change to this state.
- You can add an 'External Validation (URI)'.
Then of course you need to add more states to complete your maturity system by hitting the 'add state' button. Such a complete system could look like the following:

The JSON of the template would look like the following
"maturitySystems": [
  {
    "$id": "fastTrackCommon",
    "name": "Fast track common",
    "connection": "generalDefinitionOid",
    "start": "New",
    "maturityStates": [
      {
        "$id": "New",
        "nextSteps": [
          {
            "$stateRef": "InReview",
            "default": true
          }
        ],
        "approver": [
          {
            "$participantRef": "OEM",
            "$roleRef": "CollectionOwner"
          }
        ]
      },
      {
        "$id": "InReview",
        "nextSteps": [
          {
            "$stateRef": "Established",
            "default": true
          }
        ],
        "approver": [
          {
            "$participantRef": "OEM",
            "$roleRef": "CollectionOwner"
          }
        ]
      },
      {
        "$id": "Established",
        "externalValidation": "http://localhost/InReachExtensions/api/EstablishValidation",
        "approver": [
          {
            "$participantRef": "OEM",
            "$roleRef": "CollectionOwner"
          }
        ]
      }
    ]
  }
]
Meta data
Each Maturity System must be given an identifier $id that is unique within the SoftType. The
name property is used for presentation when using the ShareAspace Web application.
Connection
The connection property is used to reference a connection port defined in the data section. This states for what definition the Maturity System is valid. If the object is not of "MVD-type" the connection port must be on the Unit of Information "root".
Maturity states
Each Maturity Machine has a set of defined states called Maturity State. The starting state is
defined by using the start property on the Maturity System. Each state has an identifier $id,
this identifier must match an instance identifier of a Level State. When an object enters a
defined Maturity State the matching Level State will be used to track the object status. The
freezing mechanism is defined on the Level State and not on the Maturity State within the
Maturity System.
Each Maturity State can define an approver. The approver object must refer to a Participant
and a Role. This is done by using the $participantRef and $roleRef properties. Both of these
references are references to the admin data section of the space configuration. By defining an
approver, it is required that a user approves the move in to the state. This user must have a
role matching the setup on the approver object.
A state can use the nextSteps array to define possible next steps. One of these steps must
have the default set to true. The default step will be used when using the simple promote
(i.e. the one not requiring the user to pick the next state). It is possible to have
a Maturity System with different paths defined but there need to be one path configured as default.
Maturity rules
Within the data section of the SoftType it is possible to define additional data rules in addition to the SoftType rules. These rules are defined per Maturity State within the data section. If rules are defined for a State, these rule must be fulfilled before it is possible to enter that state. On "MVD-objects" it is only possible to define state rules on things contained within a definition.
Note
State rules can never make things "less strict", i.e. the first state in a maturity system can only make things stricter than the SoftType rules, and each "later" state in a chain can only make the previous rules more strict.
The Maturity Rules can be applied to both Containment Rules and to
Port Rules. The Rules are defined like the SoftType rules but with one difference.
Each State rule must have a reference to the state for which the rule is valid. This is done
by using the state property. The value of the state property must match one of the identifiers
of the defined states.
This you can see in the config tool in the following example that a 'rule' is used to specify that you may not enter the state 'InReview' for this object until the property 'Material' is filled with a string.

In the JSON the rule could look something like the following:
"$rules": [
    {
        "lower": "0",
        "upper": "1"
    },
    {
        "state": "Released",
        "lower": "1",
        "upper": "1"
    }
],
Instances
It is possible to define instances of a SoftType in the configuration. These instances will be create during the Space initialization (or added when a running space is updated). In some of the examples.
The minimum requirement to be able to define instances is to have an Input Schema defined. But
for the system to be able to create instances it is also required that the data section has been
configured. Instances will be created using the Input Schema set as the $defaultInputSchemaRef
property on the SoftType.
Each instance is required to have
- an identifier
$iddefined. This identifier is used by other SoftTypes when referring to instances. - a data payload set on the
dataproperty. This payload is a JSON Object that meets the requirements of the Input Schema (and the data section).
Instances example - unit
There are many SoftTypes where it is common to add these instances. Namely, Unit, Property, LevelState, GeneralClass, etc..
Here we will use an example of the 'Unit' SoftType and we will add a new 'Instance' to it.
- Select project
- Select SoftTypeS
- Select 'Unit' SoftType
- Select INSTANCES
- Hit the button 'add instance'

- Select your newly created instance
- Fill in the Id and the JSON in the large box. It must be a valid JSON object in this large box.

The following is how it could look for a valid 'meter' instance of the 'Unit' SoftType.

Note
The 'JSON object' defined in the example above was very simple. This JSON object can be very complex in the case where your SoftType has a very complex data structure.
The JSON in the template could look similar to the following for the entire 'Unit' SoftType. At the bottom is the 'Instance' definition
{
  "$id": "Unit",
  "definition": {
    "$defaultOutputSchemaRef": "defaultOut",
    "$defaultInputSchemaRef": "defaultIn",
    "settings": {...}
    "data": {
      "$type": "Unit",
      "$connection": "oid",
      "origin": {
        "$type": "OriginatingSystem",
        "$port": {
          "softTypeId": "OriginatingSystem",
          "instanceRef": "ShareAspace",
          "connection": "oid"
        }
      },
      "acronym": {
        "$type": "String",
        "$port": {
          "id": "acronym",
          "$type": "Value"
        }
      }
    },
    "inputSchemas": [
      {
        "$id": "defaultIn",
        "definition": {
          "type": "object",
          "properties": {
            "acronym": {
              "type": "string"
            }
          },
          "required": [
            "acronym"
          ]
        }
      }
    ],
    "outputSchemas": [...]
  },
  "instances": [
    {
      "$id": "Pages",
      "data": {
        "acronym": "Pages"
      }
    },
    {
      "$id": "meter",
      "data": {
        "acronym": "m"
      }
    }
  ]
}
An instance can also be defined to have a specific participant as its owner. If an owner is not
set the Space will own the instance. The owner is set using the $ownerRef property. The value
of the $ownerRef refers to the $plmId of a Participant within the configuration file.
It is also possible for instances to reference other instances. This is done by using the
$softType and $instanceRef properties. Where the value of $softType is the id of a SoftType
and the value of $instanceRef is the instance id of the referred instance.
Instance example - WorkItem referring to ProjectProfile instances and having an owner set
    {
      "$id": "wi002",
      "data": {
        "id": "002",
        "title": "Setup Project Contract",
        "state": "Open",
        "requestor": {
          "$softType": "ProjectProfile",
          "$instanceRef": "OEMAdmin"
        },
        "recipient": {
          "$softType": "ProjectProfile",
          "$instanceRef": "OEMAdmin"
        },
        "referencedObject": {
          "$softType": "Contract",
          "$instanceRef": "Contract"
        },
        "message": "Setup project contract."
      },
      "$ownerRef": "OEM"
    },
Participants
This document explains how to create new participants in runtime. The ability to add a new participant at runtime greatly extends the flexibility of Nova by giving you the possibility to add new actors with new rights without major changes to the template. You may however only add a new "Sub-participant." That is, you may only add a sub-participant that is based on a participant that is predefined in the template.
Template requirements
To be able to create participants in runtime there must exist the following in the template.
- The "Participant" SoftType must exist in the template based on the Participant Object.
 2. You must have a "Participant" module defined in the "Clients" section of your template. This allows access to the participant editing menus.

Runtime definition
Refers to the Participant User Guide for more documentation on how to manage Sub Participant at runtime.
Label handling in SoftTypes
All labels must be predefined in the "Settings" section before they can be used in a SoftType. Below you see an example of an "id" label setting:

And in the JSON this "Settings" section looks like the following:
"settings": {
    "icons": [
    {
        "iconType": "default",
        "size": "small",
        "relativePath": "Images/SoftTypes/Part/part_16.svg"
    },
    {
        "iconType": "default",
        "size": "medium",
        "relativePath": "Images/SoftTypes/Part/part_16.svg"
    },
    {
        "iconType": "default",
        "size": "large",
        "relativePath": "Images/SoftTypes/Part/part_24.svg"
    }
    ],
    "presentations": [
    {
        "name": "Part",
        "description": "Description of the part.",
        "languageCode": "en",
        "documentationRef": "",
        "labels": [
        {
            "key": "id",
            "value": "Id"
        },
        {
            "key": "name",
            "value": "Name"
        },
        ...
    }
}
Then you see below where that "id" setting is used in the View

As an example, consider defining a new "id.description" setting to separate the labels for the "id" and the "id description".
First hit the "add label" button

To get an empty setting

Then fill with your new key and value.

Now go back to the view and select your new label for the description of the id.

And in the view section of the JSON, this change looks like the following:
"fields": [
    {
    "fields": [
        {
        "$schemaRef": "id",
        "type": "validation",
        "colspan": 1
        },
        {
        "$schemaRef": "id",
        "label": "id",
        "type": "label",
        "colspan": 3
        },
        {
        "$schemaRef": "id",
        "helper": "id.description",
        "disable": true,
        "type": "internalIdCounter",
        "colspan": 7
        }
    ]
    },
Note
Label configuration also applies to Group labels. This works in the same way as labels on other UI controls.
View control reference
This is meant only as a reference for all controls. Under the "Usage" where it states what "views" are recommended for the control, note that most controls can be used in any view. But, often times the controls are formatted and designed for one type of view only and that is what is written under "Usage."
id counter

Setup

Runtime result

Usage
View: Create
Description: Usually used for Id. You should do the setup as "disabled" if you only want the counter to b allowed.
textbox

Setup
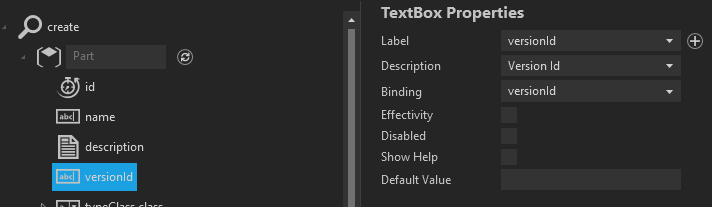
Runtime result

Usage
View: Create,Edit
Description: Most common control
textarea

Setup
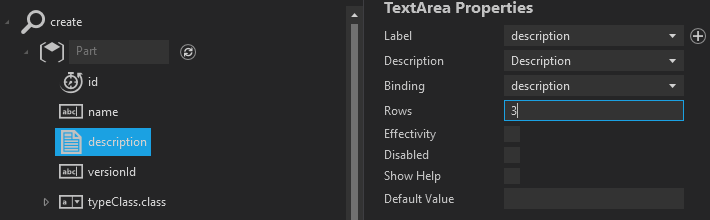
Runtime result

Usage
View: Create,Edit,Read(disabled)
Description: Several rows of text. Allows carriage returns.
datepicker

Setup
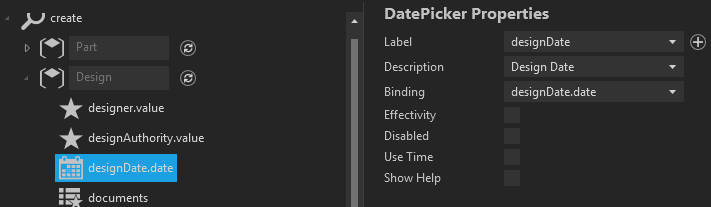
Runtime result

Usage
View: Create,Edit
Description: Select a date from a calendar
select

Setup
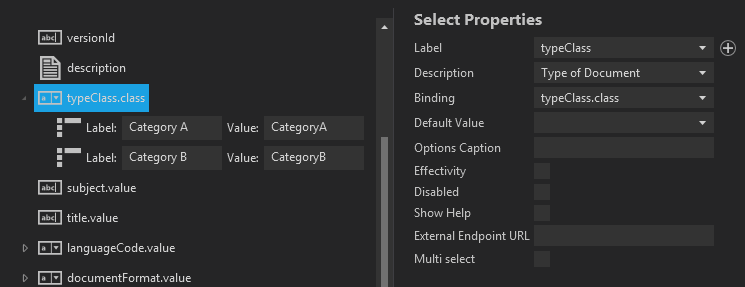
Runtime result

Usage
View: Create,Edit
Description: A dropdown listbox
queryselect

Setup
Not documented
Runtime result
Not documented
Usage
View: Create,Edit
Description: This control is not documented yet and possibly is not useable in the current versions.
singlequickselect

Setup
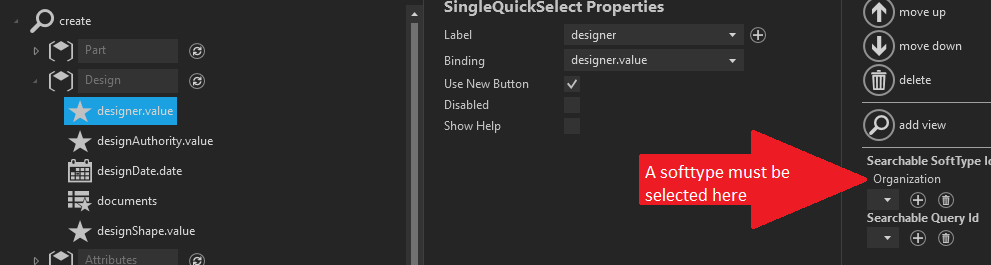
Runtime result

Usage
View: Create,Edit
Description: A search field to find and select one object.
multiquickselect

Setup
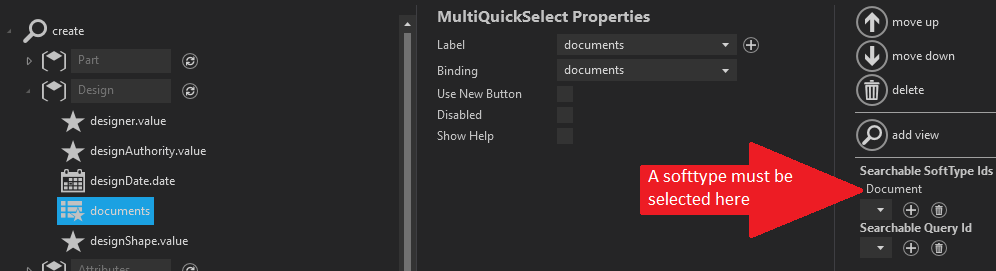
Runtime result

Usage
View: Create,Edit
Description: A search field to find and select multiple objects.
digital file

Setup
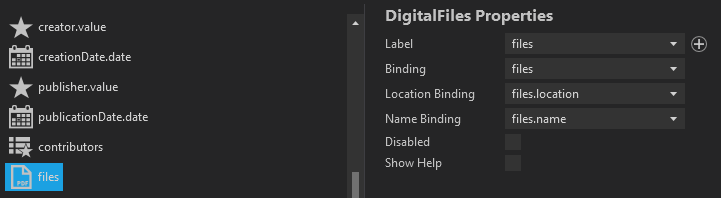
Runtime result

Usage
View: Create,Edit
Description: add multiple files
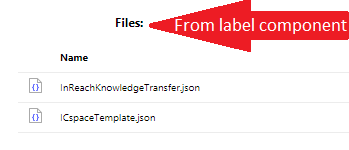
read digital file

Setup
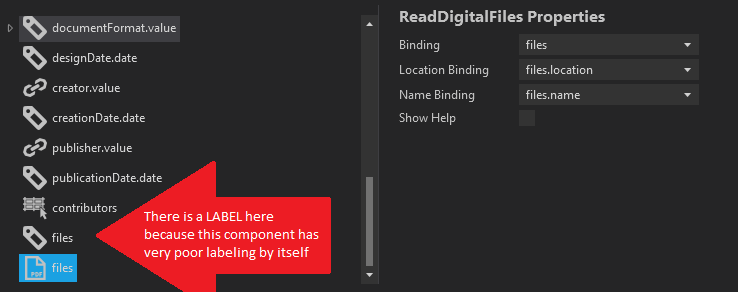
Runtime result
Usage
View: Read
Description: Show list of files in a read view
value text block

Setup
Runtime result

Usage
View: Read
Description: Extremely common in read views.
label

Setup

Runtime result

Usage
View: Read
Description: Just a label.
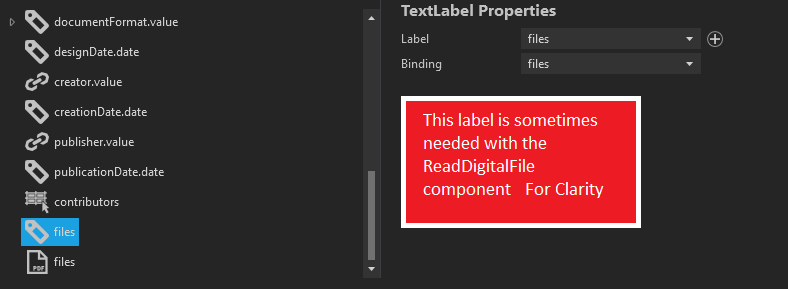
Note
There is a binding here to a port but this port value will never be shown. The defining of the binding is more for documentation purposes only.
SoftType link list

Setup
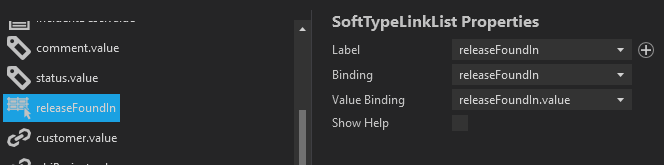
Runtime result

Usage
View: Read
Description: List of clickable objects
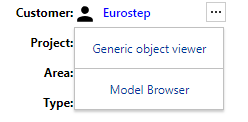
SoftType link

Setup

Runtime result
Usage
View: Read
Description: One clickable object
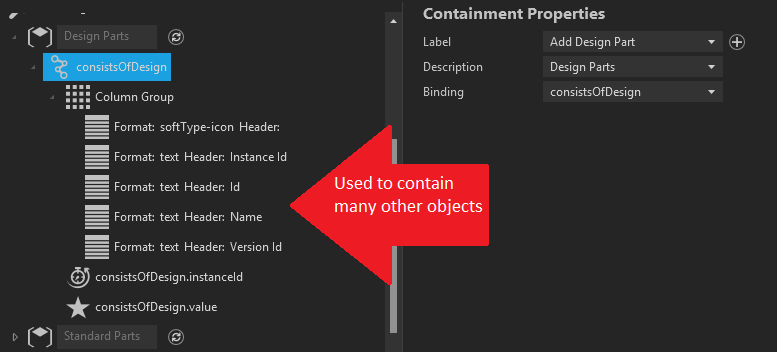
containment

Setup
Runtime result

Usage
View: Create, Edit, Read
Description: One of many needed controls for a contained view. The use of this control is a very complex subject and therefore only advanced users should attempt to use this control.
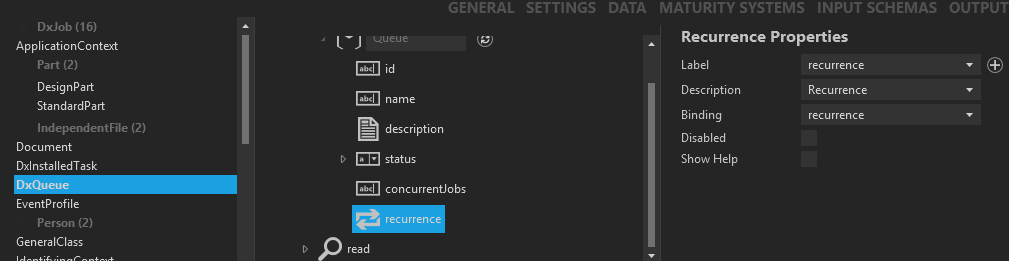
recurrence

Setup
Runtime result

Usage
View: Edit view for DxQueue objects
Description: Only for the DxQueue object
input file path

Setup

Runtime result

Usage
View: Only for DxJob objects. Create/Copy View
Description: Allows for the selection of a file from the unmanaged file areas as an input to a DxJob
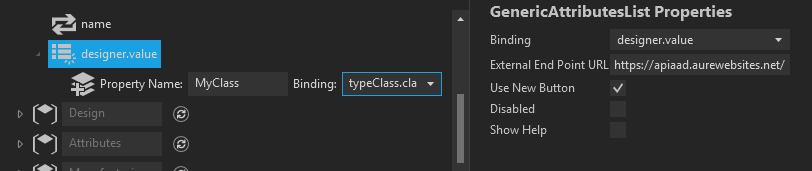
generic attribute list

Setup
Runtime result
Usage
View: Read,Create,Edit only for PropertyValueSetAssignments
Description: For the Read views make sure the "Disabled" is clicked. This is a very complex object to get working properly due to a complex RESTful API you must implement to get this to work in the Read and Edit views. Please see:
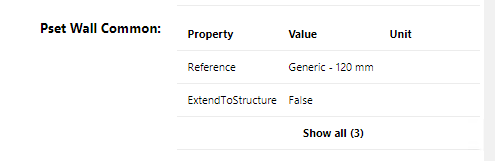
where used

Setup
Runtime result
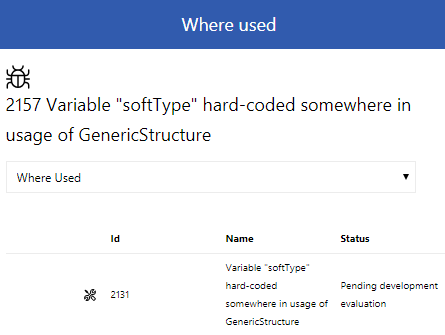
Usage
View: WhereUsed
Description: One of many needed controls for the WhereUsed to work
save as

Setup
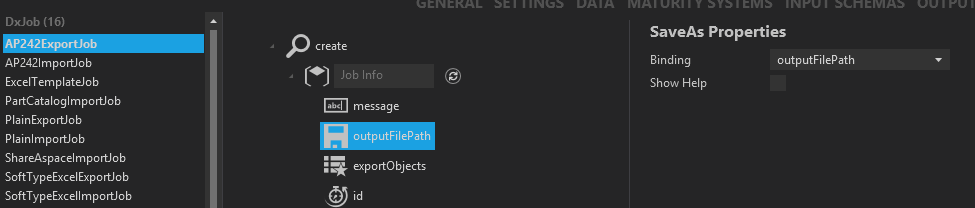
Runtime result

Usage
View: Only for DxJob objects. Create/Copy View
Description: This allows the user to select an output file path in the unmanaged file area for some sort of result for a DxJob.
single checkbox

Setup
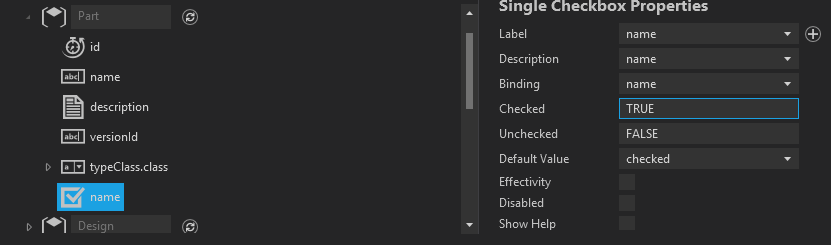
Runtime result

Usage
View: Read, Create, Edit
Description: In the read view make sure it is disabled. This will show a checkbox and you need to bind this to a string value. You define what text you want in the string for the states "checked" and "unchecked".
markdown

Setup
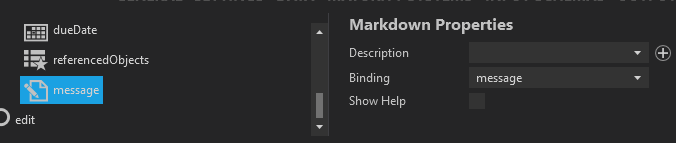
Runtime result

Usage
View: Create, Edit. Currently used only in WorkItem objects
Description: Allows the entry of MarkDown texts to a string field
space profile

Setup
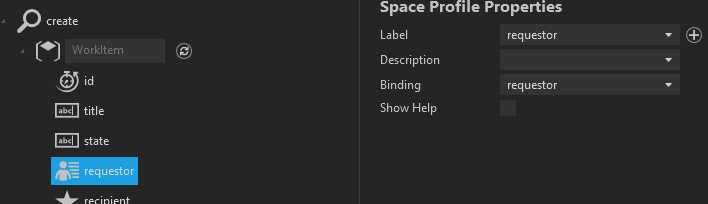
Runtime result

Usage
View: Create, Edit. Currently used only in WorkItem objects/ Share packages
Description: Allows for the selection/showing of a person/user that has a space profile.
history

Setup
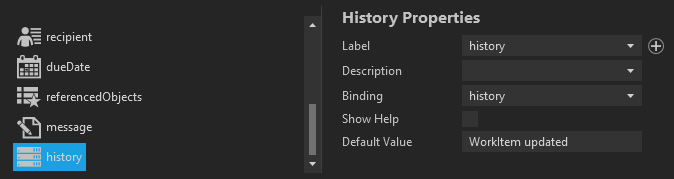
Runtime result

Usage
View: Edit, Read. Currently used only in WorkItem objects. Not possible to edit/create anything here but it is anyway used to show information in edit dialogs.
Description: Shows the WorkItemHistory objects
parameterized link

Setup
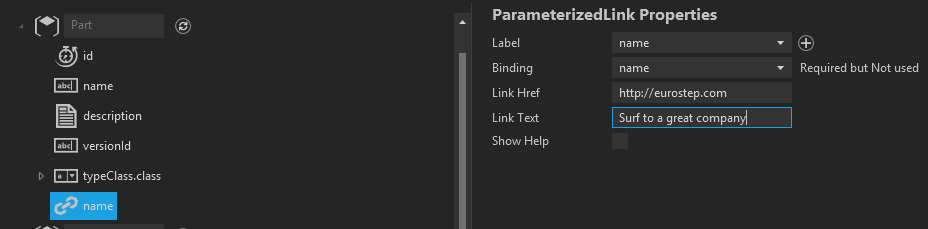
Runtime result

Usage
View: Intended and formatted for Read only
Description: This is simply adding a linked text to any URL you want
table

Setup
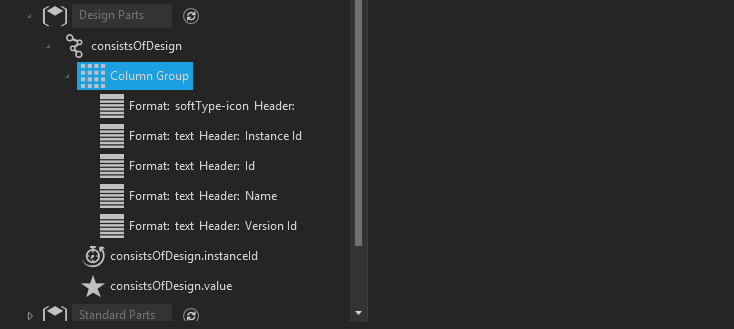
Runtime result

Usage
View: Create, Edit, Read, WhereUsed
Description: Used to create a table in a contained view. There are no settings inside of this control.