Configuration
Indexes
This section of the documentation will look at the details of Index configurations. It is expected that the reader is familiar with the Queries Concepts described in the Concept Documentation before reading this section.
Project definition
As described in the concept documentation, indexes can be defined in the Project Template. The indexes are defined based on Output Schemas of SoftTypes that are part of the Project Template.
Index
The indexes section of the Project Template contain a set of index definitions. Each index
definition can define a set of attributes from an Output Schema of SoftTypes that should be
indexed.
An index is given an id using the $id attribute. This id is used to reference the index from a
query and to retrieve the index definition via the Web API.
One index can index multiple SoftTypes, each SoftType is indexed on its own in the index array.
Each index section reference the SoftType ($softTypeRef) that it is valid for as well as the output
schema to use ($outputSchemaRef).
To define what properties from the Output Schema to use - a set of terms are defined. Each term is
given an $id and a reference (property) to the property in the Output Schema.
All the defined term $ids will make out the value properties of the defined index.
In the example below an index identified as DocumentIndex is defined. One of the SoftTypes
included in this index is the SampleDocument. The SampleDocument has an Output schema
identified as defaultOut. That Output schema has a property name which in this case is
indexed to the index property named name.
Also included in the DocumentIndex is the SoftType OtherDocument. OtherDocument also has
an Output Schema identified as defaultOut. This schema has a property versionName which in
this case is also indexed to the index property name. The DocumentIndex will because of this
have a property named name and the value of that property has mappings to different attributes of
the two different Output Schemas of the two SoftTypes SimpleDocument and OtherDocument.
The following is an example in the config tool.
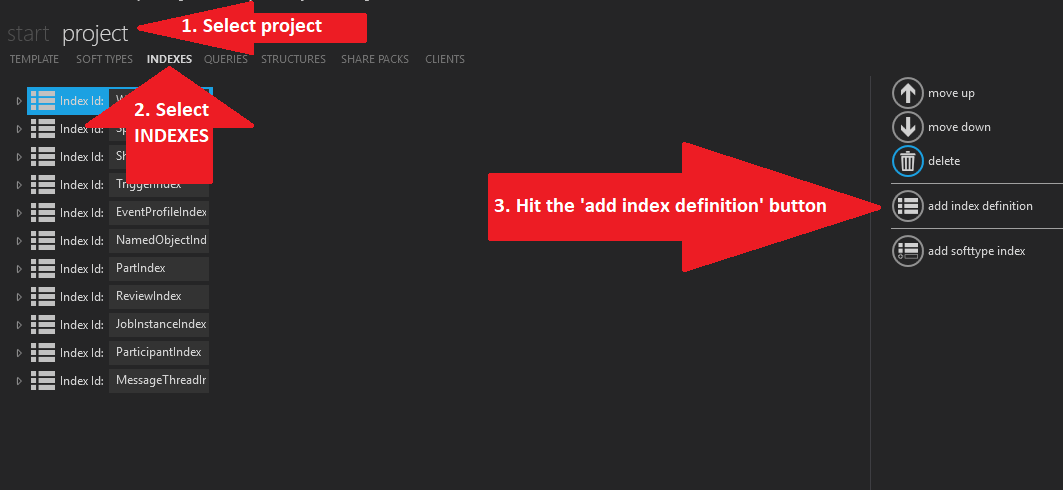
First we create a new index
- Select project
- Select INDEXES
- Hit the 'add index definition' button
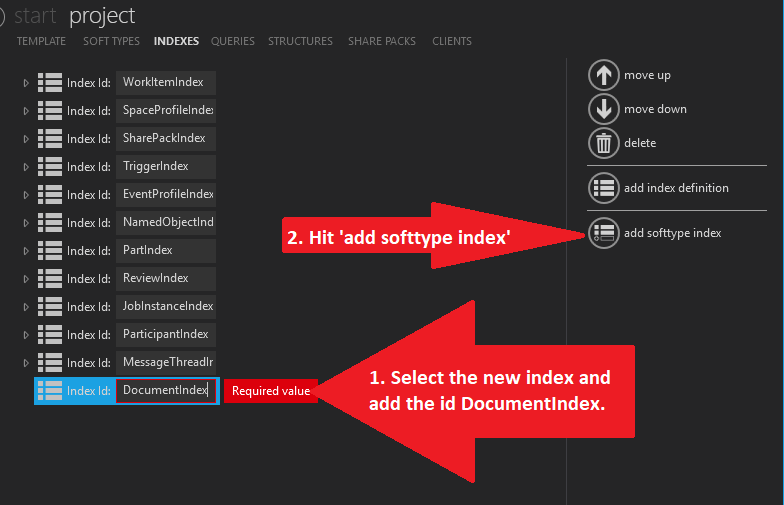
- Select the newly created index and enter the 'Index Id' of 'DocumentIndex'
- Hit 'add SoftType index'
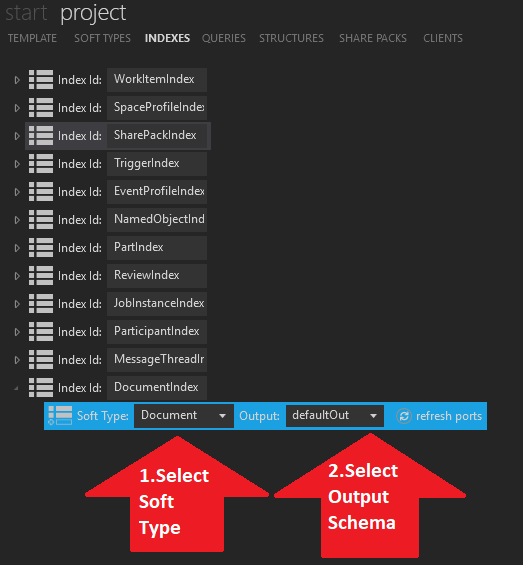
- Select the SoftType 'Document' for this example
- Select the Output (Schema) to be 'defaultOut'
- Select the entire row where you just entered the SoftType and the Output.
- Hit the 'add term' button
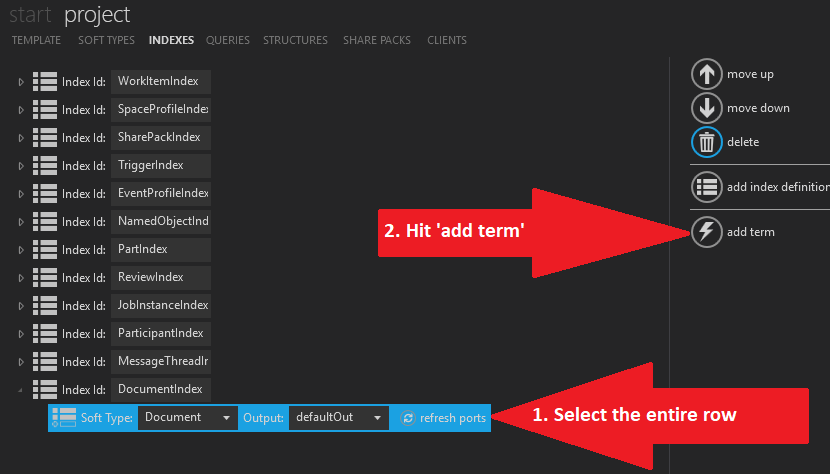
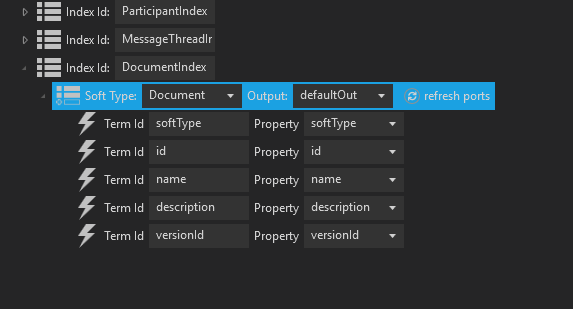
Repeat the above last step 5 times so that you have added 5 terms. Then fill in the terms as you see in the following:
Advanced index topics
Resolving object references
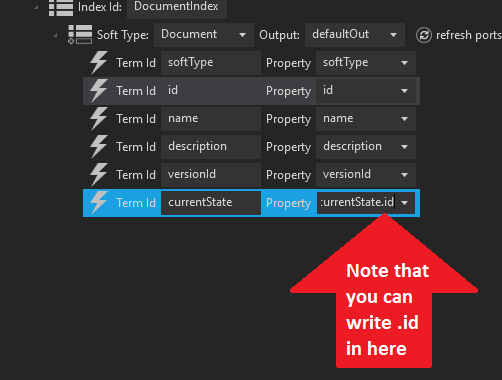
An index may also show values of other SoftType objects referred to by the SoftType in question. Continuing using the last example we will resolve the id of the currentState object which is referred to by this Document SoftType. Add one more term as shown in the previous step.
Enter the information as shown in the example below. Note that you must click inside of the 'Property' box and manually enter '.id'
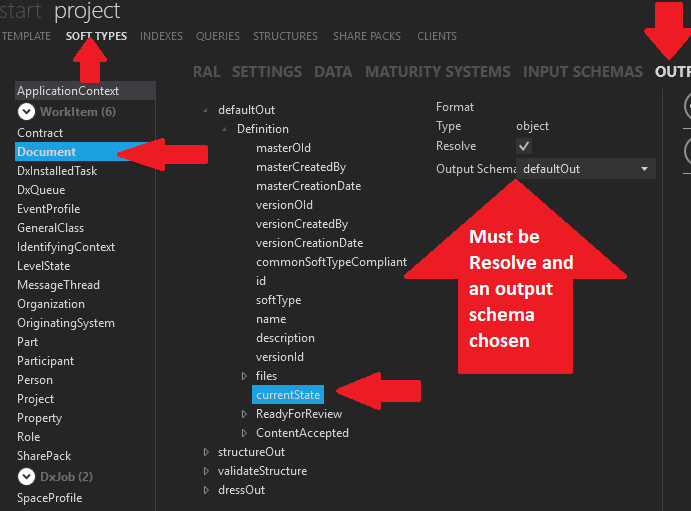
However in order to do this, we must make sure that the 'currentState' reference in the Document->defaultOut Output Schema is set to 'Resolve' and an output schema is chosen.
Lastly we must make sure that there is indeed an 'id' defined in this 'defaultOut' output schema in the LevelState->default out Output schema.
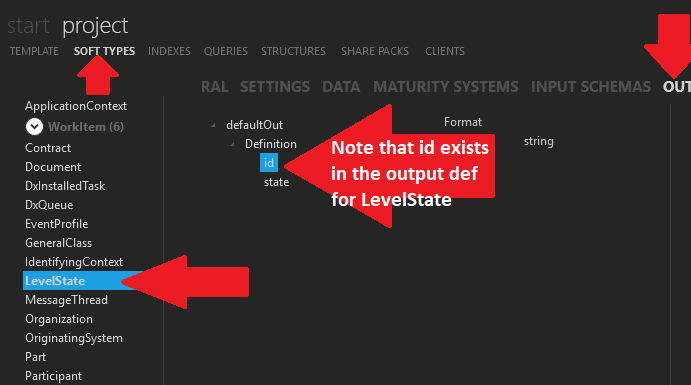
After all that the reference to the id of the the currentState will work.
Multiple SoftType indexes
In order to perform a search spanning several different SoftTypes you must have an index that includes several SoftTypes. In order for the index to have any relevance the 'Term id's' should be the same between the different SoftTypes as shown in the example below:
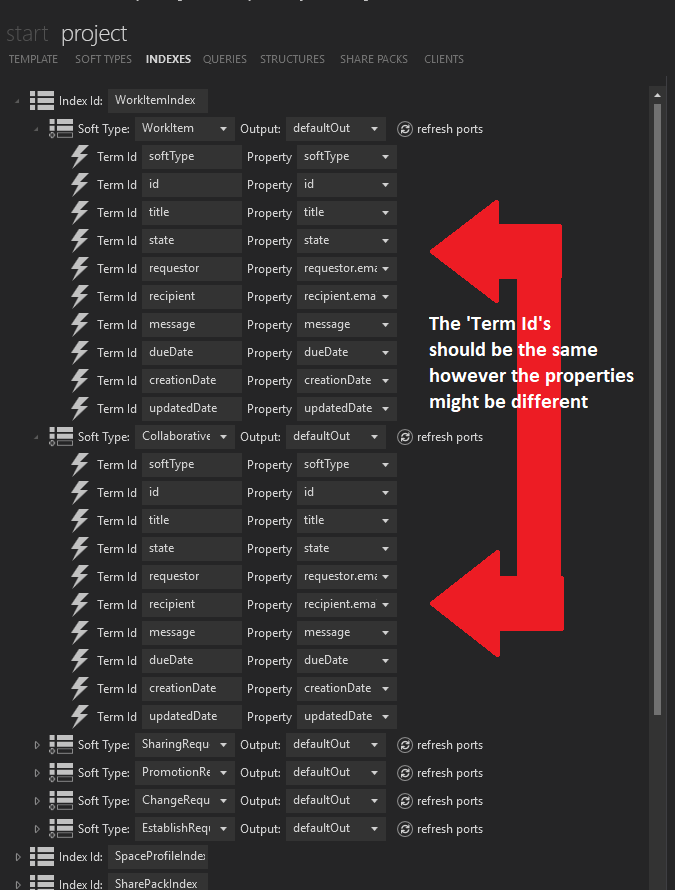
Although the 'Term Id's' should be the same it is ok that the properties are not exactly the same. It is the 'Term id' that is the critical search point.
The following is an example of how indexes look in the JSON of the template
"indexes": [
  {
    "$id": "DocumentIndex",
    "index": [
      {
        "$softTypeRef": "SimpleDocument",
        "$outputSchemaRef": "defaultOut",
        "terms": [
          {
            "$id": "softType",
            "property": "softType"
          },
          {
            "$id": "versionOId",
            "property": "versionOId"
          },
          {
            "$id": "creationDate",
            "property": "versionCreationDate"
          },
          {
            "$id": "createdBy",
            "property": "versionCreatedBy"
          },
          {
            "$id": "id",
            "property": "id"
          },
          {
            "$id": "name",
            "property": "name"
          },
          {
            "$id": "version",
            "property": "versionId"
          }
        ]
      },
      {
        "$softTypeRef": "OtherDocument",
        "$outputSchemaRef": "defaultOut",
        "terms": [
           ...
          {
            "$id": "name",
            "property": "versionName"
          },
          ...
        ]
      }
    ]
  }
]
Queries
This section of the documentation will look at the details of Query and Index configurations. It is expected that the reader is familiar with the Query Concepts described in the Concept Documentation before reading this section.
Project definition
As described in the concept documentation, queries can be defined in the Project Template. The queries are defined based on the Indexes that are part of the Project Template.
The example used in this section of the documentation is a query defined for the "DocumentIndex" index defined in the Index configuration section.
Create in ConfigTool
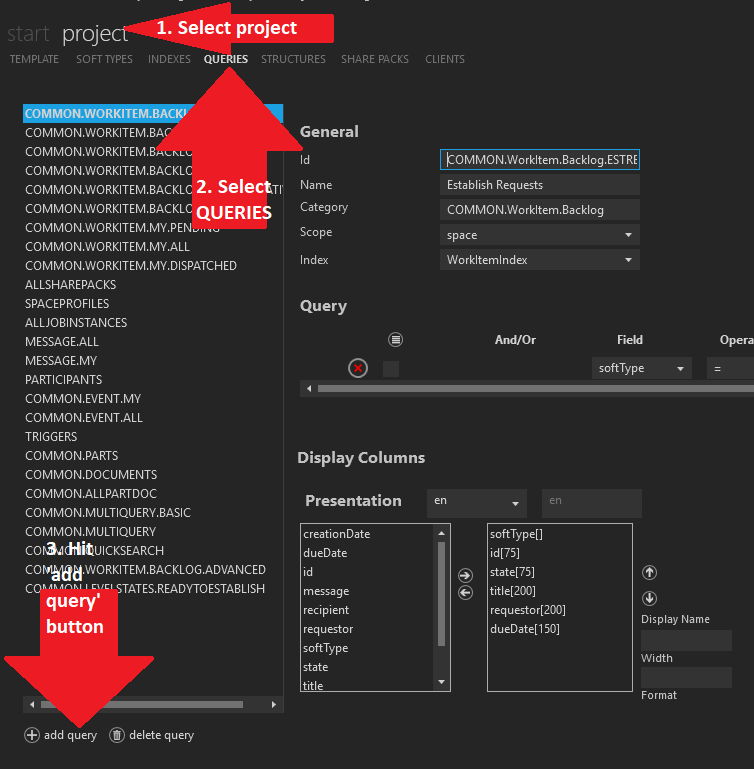
To create a query in the config tool do the following:
- Select project
- Select QUERIES
- Hit the 'add query button'
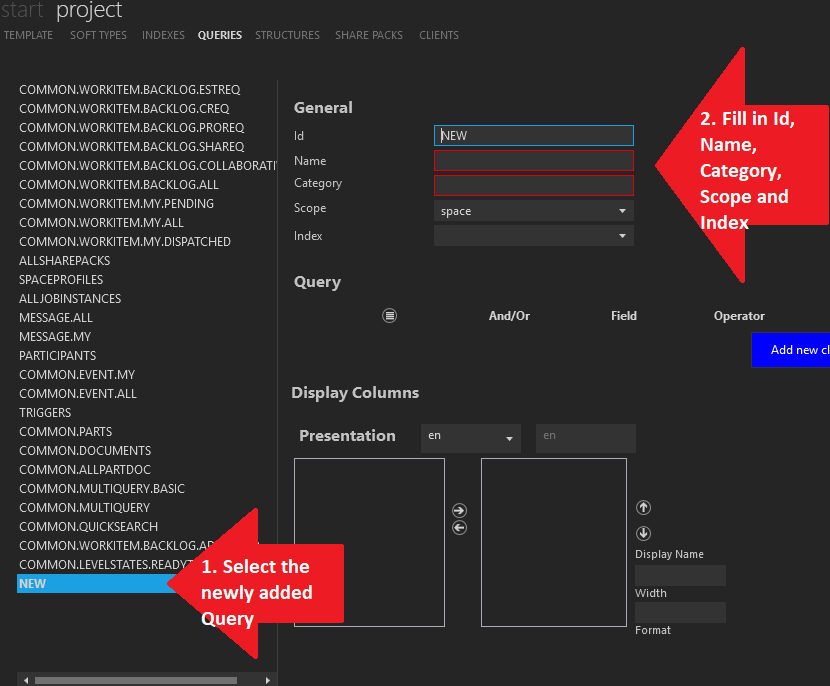
- Select your newly created query in the left side list
- Fill in Id, Name, Category, Scope and Index
- Id: A unique id among all the queries
- Name: This is the displayed name of the query to the user. So it is important that this is short but descriptive and easily readable.
- Category: This is a technique for grouping queries together. It can be anything but if you want your query to be a part of a certain group of queries this must have the same category as that group.
- Scope: Where do you want the query to show up. Space means for everyone. You can also choose a particular participant.
- Index: this is the index defined in the Index configuration section
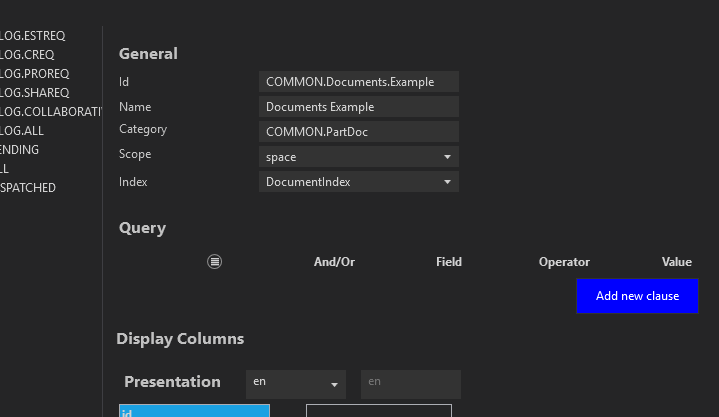
As an example it could look like the following
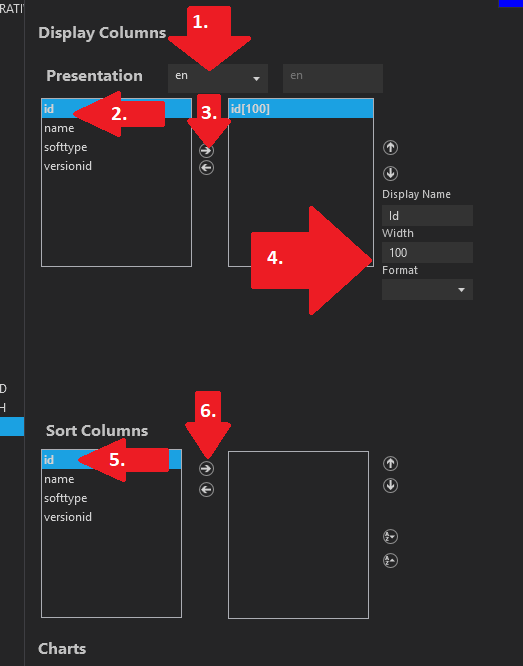
Once the 'Index' has been selected in the previous steps, then you need to choose your 'Display Columns' and 'Sort columns'
- Make sure you are editing the desired language, in this case it is 'en'
- Select one of the presentation fields in the left column
- Hit the arrow right to move that field over into the list of presented fields on the right hand side.
- Fill in the appropriate 'Display name' and width of the column.
- You need to select a sort column. Select the column you want to sort by
- Hit the 'arrow right' to move it to the right hand side of sorted columns.
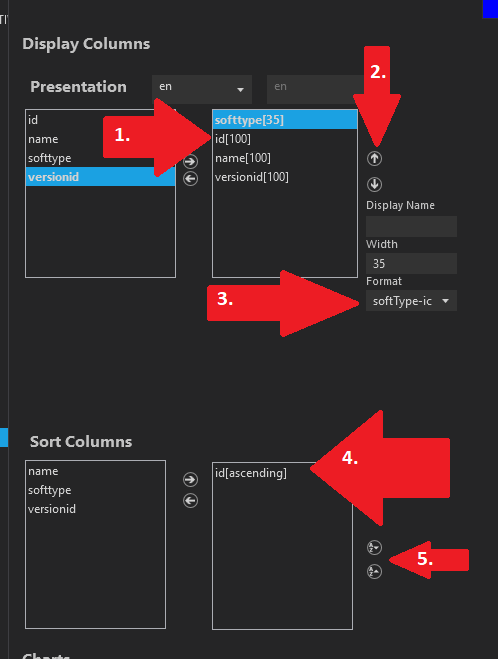
- Continue to move over to the right all the fields you want to present in your display.
- Use the 'arrow up' and 'arrow down' to change the order of the displayed fields.
- Formatting can be applied to certain fields. For instance in the case of the SoftType field you can choose to show a 'SoftType-icon'
- Your 'sorted' field will appear in the right hand side after you do what is in the previous picture.
- With these buttons you can change the sort to be 'ascending' or 'descending'
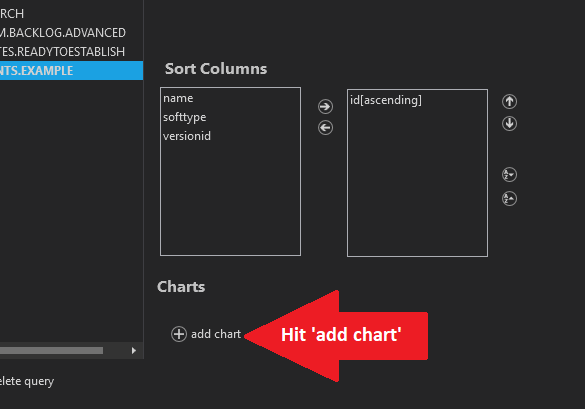
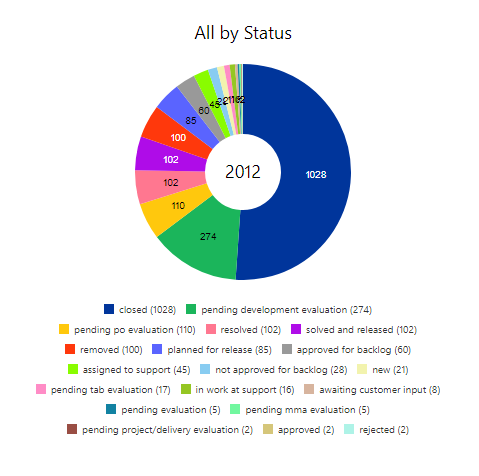
You can decide to show a Pie chart or a Column chart based on the data in your search. To do so hit the button 'add chart'
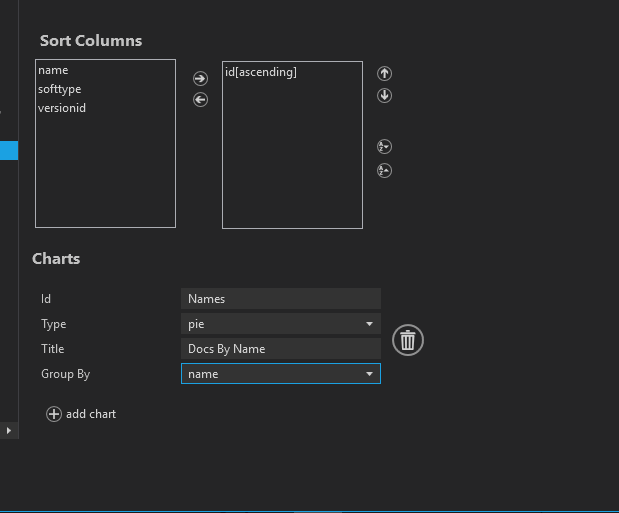
Then you can fill in the information for the chart as shown below. Actually grouping by 'Name' is an illogical thing to do. A better grouping would be by 'Status' or some other field that creates interesting groups.
An example of how the pie chart looks for the user is the following:
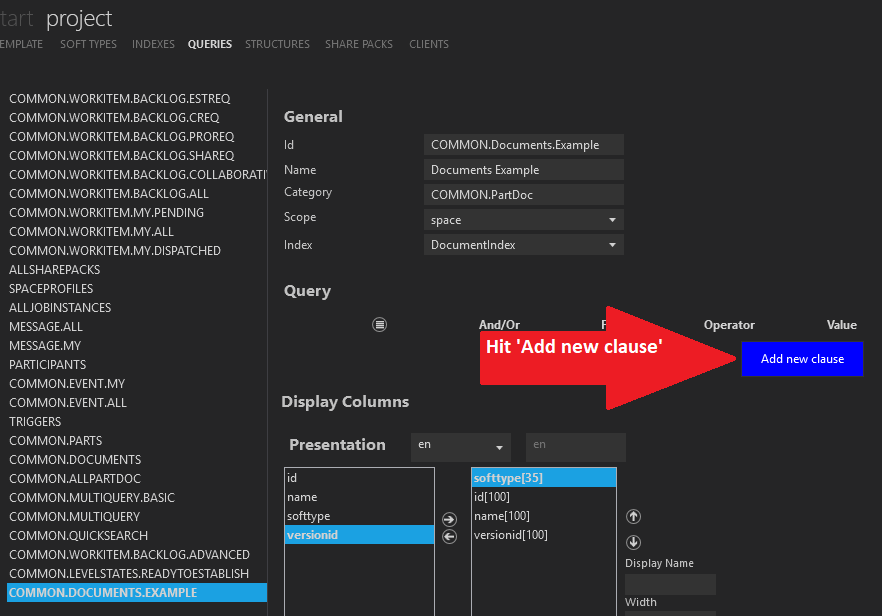
To filter the query you need to hit the 'Add new clause' button
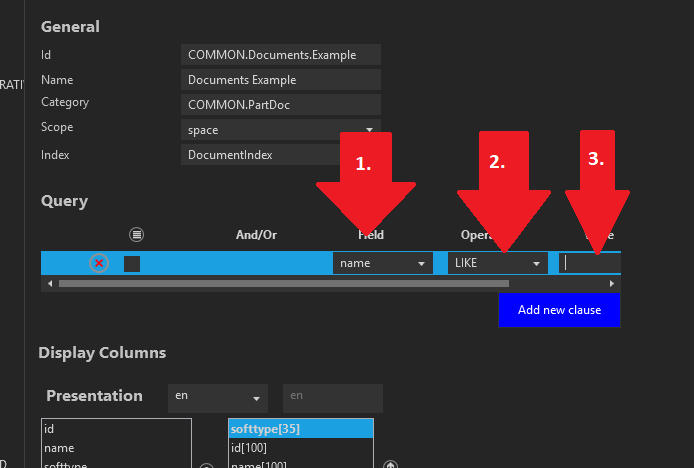
- Select the field you want to filter on
- Select a comparison operator
- Select a Value to compare to or you can leave the value blank which means that each time the query is run the user will be asked to fill in the value to filter by.
It is possible to offer the user a drop-down list box to choose a value to filter with as shown below in the user interface
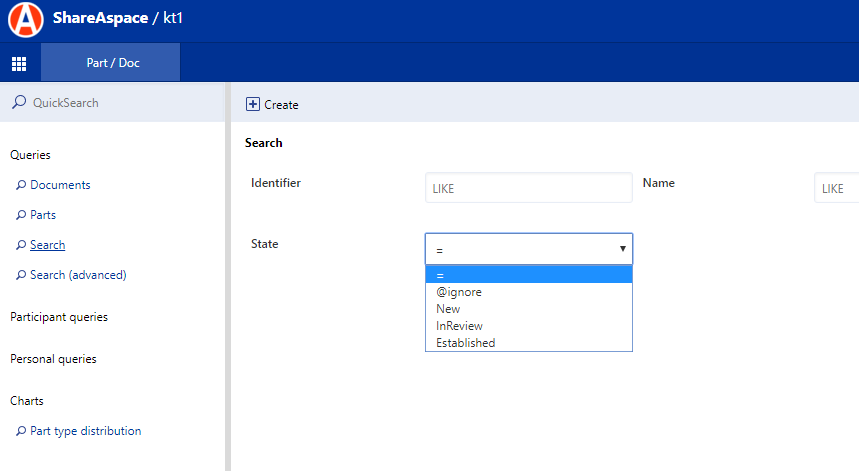
To achieve this drop-down list box for the user you configure it by hitting the 'options' button on the filter/clause
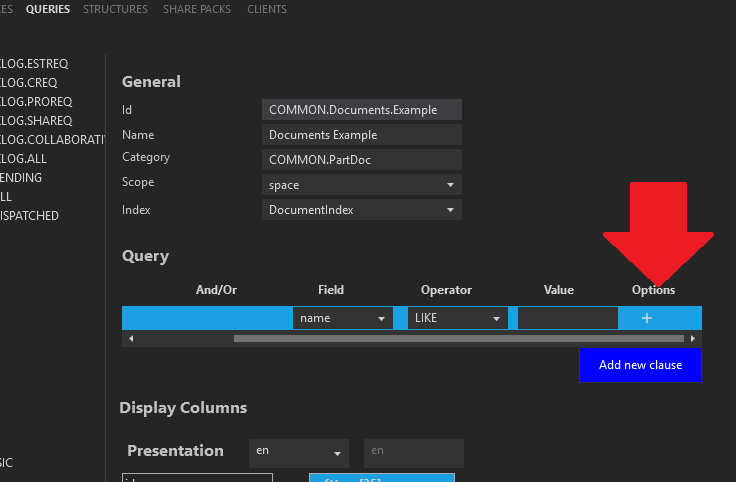
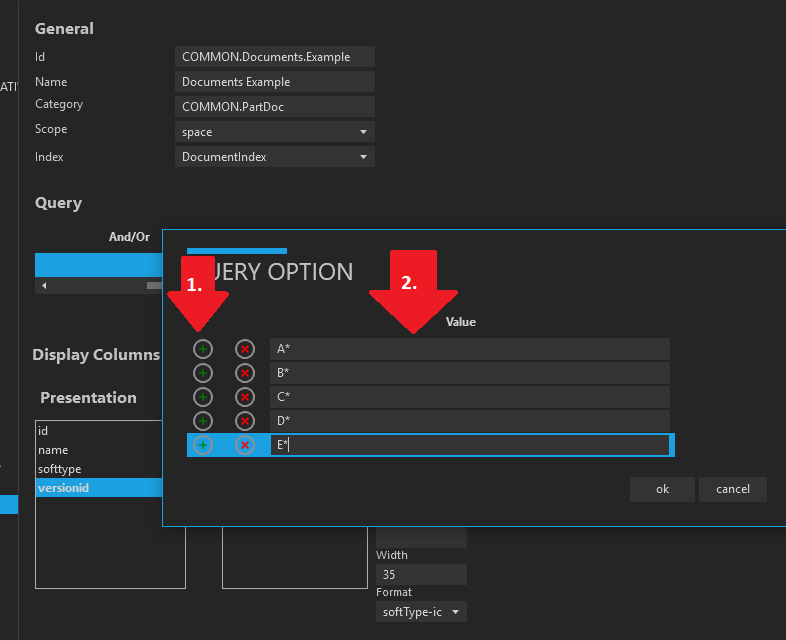
Then you can fill in what entries you want in the users drop-down list box by:
- Hit the green plus button to add more rows to the list box.
- Fill in the value you want presented to the user to select in the list box.
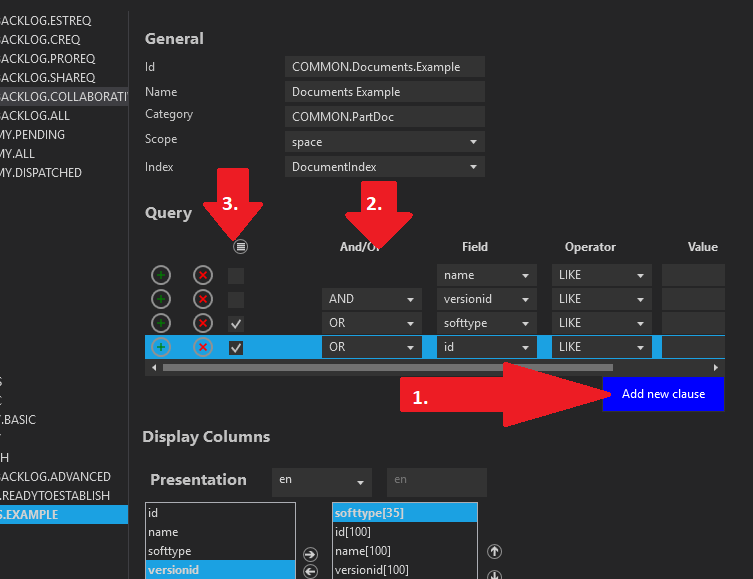
You can have multiple clauses for your filter.
- Hit the 'Add new clause' button once for each new clause you desire.
- Choose the 'and' or 'or' function you want to be performed between the clauses
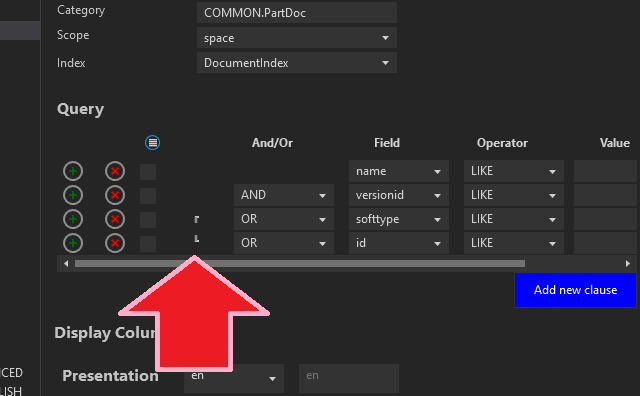
- It is possible to apply brackets around groups of clauses in order that those groups will be evaluated first in the boolean calculation. Do this by Checking the checkboxes in this column and then hitting the round button at the top of the column.
The result of the grouping will be as shown in the following picture. Notice the brackets added.
Query metadata
Each query has a set of metadata describing the query.
$id- Unique id for the queryname- Name of querycategory- Controls for what modules or components the query should be available
"queries": [
	{
		"$id": "MySimpleDocuments",
		"query": {
      "$indexRef": "DocumentIndex",
			"name": "My Simple Documents",
			"category": "document",
      "scope": ...,
			"where": ...,
			"select": ...,
			"orderBy": ...,
      "charts": ...
		}
	},
	...
]
Category
A category is a tag for the Query. This tag is used in other configurations, e.g. some module
configurations (like the SoftTypeAuthoring module) can specify a Query category. The Module will
then make all queries with that category on the Query list within the module.
Scope
The Query Scope states on what level a query is accessible. Queries scopes can be the whole project, specific participants, specific roles, or a specific person (personal queries).
Where
The where section is used to describe the actual query logic. The query can either be
described in a Query Clause or by using Query Groups containing Query Clauses and
possibly nested Query Clauses. The where section is optional.
Query clause
A Query Clause reference an index property using the $fieldRef attribute referring
to the $id of an index property, an operator, and optionally a value. The operator
describes the operation between the index property value and the stated value. The
result of a clauses is a Boolean. The value can either be set to a "hard" value, a
variable such as @me or be left empty. It may also have a list of possible values in an Options group as shown in the following:
"where": {
  "operator": "AND",
  "left": {
    "operator": "LIKE",
    "$fieldRef": "contentAccepted",
    "options": [
      {
        "value": "@ignore",
        "value": "True",
        "value": "False"
      }
    ]
  }
}
Variables will change depending on when and by whom the query is executed. If a value
in a where statement is left empty, the user will be prompted to give that value via the
user interface before executing the query. If the query is executed directly via the Web
API it is expected that the API Request has filled in the blanks.
List of value variables:
| Variable | |
|---|---|
@me |
Will pick the email address of the user executing the query |
@ignore |
Ignores the query clause, used as an "empty" value. Most commonly used for search forms |
List of operators
| Operator | Description |
|---|---|
= |
equal to |
> |
grater than |
< |
smaller than |
>= |
greater or equal to |
<= |
smaller or equal to |
STARTSWITH |
string value start with |
LIKE |
like equal to but case insensitive |
Query clause example
{
  ...
  "where": {
    "operator": "=",
    "$fieldRef": "createdBy",
    "value": "@me"
  },
  ...
}
Query group
A Query Group consist a left Query Clause/Group and a right Query Clause/Group. A Query
Group has a condition of type AND or OR describing how the left and right Clauses/Groups
should be evaluated.
Example query group (left: query group, right: query clause)
{
  ...
  "where": {
    "operator": "AND",
    "left": {
      "operator": "AND",
      "left": {
        "$fieldRef": "createdBy",
        "operator": "=",
        "$id": "createdBy",
        "value": "@me"
      },
      "right": {
        "$fieldRef": "id",
        "operator": "=",
        "$id": "id",
        "value": "123"
      },
      "isGroup": false
    },
    "right": {
      "operator": "LIKE",
      "$id": "name",
      "value": "Test"
    },
    "isGroup": false
  }
  ...
}
"NOT inner" group
The "NOT inner" group is used when combining an operator with the NOT keyword, like "NOT equal to", "NOT like", etc.
A "normal" LIKE clause could look like:
    "right": {
      "operator": "LIKE",
      "$id": "name",
      "value": "Test"
    },
where a NOT LIKE example could look like:
    "right": {
      "operator": "NOT",
      "inner": {
        "$fieldRef": "name",
        "operator": "LIKE",
        "$id": "name",
        "value": "Test"
      }
    },
Note
That the "NOT inner" group combines the operator with an inner clause (instead of using the right/left clauses).
Select
The select section defines what index properties should be returned in the query result
via the $fieldRef (i.e. the value of $fieldRef should be the index property name). A
Query will also always return the indexed object database id $oid and the indexed objects
SoftType id reference $softTypeId.
"select": [
	{
		"$fieldRef": "id"
	},
	{
		"$fieldRef": "name"
	},
	{
		"$fieldRef": "version"
	}
]
Presentation
To define the table columns for a query result the presentation section is used. It is
possible to define multiple presentations, one per language code. Each column binds to the
select via the $fieldRef property. The value of displayName will be used as the column
header and the width defines the column width in pixels. It is also possible to configure
the presentation for types like Boolean and date times. This is done by using the format
property. The format property is an object with the required property type. Some of
the types require additional properties to be set on the format object.
"format": {
    "type": "booleanText"
}
Available presentations:
softType-icon- must bind to thesoftTypevalue that is always returned from queries. Will display an icon for the SoftType in questionbooleanText- used for Boolean values, will display a true or false text depending on the valuebooleanIcon- used for Boolean values, will display a checkbox ticked or not depending on the valuedate- used for date timesstatusIcon- used statuses
Note
Multi language support is not yet implemented, use languageCode "en".
"presentation": [
  {
    "languageCode": "en",
    "columns": [
      {
        "$fieldRef": "versionOId",
        "displayName": "ObjectId",
        "width": 200
      },
      {
        "$fieldRef": "id",
        "displayName": "Id",
        "width": 200
      },
      {
        "$fieldRef": "name",
        "displayName": "Name",
        "width": 200
      },
      {
        "$fieldRef": "version",
        "displayName": "Version",
        "width": 200
      }
    ]
  }
]
Order by
Next there is the orderBy section which is used to define the ordering of the result.
The order can be either ascending or descending. The order is applied to a result
value via the $fieldRef attribute. It is possible to have several order by clauses and
they will be prioritized according to the order in which they appear in the orderBy
array.
"orderBy": [
	{
		"order": "descending",
		"$fieldRef": "documentId"
	}
]
Charts
The final, and optional, section is the charts section. This section is used to define
chart views for presenting the total query result. Currently there is support for two types
of charts, pie and column. The chart can pick one query column, specified using groupBy
and present either a pie chart or a staple diagram of the distribution of the different values
of the specified column.
"charts": [
	{
		"id": "chart1",
		"type": "column",
    "title": "All documents ordered by currentstate",
    "groupBy": "currentState",
	}
]
Where used
The Where Used concept provides a way to locate structures where an object is used. By configuring indexes, queries and views, it is possible to traverse structures from child nodes to parent nodes that fulfill the query conditions.
Index
Define a Where Used index for each SoftType that will be enabled for the functionality.
From the parent, index the parent and its children. Give the child property an id.
Example of an index for DesignPart
{
  "$id": "WhereUsedDesign",
  "index": [
    {
      "$softTypeRef": "DesignPart",
      "$outputSchemaRef": "editDesignStructure",
      "terms": [
        {
          "$id": "softType",
          "property": "softType"
        },
        {
          "$id": "id",
          "property": "id"
        },
        {
          "$id": "name",
          "property": "name"
        },
        {
          "$id": "versionId",
          "property": "versionId"
        },
        {
          "$id": "instanceId",
          "property": "consistsOfDesign.instanceId"
        },
        {
          "$id": "childOId",
          "property": "consistsOfDesign.value.versionOId"
        },
        {
          "$id": "designer",
          "property": "designer.value.id"
        }
      ]
    }
  ]
}
Query
Setup one or more Queries using the index child property id as the field reference. Choose an operator, preferably '=', and leave the value section empty. The empty value section means the actual value must be provided when executing the query. It is possible to have multiple clauses in the where clause.
The presentation section defines the columns that will be shown in the query result.
Example of queries for DesignPart. The first one only looks at the child-parent indexing. The second query is a simplistic example, where multiple clauses in the where clause are used, the designer id must be the same in both child and parent.
[
  {
    "$id": "WhereUsedDesign",
    "query": {
      "$indexRef": "WhereUsedDesign",
      "name": "Where Used Design",
      "scope": {
        "type": "space"
      },
      "category": "COMMON.WhereUsed",
      "where": {
        "operator": "=",
        "$fieldRef": "childOId"
      },
      "presentation": [
        {
          "languageCode": "en",
          "columns": [
            {
              "$fieldRef": "softType",
              "displayName": "",
              "format": {
                "type": "softType-icon"
              }
            },
            {
              "$fieldRef": "id",
              "displayName": "Id",
              "width": 75
            },
            {
              "$fieldRef": "name",
              "displayName": "Name",
              "width": 75
            },
            {
              "$fieldRef": "versionId",
              "displayName": "Version Id",
              "width": 75
            },
            {
              "$fieldRef": "instanceId",
              "displayName": "Instance Id",
              "width": 75
            }
          ]
        }
      ],
      "select": [
        {
          "$fieldRef": "softType"
        },
        {
          "$fieldRef": "id"
        },
        {
          "$fieldRef": "name"
        },
        {
          "$fieldRef": "versionId"
        },
        {
          "$fieldRef": "instanceId"
        }
      ],
      "orderBy": [
        {
          "order": "ascending",
          "$fieldRef": "id"
        }
      ]
    }
  },
  {
    "$id": "WhereUsedDesignSameDesigner",
    "query": {
      "$indexRef": "WhereUsedDesign",
      "name": "Where Used Design Same Designer",
      "scope": {
        "type": "space"
      },
      "category": "Common.WhereUsed",
      "where": {
        "operator": "AND",
        "left": {
          "operator": "=",
          "$fieldRef": "childOId"
        },
        "right": {
          "operator": "=",
          "$fieldRef": "designer"
        }
      },
      "presentation": [
        {
          "languageCode": "en",
          "columns": [
            {
              "$fieldRef": "softType",
              "displayName": "",
              "format": {
                "type": "softType-icon"
              }
            },
            {
              "$fieldRef": "id",
              "displayName": "Id",
              "width": 50
            },
            {
              "$fieldRef": "name",
              "displayName": "Name",
              "width": 75
            },
            {
              "$fieldRef": "versionId",
              "displayName": "Version Id",
              "width": 75
            },
            {
              "$fieldRef": "instanceId",
              "displayName": "Instance Id",
              "width": 50
            },
            {
              "$fieldRef": "designer",
              "displayName": "Designer",
              "width": 75
            }
          ]
        }
      ],
      "select": [
        {
          "$fieldRef": "softType"
        },
        {
          "$fieldRef": "id"
        },
        {
          "$fieldRef": "name"
        },
        {
          "$fieldRef": "versionId"
        },
        {
          "$fieldRef": "instanceId"
        },
        {
          "$fieldRef": "designer"
        }
      ],
      "orderBy": []
    }
  }
]
View
The Where Used view is used to select which queries that should be available. The view is also where the bindings to the values that will be passed in to the query are defined.
Create a view with the id 'whereUsed'. Add one or more of the whereUsed control and set the 'query' parameter. Depending on the number of where clause parameters in the query, the number of bindings that have to be set will differ. The $schemaRef must have a format with the pattern "binding1=mapping1,binding2=mapping2,...".
The binding needs the absolute path, except if the indexed value is an oId. E.g. designer.value.id if the designer id is indexed and used in the query, or versionOId if this has an oId defined.
Example of a Where Used view with two different queries for DesignPart:
{
  "id": "whereUsed",
  "label": "Where Used",
  "$inputSchemaRef": "",
  "$outputSchemaRef": "defaultOut",
  "fields": [
    {
      "label": "Where Used Design Part",
      "type": "group",
      "fields": [
        {
          "fields": [
            {
              "$schemaRef": "versionOId=childOId",
              "type": "whereUsed",
              "colspan": 11,
              "query": "WhereUsedDesign"
            }
          ]
        }
      ]
    },
    {
      "label": "Where Used Design Same Designer",
      "type": "group",
      "fields": [
        {
          "fields": [
            {
              "$schemaRef": "versionOId=childOId,designer.value.id=designer",
              "type": "whereUsed",
              "colspan": 11,
              "query": "WhereUsedDesignSameDesigner"
            }
          ]
        }
      ]
    }
  ]
}