DataExchange
The Data Exchange is a Platform feature for scheduling and coordination of
long running tasks, like imports, exports, and reports. The Data Exchange is using the notion of Task Assembly,
Configured Task, Configured Job, Configured Queue, and Job Instance. It enables the ability to
schedule background jobs on defined queues for a specific collaboration space.
All Data Exchange components are SoftType:able and all Data Exchange configuration is done by using SoftTypes of these components.

Components
Task assembly
A Task Assembly is a binary component that specifies a function that is performed on an input, often a file,
to produce an output and a log. A typical task is a mapper, responsible for transforming one format to another. A
Task Assembly is installed on collection level. A collaboration space can make use of installed tasks by
referencing them in their Data Exchange configuration (see Configured Task) as long as the
license for the collaboration space is licensed to use the Task Assembly.
An important task is the ShareAspace Importer Task. The ShareAspace Importer takes a ShareAspace data set and consolidates that information into ShareAspace.

External task service
By using the ShareAspace External Extensions it is possible to register external services that perform the duties of a DataExchange Task. Instead of the code being executed by the ShareAspace host, ShareAspace will call an external service to perform the work. The external service will be given links to where to download files to be processed, to where to upload the result of the process, as well as links to report back status and log information about the work done externally. For custom implementations of Tasks, the External Task Service should be used.
Configured task
There are two types of Configured Tasks, Internal Task and External Task.
A Configured Task is a reusable configured instance of a Task Assembly (Internal Task) or a configured instance
of a reusable External Extension. A Configured Task contains a set of
parameters used to execute a Task. There can be multiple configurations (Configured Task) for each Task Assembly /
External Task.
For instance, the ShareAspace importer task could be used by a Configured Task with a specific set of settings.
Configured job
A Configured Job is a configured sequence of Configured Tasks. An example could be a Configured Task sequence of two Configured Tasks where the first Configured Task is a configured instance of a mapper Task followed by a configured instance of the ShareAspace Importer Task. The first Configured Task would take a file of format X, map that to a ShareAspace data set, pass the data set to the Import Configured Task that would then consolidate the information in to ShareAspace.
Note
There is a limit of 6 Configured Tasks per Configured Job.
There are two types of tasks that can be configured within a Job. Internal Tasks (i.e. Configured Task) and External Task. The External Tasks will use an identifier for the external task for reference. For this to work it is required that this identifier and the route to the external service is provided to ShareAspace during the metadata exchange when registering a ShareAspace Extension. This registration is done by the Collection Administrator.
A Configured Job is a SoftType. It must be configured to be run on one Configured Queue. The configuration can also contain additional parameters that can have either default values or require the user (end-user or system) to provide these parameters. The parameters can be accessed by Task Assemblies being run within the Job.
When scheduling a Job from a Configured Job, a Job Instance is created. The Job Instance will keep the status and the parameters specific to that scheduling.
Configured queue
A Configured Queue is the definition for a job queue inside a specific collaboration space. The queues are
required for Configured Jobs to execute. A typical settings for a configured queue is the number of parallel
jobs to be run. Most out of the box Space Templates are configured with two queues: one for read jobs and one
for write jobs. It is, however, possible to configure any number of queues. Queues can be in different states
and handle errors differently (more on this later). Each queue handle its jobs independently from other queues.
Job instance
A Job Instance is an instance of a Configured Job. When created the instance is place in the queue configured
on the Configured Job. When a Job Instance has been executed and popped from the queue it is placed into
the Job Instance Archive
Job instance archive
The Job Instance Archive is a store for all executed Job Instances. It is possible to run queries on the archive.
Mapper
A mapper is a component that transforms information on one format to another. The Mappers are often hosted within a Task.
Components and their relations

Staging

A "Read only" job, such as an export or report, is either queued or running while in the queue. When it has finished it will either be in the state of Failed, Succeeded or Cancelled. The cancelled state is only entered when a user has cancelled the job manually (or when an external system has cancelled the job via the API).
It is possible to cancel a "Read only" job at any time while it is in the queue.
A "Read/Write" job is either queued, running, or staged while it is in the queue.
The final state before archival of a "Read/Write job" is "Committing". In this state the Nova store is being updated with the write data from the job and is no longer possible to cancel.
A "Read/Write" job can be configured to be staged before committing. In the staged state the data is prepared and awaits confirmation from a user to be committed.
When a "Read/Write" job is staged it blocks all other "Read/Write" jobs in that queue from executing.

Levels of staging
A R/W job can define different behaviors with regards to staging. If the job never shall be staged
then the NoStaging option shall be used.
If a R/W job always requires manual approval then the MandatoryStaging option shall be used. This
will always put the job into the staged state after the running phase has ended. This option will
also always block the queue for each job until a user approves it.
If a R/W job can run silently as long as everything is fine then the AdaptiveStaging option shall
be used. This option will move from running to committing, to success silently as long as the Running
state does not produce any errors or warnings. If so then the job will be put into staged mode and a
user will need to decide its future.

State of queues
In the same way as a job can have a status the queue in itself can also have a status. A queue can
either be Running or Stopped.
When a queue is Running it will automatically start the allowed number of parallel jobs as soon as
they are queued. A job that is staged will block one of the allowed parallel job slots in the queue.
When a queue is Stopped it will still allow jobs to be scheduled onto it, but they will not be
processed until the state of the queue is set to Running again.
A queue can be stopped by:
- Manually changing the state of the queue to Stopped. (manual stop)
- Adding a stop instruction to the queue as a job (scheduled stop)
- As a result of a failed commit if the Configured Job is configured for this. (reactive stop)

Queues
Each space has its own Data Exchange configuration. These configurations are siloed to the space.
A typical configuration will have at least two queues, one for read jobs (exports and reports) and one for read/write jobs (imports).
In the example below two separate spaces have been configured, each with two queues. In both configurations the write queues are configured to process one job at the time while both read queues have been configured to run a maximum of three jobs in parallel.

Queues, jobs, and priority
All queues follow the First-In-First-Out (FIFO) pattern. This means that when a new job is scheduled it is always put at the back of the queue. As long as a job has not started processing it is possible to change the priority of that job. It is only possible to rearrange queued jobs (i.e. running jobs cannot be rearranged).

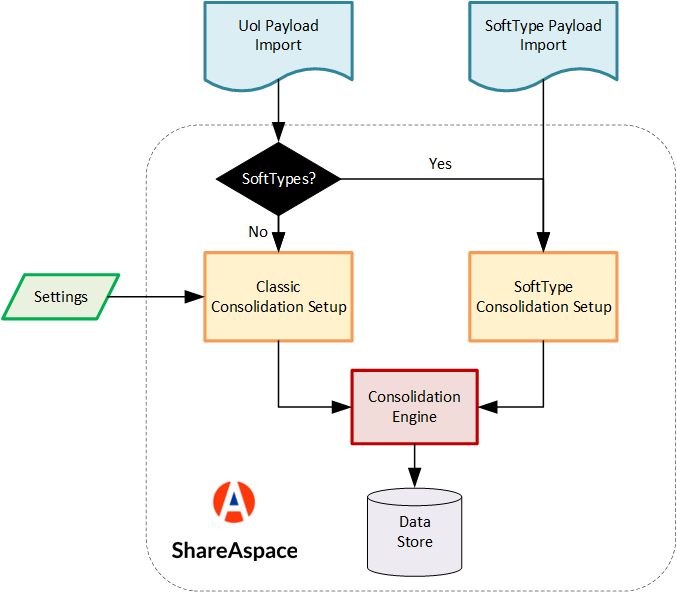
Import and consolidation
There are basically two ways for importing data into ShareAspace Nova. Either a SoftType or a Unit of Information payload is passed to the corresponding importer.
In both cases the data is analyzed, prepared and passed to the consolidation engine.
The consolidation engine is responsible for deciding if the imported data should be created, used for modifying existing data in the store or ignored.
The import of a pure Unit of Information payload can be configured using consolidation rules whereas the import of SoftType as a default behavior which is considering that the data being pushed as the new truth for the data base.
The import flow is summarized in the following diagram.
For more details about consolidation and rules, please refer to the import settings section.
Export concepts
Data exchange in Nova is equipped with two different export formats, SoftType JSON and native binary. The output from those exports can be chained with mappers in a job to get other formats such as Excel or AP242.
All exports starts by defining start points i.e. what instances the export should start the export on. The export then will recursively continue by resolving external references e.g. referenced documents or structures.
Native binary export
The native binary format is based on the raw Nova model and can be used to export both data that is SoftTyped and data that is not SoftTyped.
There is four settings that can be used
Resolveis an array ofAttributeIdto specify which external references to resolve.ResolveDepthis an integer that specify how deep the recursion should go resolving external references.FullResolveis an Boolean that specifies whether all external references should be resolved, overridesResolve.FileModeis the enumDxFileModethat specifies how to handle file collisions in the unmanaged file area.
SoftType JSON export
The SoftType format is based on the schemas of the SoftType that is defined in the space template. All SoftType instances is exported according to a schema. The schema for the start point instances are defined at runtime when starting the job. The export schema for the external references is defined in the schema in the space template.
File formats
JSON SoftType file
A JSON SoftType file is a format that resembles the space template format although most of the space template
format is ignored. The JSON SoftType file has one root node and it is SoftTypes and it is an array that
contain JSON objects. Each JSON object in SoftTypes has one $id property, that is a string and should be
the SoftType id, and one instances property, that is an array and contain the SoftType instances to import
for that specific SoftType.
Each instance in instances is a JSON object and has three properties, $id, $inputSchemaRef/$outputSchemaRef
and data. The $id property is the unique instance id. The $inputSchemaRef/$outputSchemaRef property is
a string property that reference what schema to use for that particular instance during import/export. The data
property is a JSON object that is the data of the instance and that data must conform to the specified schema.
Example of a simple JSON import file below.
{
  "softTypes": [
    {
      "$id": "DesignPart",
      "instances": [
        {
          "$id": "1",
          "$inputSchemaRef": "defaultIn",
          "data": {
            "id": "001",
            "name": "Bike",
            "typeClass": {
              "class": "TODO"
            },
            "versionId": "A",
            "designDate": {
              "date": "2001-01-01T00:00:00"
            }
          }
        }
      ]
    }
  ]
}
SoftType Excel integration
A SoftType Excel mapper has been developed to make it easier to import and export SoftType instances defined in an Excel file into/out of ShareAspace. The SoftType mapper functionality is based on an Excel template that has a specific structure known to the mapper.
A new Excel template is only needed when the user plans to do an import. During the Excel export the system will create an Excel template and fill in the data.
Excel template
The Excel spreadsheet is built up in a hierarchical way to resemble SoftType instances of different SoftTypes.
Each work sheet represents a SoftType schema where the default sheet name is a concatenation of SoftType id and schema
name with one space between e.g. Document import. A sheet name can have a maximum of 31 characters so if the default name exceeds 31 characters then a custom sheet name must be used.
Each row on that work sheet represents an instance of a SoftType for that particular schema
except the first and second row.
The first row is the header row and each cell will contain the property id taken from the schema.
The second row is a description of what kind of data the cell represents. For mandatory data a * is present.
For enums a list of allowed values is displayed. The columns in the work sheet represent properties from the
schema for that SoftType except the first column A with header oid. This represents a unique instance id
for the SoftType instance and is mandatory and must be unique within the sheet (excepting when loading arrays of properties - see below).

For properties that are of type array it is possible to add several items
to the array by adding a new row in the work sheet using the same oid as the row above.

Note
Rows are not checked for potential duplication prior to import. This may lead to duplicate data imported or validation errors for properties that do not allow duplication.
There are two ways to create a Reference:
- Excel formula, where you in the cell type an
=and then select the instance id cell for correct instance e.g.=A3.

- Excel hyperlink, where you in the cell type
Sheet Name!ARow Noe.g.DesignPart defaultIn!A3.

Excel formulas are updated when rows are inserted, so it may be the preferred way.
Excel hyperlinks are essentially treated as strings by Excel and do not get updated when rows are inserted.
Refer to Excel template format for further details about the format and to Excel template generation for instructions how to generate excel templates from a space template.
Excel import
There are two excel import jobs, both take an excel file as input but they use different consolidation engines. There is the SoftType consolidation engine, the one that the Web UI is using, and there is the classic consolidation engine, the one used for imports on raw model level. Regardless of excel import type, they have two tasks. First is the excel to JSON mapper task that reads the excel file and maps the data to JSON. The second task is the import task and as mentioned before there is two of them, JSON SoftType import with SoftType consolidation or JSON SoftType to binary import with classic consolidation.
Start an Excel import with SoftType consolidation
To run an excel import with SoftType consolidation click Schedule in the Data Exchange module
and select the SoftType Excel Import Job in Type definition.
Fill in the Message field to associate a message with the job. To select an Input File
click Select and pick an existing file or upload a file and pick that one.
To enable the job logger, expand the Job Logging section and choose a Name for the log file then
select a Location for the log file by clicking Browse and choosing a folder. To put the log file
into a sub-folder of current Location check the New folder checkbox and write the Folder name.
In the Import Settings section the user can choose the level of validation to be applied.
Choose SoftType Validation Mode:
Relaxed: failed SoftType rules will be rendered as aWarning.Strict: failed SoftType rules will be rendered as anError.
To determine whether Input Schema Validation should be done:
True: will run JSON schema validation on input file, the validation can decrease the performanceFalse: will skip the JSON schema validation, SoftType validation will then occur on commit of data.
To start the job click Schedule Job

Start an Excel import with classic consolidation
To run an excel import with classic consolidation click Schedule in the Data Exchange module and
select the SoftType Excel Import Job With Classic Consolidation in Type definition.
Fill in the Message field to associate a message with the job. To select an Input File
click Select and pick an existing file or upload a file and pick that one.
To enable the job logger, expand the Job Logging section and choose a Name for the log file then
select a Location for the log file by clicking Browse and choose folder. To put the log file
into a sub-folder of current Location check the New folder checkbox and write the Folder name.
In the Import Settings section the user can choose various settings for the importer.
With Use MDM the user can choose if the import is under Master Data Management or not.
The Origin Context defines the default Origin for the imported data.
If a valid email address is put into Maturity System User that user will be the default user for
any imported LevelState. When field is blank the user that started the import will be the default
user.
The effectivity settings: Replace With New, Force Source Eff, Close All On Empty,
Use Target Eff, Trim Overlap are used to handle effectivity consolidation. To learn more on
these classic consolidation rules check the
consolidations concept section.
Choose SoftType Validation Mode:
Relaxed: failed SoftType rules will be rendered as aWarning.Strict: failed SoftType rules will be rendered as anError.
Determine if Input Schema Validation should be done:
True: will run JSON schema validation on the input file. The validation can decrease the performanceFalse: will skip the JSON schema validation. SoftType validation will then occur on commit of the data.
To start the job, click Schedule Job

Excel export
There is only one Excel export job that comes out of the box with ShareAspace. The Excel export is a job that contain two tasks. The first task is a JSON SoftType export task that exports the selected data as JSON SoftTypes. The second task is a JSON to Excel mapper that takes the JSON SoftTypes from the first task and maps them into a Excel file based on the Excel template.
Start an Excel export
To run an Excel export click Schedule in the Data Exchange module and select the SoftType Excel Export Job in Type definition.
Fill in the Message field to associate a message with the job. Choose a Name for the export file and
select a Location by clicking Browse. To export into a sub-folder of current Location, check
the New folder checkbox and write the Folder name.
Select the export start points by adding SoftType instances to the Export Objects multi select
input.
To enable the job logger, expand the Job Logging section and choose a Name for the log file then
select a Location for the log file by clicking Browse and choose folder. To put the log file
into a sub-folder of current Location check the New folder checkbox and write the Folder name.
In the Export Settings section the schema for the start point can be selected. Select the required
output schema for all SoftTypes. Drop downs are only added for SoftTypes that have more than one
output schema.
To start the job click Schedule Job

Excel template configuration
Introduced in ShareAspace 1.7.1 there are capabilities for generating excel templates to be used for SoftType imports. Previously it was only possible to generate a template that would contain all SoftTypes and all their schemas as configured in the Space template.
With the new capabilities it is possible to setup multiple configuration files for the template generator.
The configuration files can specify which SoftTypes, and which schemas for those SoftTypes should be included in the template. It is also possible to opt out from optional ports in the schemas.
In addition to controlling what should be included in the template, it is also possible to configure instructions for the template as a whole as well as for specific columns within the template.
The generated templates are now also help with lookups for references.
To get started, select the "Import attributes" section in the Configuration Tool.

Create new template
It is possible to load already saved configurations into the tool. This is done by clicking the load settings button.
To create a new template:
- Click the
newbutton. - Select a path to where the template should be saved.
- Select a first SoftType for the template.

From here it is possible to continue with the configuration.
To add more SoftTypes, use the add softtype button.
To include a schema in the template: Select the schema and make sure that the Excel Include checkbox is ticked.
To include a port within a schema in the template: Select the port and make sure that the Excel Include checkbox is ticked.

Save template
The templates are automatically saved when clicking the Save and verify button in the Verify section of the Configuration Tool.
Generate Excel based on template
To generate the Excel spreadsheet, go to Files and click the new excel template button.
This will allow you to pick a path to the import attributes template file as well as a path to where the Excel file should be saved.

Excel instructions
It is also possible for the generated Excel spreadsheet to be setup to include a first "Instructions" sheet.
A generic instruction for the whole template can be defined by clicking the edit excel instructions button and filling out the
heading and the text.

For each schema included in the template it is also possible to set a heading and a text. The "Instructions" sheet will summarize all of these instructions.

Excel prompt
For schemas and ports it is also possible to configure Excel tool tips. This is configured by setting a value for Excel Prompt
on schemas and ports.
Schema tool tips will show when selecting the second cell in the oid column.

Port tool tips will show when selecting the second cell in the port column.

Excel reference
For ports that are of reference type, i.e. reference to another SoftType instance it is possible to define the type and schema for a reference.

Doing so will setup the Excel spread sheet to help with selecting instances for those references. Excel will show a selection list of the available instances matching the Excel reference configuration.

Excel file validation
The Excel File Validation option is a specialized validator for file references. It is only applicable when referring to
files that are already placed in the ShareAspace unmanaged file vault.
Excel validation
With the new type of Excel spread sheets it is also possible to use the built in data validator in Excel. This will check that all required values has been given correct values.
Logging
Summary logger
When a Data Exchange job is staged or has finished a compact summary log will be produced. The purpose of the Summary Log is to give the user a short summary of the job. If the job is staged the summary can give relevant information to the user if the job should be committed or not. The log is divided in four sections:
- Summary, gives the number of new and updated SoftType's
- Information, gives short information items grouped by task
- Warning, gives the warnings grouped by task
- Error, gives the errors grouped by task
File logger
After a Data Exchange job has finished a log file is produced with detailed information about exceptions, errors, warnings and information from tasks in the job and the commit of the job.
Every line in the log-file is of this format:
#Line No|Severity|Source|Message|Error Hex Code|Correlation Id|Date Time Stamp
Where
- Line No is the line number in the log file
- Severity is the severity of the log line:
Information,Warning,Error - Source is the source of origin of log line, usually
Task Name - Message is the log message
- Error Hex Code is the error code if it is a sas error
- Correlation Id is the correlation id that can be mapped to items in
Event Viewer - Date Time Stamp is a date-time of when the issue was logged
Indexing
When new data has been committed into Nova it is immediately available for direct API calls and further consolidation. It is however not directly available for the Search Engine and Queries. For it to show up in the queries it first need to be indexed.
In a case with little or no interactive usage (reliance on the search engine) it will be more performant
to allow for the indexing to happened after the job has been completed, with the drawback that the query
engine will not see the data. To enable this the job shall define the ExcludeIndexing option.
In cases with high end user activity (reliance on the search engine) the user experience might outweigh
the drop in performance that including the indexing step in the job would add. To require the job to perform
the indexing step before moving the job to the archive the IncludeIndexing option needs to be set on the job.

Initial data load
Normally when importing data to a ShareAspace Space the indexing engine is triggered after each import commit. The indexer will make sure to keep the configured indexes up to date with information that was created and/or updated.
During normal use this is the preferred way of managing information and indexing of the same. However, it is some time the case that you would want to load a large and complex initial data set to a Space once it has been setup.
Depending on the amount of data, the structure of the data, as well as the spilt of data (i.e. the data coming in multiple files with references and updates to data in previously loaded files) you might want to turn off the indexing engine during the initial load. This in order to faster run the data load and once the initial set is loaded trigger the indexing of the complete set of initial data.
When to turn of indexing?
- When loading a large amount of Unit-of-Information (reaching over ~100 000 UoIs)
- And when the information for one UoI is built by consolidating multiple input files. Information about one UoI is typically sourced from multiple systems.
The reason for this is that the indexing is run after each import. Each indexing has an impact on system resources and takes a bit of time (longer time the larger the index is in combination with the amount of objects that must be re-indexed).
It is therefore better to do the initial load and only index once, when the full data set has been loaded.
Why only index once?
Since the full truth is only in the system once the initial load has been done only the last indexing will build indexes that are "true". The intermediate indexes that are up-to-date after each import are not compliant with the end state after the initial load - i.e. there is no need for them.
Note
The indexing of the full data set will take some time (much longer time than the indexing after a normal import). However the total amount of time for initial load plus one indexing is considerably lower than the time it takes to run the data load with indexing turned on.
Scenario
- Turn off the indexing triggers for the Space that should be initialized.
- Run the full initial load - importing all the source information.
- Trigger an index rebuild for the Space that has been loaded. This will make sure to setup all indexes as configured in the Space Template.
- Turn on indexing triggers for the Space that is now ready to use in a normal mode.
Scripts
Disable indexing
Requires
- API Key
- Bearer token generated using the Admin Key and request path
API
POST /admin/indexer/disable/{spaceId}
Sample
$APIKey = "fBGFCoHv...5L/oZy9Tg=="
$path = "/admin/indexer/disable/space1"

$encodedPath = [Text.Encoding]::ASCII.GetBytes($path)
$hmacsha = New-Object System.Security.Cryptography.HMACSHA512
$hmacsha.key = [Convert]::FromBase64String($APIKey)
$bearerToken = $hmacsha.ComputeHash($encodedPath)

$bearerToken = [Convert]::ToBase64String($bearerToken)
$bearerToken = $bearerToken.Split('=')[0]
$bearerToken = $bearerToken.Replace('+', '-')
$bearerToken = $bearerToken.Replace('/', '_')

$bearerHeader = @{ "Authorization" = ("Bearer", $bearerToken -join " ") }

$url = ("http://localhost:5000", $path -join "")
$response = Invoke-RestMethod -Method Post -Uri $url -Headers $bearerHeader
Write-Host "$([int]$res.StatusCode) ($($response.StatusCode))"
Trigger re-index
Requires
- API Key
- Bearer token generated using the Admin Key and request path
API
POST /admin/reindex/{spaceId}
Sample
$APIKey = $APIKey = "fBGFCoHv...5L/oZy9Tg=="
$path = "/admin/reindex/space1"

$encodedPath = [Text.Encoding]::ASCII.GetBytes($path)
$hmacsha = New-Object System.Security.Cryptography.HMACSHA512
$hmacsha.key = [Convert]::FromBase64String($APIKey)
$bearerToken = $hmacsha.ComputeHash($encodedPath)

$bearerToken = [Convert]::ToBase64String($bearerToken)
$bearerToken = $bearerToken.Split('=')[0]
$bearerToken = $bearerToken.Replace('+', '-')
$bearerToken = $bearerToken.Replace('/', '_')

$bearerHeader = @{ "Authorization" = ("Bearer", $bearerToken -join " ") }

$url = ("http://localhost:5000", $path -join "")
$response = Invoke-RestMethod -Method Post -Uri $url -Headers $bearerHeader
Write-Host "$([int]$res.StatusCode) ($($response.StatusCode))"
Enable indexing
Requires
- API Key
- Bearer token generated using the Admin Key and request path
API
POST /admin/indexer/enable/{spaceId}
Sample
$APIKey = $APIKey = "fBGFCoHv...5L/oZy9Tg=="
$path = "/admin/indexer/enable/space1"

$encodedPath = [Text.Encoding]::ASCII.GetBytes($path)
$hmacsha = New-Object System.Security.Cryptography.HMACSHA512
$hmacsha.key = [Convert]::FromBase64String($APIKey)
$bearerToken = $hmacsha.ComputeHash($encodedPath)

$bearerToken = [Convert]::ToBase64String($bearerToken)
$bearerToken = $bearerToken.Split('=')[0]
$bearerToken = $bearerToken.Replace('+', '-')
$bearerToken = $bearerToken.Replace('/', '_')

$bearerHeader = @{ "Authorization" = ("Bearer", $bearerToken -join " ") }

$url = ("http://localhost:5000", $path -join "")
$response = Invoke-RestMethod -Method Post -Uri $url -Headers $bearerHeader
Write-Host "$([int]$res.StatusCode) ($($response.StatusCode))"