User interface
With external extensions it is possible to connect external services to ShareAspace. There are three categories:
| Category | Description |
|---|---|
| Nova Extension | The Nova Extensions are using a metadata exchange to pull the available endpoints from the registered Extension. |
| External Endpoint | A registered endpoint that is fully configured when registered within this administration UI. |
| Trusted External Endpoint | A registered endpoint that is fully configured when registered within this administration UI. This configuration is also defining the settings for the impersonation access tokens that can be sent to this type of endpoint. |
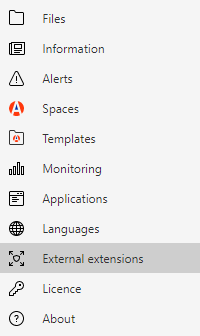
Click on External extension in the left menu in the administration section to enter
the external extension section.

In the external extension section it is possible to create, update, refresh, delete and activate/deactivate external extensions and endpoints.
Nova extension
Create a Nova extension
In the external extension section click the Create Nova extension button at the top ribbon.

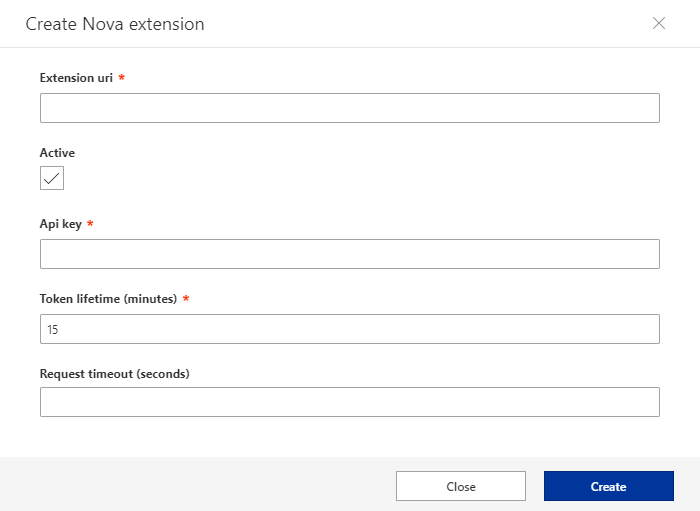
A Create Nova extension dialog will appear.

The dialog requires the following input:
| Setting | Description |
|---|---|
| Extension URI | The URL to the root of the Extension API. |
| Active | Specifies if the extension should be available for use or not. |
| API Key | The symmetric key used for the External Extension. ShareAspace will create an Authorization header using this key. The External Extension will validate that the request Authorization header has been signed using the correct key. |
| Token lifetime | A number in minutes defining for how long an impersonation access token will be valid for the External Extension. |
| Request timeout | The time in seconds that ShareAspace will use before timing out a request to the extension. |
Click the Create button in the dialog when the correct values have been filled in. As the Extension is registered, ShareAspace will ask the Extension for metadata describing the available resources.
Selecting a Nova Extension will list all available resources in the view pane to the right.
Update manifest
Select the extension in the list that is to be updated. In the top ribbon
new buttons will appear. Click the button Update manifest.
This will trigger the metadata exchange again. Updating the ShareAspace instance with any newly added resources to the Extension.
Delete an external extension
Select the extension in the list that is to be deleted. In the top ribbon,
new buttons will appear. Click the button Delete.
When the delete button is clicked a delete external extension dialog will appear.
When the Delete button in the dialog is clicked the external extension will be
deleted. If the Close button is clicked instead the dialog will be closed and
the external extension will not be deleted.
Edit
Select the extension in the list that is to be edited. Click the Edit
button in the top ribbon.
In the dialog you are able to reconfigure the:
- token lifetime for the impersonation tokens that are sent to the extension. The value is stated in minutes.
- request timeout used by ShareAspace for calling the extension. The value is stated in seconds.
Deactivate/activate
It is possible to deactivate a configured ShareAspace Extension. Deactivating the extension deactivates all resources defined during the metadata exchange.
Collection and Space configurations that rely on resources within the extension will stop working while the extension is deactivated.
Note
There is however an exception to this. It is possible to register multiple extensions that all provide the same resources. If you have multiple instances of an extension registered, configured functionality on Space/Collection will not stop functioning since you have a redundant configuration (provided that you do not deactivate all of them).
If the current status of the extension is deactivated, a button named Activate will
appear. Click the button Activate to activate the selected extension.
Deactivate/activate resource
In addition to deactivating/activating the full extension it is also possible to deactivate and activate single resources defined by the extension.
To do this, select the extension and click the Deactivate resource button in
the ribbon menu.
A dialog with a drop down menu will appear. Select the resource to deactivate and
click the Save changes button.
Activation is done in the same way. Use the Activate resource button to activate
resources.
External endpoint
Create
In the external extension section click the Create external endpoint button at the top ribbon.
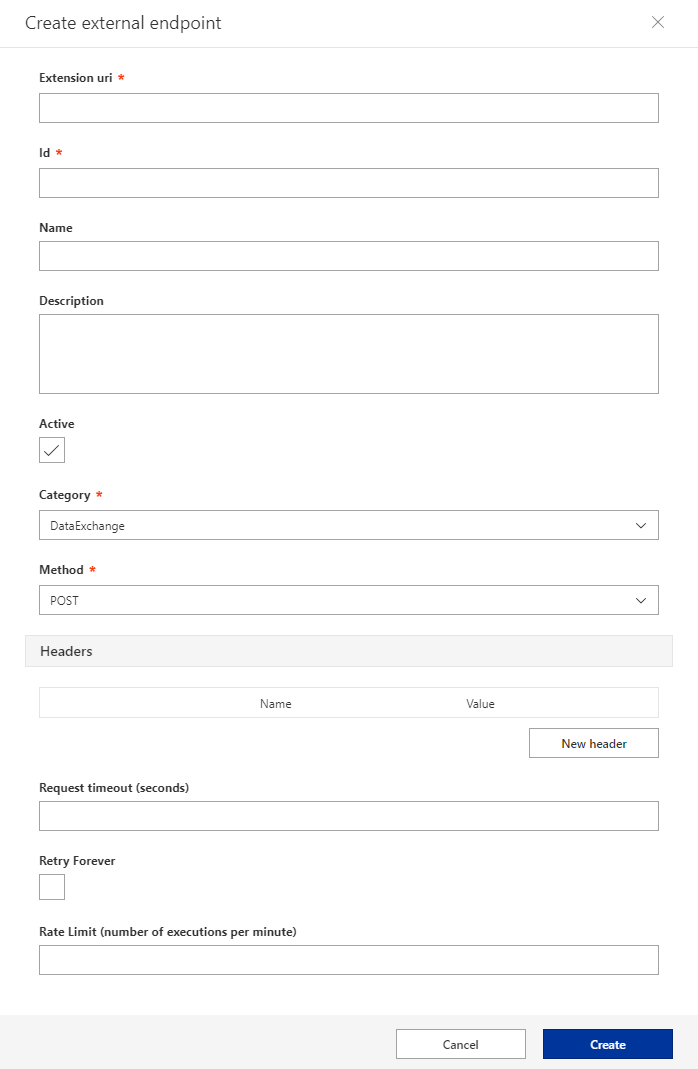
A Create external endpoint dialog will appear.

The dialog requires the following input:
| Setting | Description |
|---|---|
| Extension URI | The URL to the root of the Extension. |
| Id | The identifier of the extension, this identifier is used in configurations to refer to this extension. |
| Name | The name of the endpoint. |
| Description | Description of the endpoint. |
| Active | Specifies if the extension should be available for use or not |
| Category | The category for where the extension is going to be used. See descriptions below. |
| Method | The HTTP verb that should be used when sending requests to this endpoint. |
| Headers | HTTP headers that are statically configured for this endpoint. |
| Request timeout | The time in seconds that ShareAspace will use before timing out a request to the extension. |
| Retry forever | If checked. Disables the resilience backoff strategy |
| Rate limit | Maximum number of retries within 1 minute while executing the resilience backoff strategy. |
| Category | Description |
|---|---|
| DataExchange | Used for endpoints that are called in a DataExchange flow. |
| Event | Used for extension endpoints that take action based on triggered events. |
| Client | Used for ShareAspace Web Module extensions. |
| Custom | Any other type of usage. |
Note
That when configuring the use of this endpoint it is possible to append additional headers to the request. The request body (if any) is defined where the use of the endpoint is configured.
Click the Create button in the dialog when the correct values have been filled in.
Edit
To edit an external endpoint. Select it from in the list of extensions and click the
Edit button in the ribbon menu.
The edit form will allow you to update all values that were available in the create form, except for the Id of the endpoint.
Delete
To remove an external endpoint, select it from the list of extensions and click
the Delete button in the ribbon menu.
Complete the action by pressing the Delete button in the dialog that appears.
Deactivate/activate
The endpoint can be deactivated and activated. Select an active endpoint from the
extensions list and click the Deactivate button in the ribbon menu to deactivate.
Select a deactivated endpoint from the extensions list and click the Activate
button in the ribbon menu to activate.
Trusted external endpoint
In the external extension section click the Create trusted external endpoint button at the top ribbon.
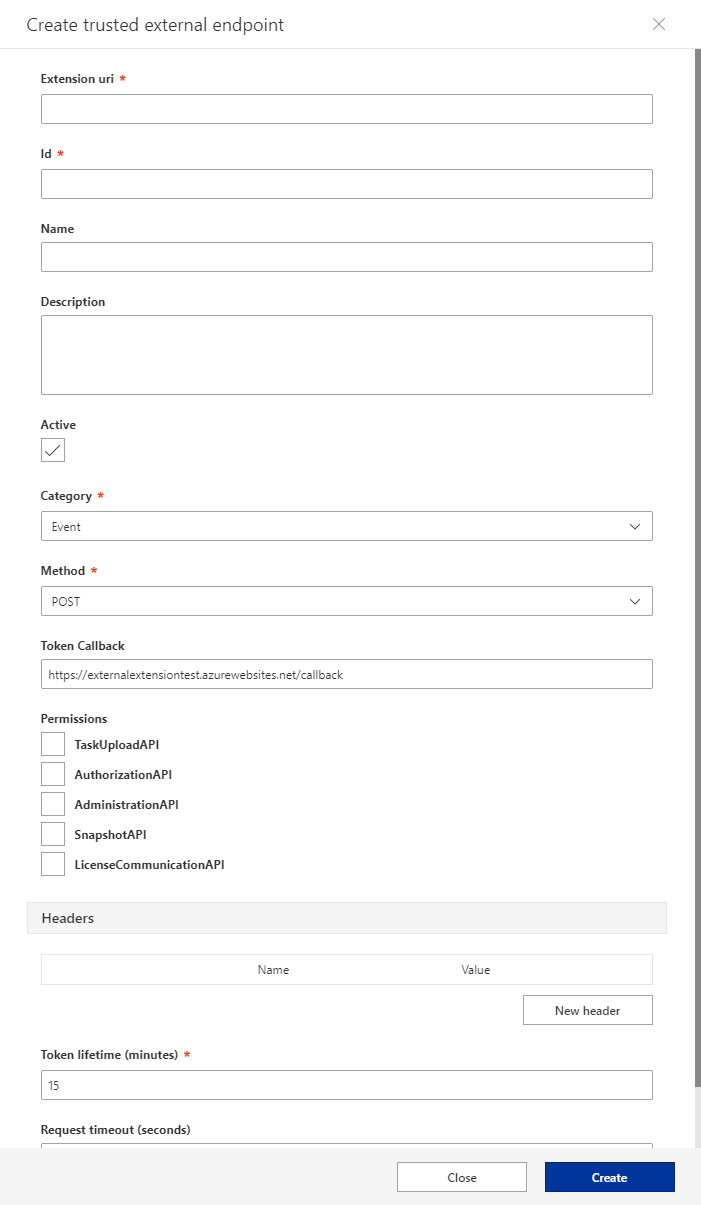
A Create trusted external endpoint dialog will appear.

The dialog requires the following input:
| Setting | Description |
|---|---|
| Extension URI | The URL to the root of the Extension. |
| Id | The identifier of the extension. This identifier is used in configurations to refer to this extension. |
| Name | The name of the endpoint. |
| Description | Description of the endpoint. |
| Active | Specifies if the extension should be available for use or not |
| Category | The category for where the extension is going to be used. See descriptions below. |
| Method | The HTTP verb that should be used when sending requests to this endpoint. |
| Headers | HTTP headers that are statically configured for this endpoint. |
| Permissions | Holds the configuration for requested permissions of the extension. Activating the permissions makes it possible for the extension to retrieve ShareAspace API keys (non-user-impersonating keys). These keys are rotated every 24hrs. Once configured the extension can request the keys using the ShareAspace API. ShareAspace will respond with the keys using a POST request to the configured Token callback address. |
| Token lifetime | A number in minutes defining for how long an impersonation access token will be valid for the External Extension. |
| Request timeout | The time in seconds that ShareAspace will use before timing out a request to the extension. |
| Retry forever | If checked. Disables the resilience backoff strategy |
| Rate limit | Maximum number of retries within 1 minute while executing the resilience backoff strategy. |
| Category | Description |
|---|---|
| DataExchange | Used for endpoints that are called in a DataExchange flow. |
| Event | Used for extension endpoints that take action based on triggered events. |
| Client | Used for ShareAspace Web Module extensions. |
| Custom | Any other type of usage. |
Note
That when configuring the use of this endpoint it is possible to append additional headers to the request. The request body (if any) is defined where the use of the endpoint is configured.
Permissions:
| API Key | Description |
|---|---|
TaskUploadAPI |
Used for installing internal DataExchange tasks. |
AuthorizationAPI |
Used for managing ShareAspace internal user accounts. |
AdministrationAPI |
Used for managing a ShareAspace collection as a non authorized collection administrator. |
SnapshotAPI |
Used for creating and restoring ShareAspace snapshots. |
LicenseCommunicationAPI |
Used for managing the ShareAspace license. |
Click the Create button in the dialog when the correct values have been filled in.
Edit
To edit an external endpoint. Select it from in the list of extensions and click the
Edit button in the ribbon menu.
The edit form will allow you to update all values that were available in the create form, except for the Id of the endpoint.
Delete
To remove an external endpoint, select it from the list of extensions and click
the Delete button in the ribbon menu.
Complete the action by pressing the Delete button in the dialog that appears.
Deactivate/activate
The endpoint can be deactivated and activated. Select an active endpoint from the
extensions list and click the Deactivate button in the ribbon menu to deactivate.
Select a deactivated endpoint from the extensions list and click the Activate
button in the ribbon menu to activate.